The post How to Speed Up the Installation of SharePoint Cumulative Updates using PowerShell Step by Step appeared first on Blog IT.
This post will explain how you can speed up the installation of Cumulative Updates in a SharePoint farm step by step using PowerShell. Using PowerShell, you can greatly reduce the time it takes to update your SharePoint farm which can take several hours to complete if you use the traditional method of installing Cumulative Updates. The steps described in this post are valid for SharePoint 2013, SharePoint 2016 and SharePoint 2019.
This post assumes a single SharePoint server but if you have multiple SharePoint servers, you must follow these steps on all SharePoint servers in your farm.
Introduction
The SharePoint world is rapidly moving into the Cloud with SharePoint Online and Office 365, but some organizations are still not ready to move completely to Office 365 and SharePoint Online.
Upgrading to SharePoint 2019 that has support for a hybrid scenario can be a valid solution to allow a gradual move to the cloud.
Installing a SharePoint 2019 farm can be done in an automated way using PowerShell and AutoSPInstaller. One additional advantage of this installation process ensures that the SharePoint farm is installed with the latest updates, leaving the SharePoint farm updated and working properly (if you want to learn how to install a SharePoint 2019 farm in an automated way, click here and here).
To ensure that after the installation, the SharePoint server is kept always updated, we must ensure that both the Windows Updates and specially the SharePoint Cumulative Updates are properly installed.
Installing SharePoint Updates
To install the latest SharePoint Cumulative Updates in your farm, follow the following steps:
- Download the SharePoint Cumulative Updates
- Backup SharePoint Farm and Configurations
- Install the Cumulative Updates in the SharePoint Farm (using PowerShell)
- Run SharePoint Products and Configuration Wizard
Download the SharePoint Cumulative Updates
All starts by downloading the latest SharePoint Cumulative Updates. To do that, you must download:
- SharePoint 2016 and SharePoint 2019:
- The latest language independent SharePoint updates
- The latest language dependent SharePoint updates (if you have any language pack installed in your farm)
- SharePoint 2013:
- The latest SharePoint Server updates
- The latest SharePoint foundation updates
To stay up to date and download with the latest updates, click here.
Backup SharePoint Farm and Configurations
Before applying the updates, you should perform the following backups:
- Backup the SharePoint farm by running the following command: Backup-SPFarm -Directory -BackupMethod Full -Verbose
The backup folder should be a shared folder on the network, accessible by both SharePoint and database servers.
Ensure the SharePoint Server 2013 VSS Writer service is started on the SharePoint server (not started automatically).
Ensure the SQL Server VSS Writer service is started on the database server.
For more details about SharePoint farm backup, click here, hereand here
- Backup all SharePoint databases in the database server that supports the SharePoint farm using SQL Server Enterprise tools
- Backup the web.config files for all web applications
- If you have custom developed solutions using server-side code, backup the solutions. To make this easier, you can download a PowerShell script from my GitHub repository
Install the Cumulative Updates in the SharePoint Farm (using PowerShell)
After downloading the latest updates and taking the necessary precautions, you are ready to install them in your SharePoint farm.
If you want to use the traditional method to update your farm, click here. If you want to learn the PowerShell way and speed up the installation of the Cumulative Updates in your SharePoint farm, read on!
To download the SharePoint Patch PowerShell script, click here. This script is an improved version of a PowerShell script originally created by Russ Maxwell for SharePoint 2013.
The way this PowerShell script ensures that the SharePoint patch process time is reduced from 4 to 5 hours to less than one hour is by doing the following:
- If you choose to (use the -Pause switch parameter), suspends the Search Service Application. This is very important since if a search crawl was triggered during the installation of the Cumulative Update, the Search Application could get corrupted and you could be forced to rebuild the entire Search Service Application, recreate any custom managed properties and perform a Full Crawl again to ensure you have search results and all search based solutions work properly
- For SharePoint 2013 (not necessary for SharePoint 2016 and SharePoint 2019), the following services will be disabled and then stopped:
- Search services are disabled
- Search services are stopped
- IISAdmin and SPTimerV4 services are disabled
- IISAdmin and SPTimerV4 services are stopped
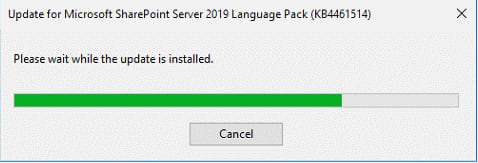
- If you choose to, the Cumulative Updates are installed are in passive mode (without any necessary user interaction) but you can still see the installation process in the UI
- When the installation of the Cumulative Updates is complete:
- For SharePoint 2013 (not necessary for SharePoint 2016 and SharePoint 2019), the following services will be set to automatic:
- Search services
- IISAdmin and SPTimerV4 services
- If you choose to use the -Pause switch parameter, the Search Service Application will be resumed
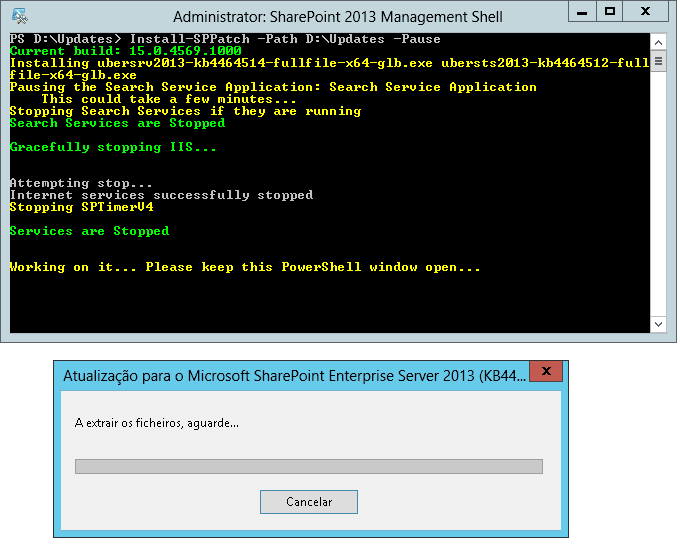
To start the installation process, open the SharePoint PowerShell window and execute the following commands:
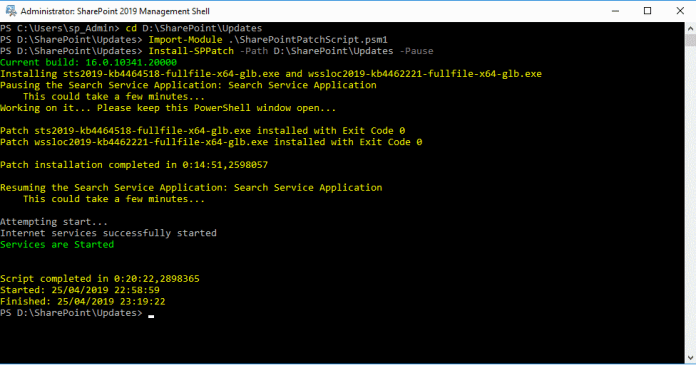
- Import-Module .\SharePointPatchScript.psm1
- Install-SPPatch -Path -Pause
- Example: Install-SPPatch -Path D:\SharePoint\Updates -Pause
This will start the SharePoint farm update process (examples for SharePoint 2013 and SharePoint 2019).
For SharePoint 2013, both SharePoint Server and SharePoint Foundation packages will be detected automatically and installed.

For SharePoint 2016 and SharePoint 2019, both language independent and language dependent packages will be detected automatically and installed.

Instead of taking hours to perform, the updates should be installed in less than one hour.

A reboot to the server may be necessary.

To read the entire article and learn more on how to update your SharePoint farm, click here.
Happy SharePointing!
The post How to Speed Up the Installation of SharePoint Cumulative Updates using PowerShell Step by Step appeared first on Blog IT.


Top comments (0)