Traditionally in a .NET or Java Server application, the APIs have been secured using SessionId. After a user authenticates with the server; the server generates a unique sessionid and this sessionId is sent to the client in the Http Response. All further communication between the client and server will carry this sessionid in the payload. Though the HTTP protocol is stateless; using this sessionid helps the server to track the client and group all the client's requests as being part of one conversation. Now, this approach has worked for a long time; but it has some significant weaknesses.
| Issues | Details |
|---|---|
| Session affinities | When there is just one server it works fine. But when 2 or more server behind a load balancer, the SessionId will need to be store outside the app server. Like a external State server or Database. This adds complications like serialization/deserialization and latency issues. |
| Session ID hacking or spoofing |
Spoofing is hard if the session id is a Guid. But it does not prevent a stolen session id (or cookie) from being reused. |
| Multiple authentication | if the client needs to connect to a different service/, the client needs to authenticate again and use a different sessionid. This multiple authentications is cumbersome and also a security risk. |
| No access granularity | There is only id exchanged. No extra information, attributes are available. The server ends up making look ups into the database for enriching information about the user logged in, |
| Access propagation |
if the server needs to talk another service on the client's behalf the sessionId will not suffice. A different mechanism needs to involved making this SessionId route more cumbersome and adding security risk. |
So the industry guidance today is to avoid baking in API security into code. (read sessionid). Today in the world of cloud development; it is recommended to adopt the infrastructure for security instead of baking it in code.
Using infrastructure for API security has the following advantages.
- Respects the separation of duties.
- Makes the code simple and easy to maintain. (now that all that ugly & scary security stuff are removed.)
- Less maintenance burden.
- Reusable.
- Transparent to the security team.
So what is the modern way of securing APIs in the cloud? The answer is Oauth2.0.
We won't go into the OAuth2.0 protocol. To learn more on the OAuth2.0 protocol you can use this as reference => https://www.oauth.com/.
The goal here is to look at how we can secure APIs hosted behind the API gateway. We will look at Okta (Identity as a service provider) as the OAuth2.0 token generator and API gateway ensuring each API request is authorized.
Just for analogy purpose let's see what roles Okta and Azure API Gateway play in securing our APIs.
As the above pic shows Okta issues the Access card (token to be exact) and the Gateway sits in front of each door (API to be exact) and validates whether the user has access to the said API.
Okta actually generates two tokens. ID Token and Access Token. We will focus on the Access Token. According to Wikipedia, an access token is defined as
"In computer systems, an access token contains the security credentials for a login session and identifies the user, the user's groups, the user's privileges, and, in some cases, a particular application."
Okta
So how does Okta know what token to issue a user?. Befire we answer that question; let's look at Okta a little more in detail.
The above screenshot shows that Okta stores
- Users (and passwords),
- Client Application information (SPA, Mobile Apps, etc..)
- User Attributes (Prebuilt and Custom attributes based on client Application)
- Authorization Server
Users
Okta stores users and their passwords. (In most enterprises this will actually be federated from the Enterprise Active Directory.)

Client Application
Okta configures the Client application (that will consume the APIs). The below screenshot shows an example Okta APP page with users assigned to it. Usually, you do not assign users directly to Apps, instead you would assign user groups to apps.

Only the users assigned to the applications can authenticate into the applications.
User Profiles
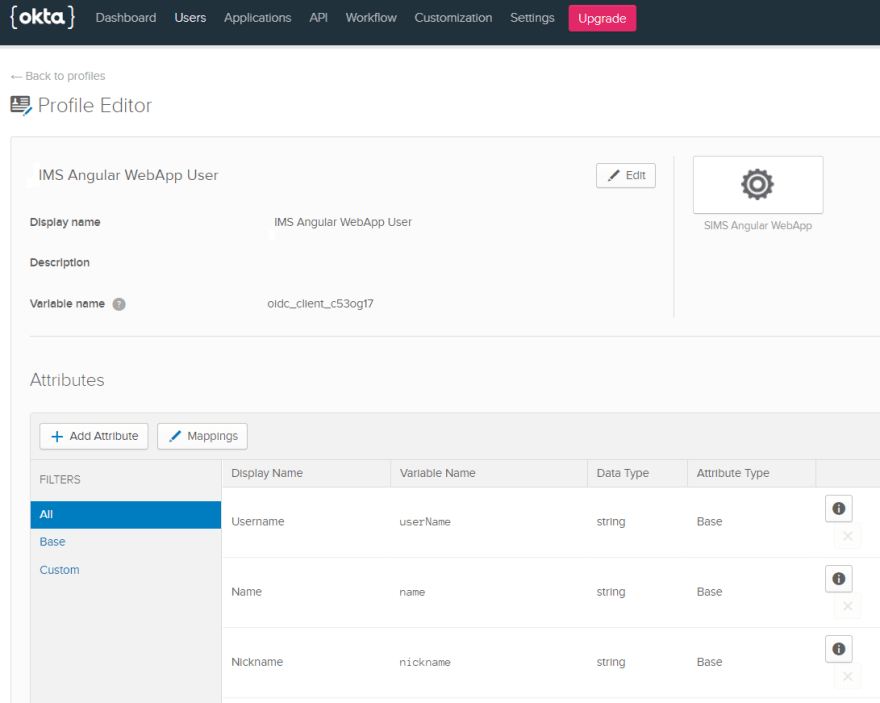
Okta allows us to store User attributes. Some of these are built-in. Admins can add custom attributes either at the Base Okta level or at the individual application level. Below screenshot shows; the IMS application's User Attribute configuration page. Here admins can add new or custom attributes about Users that are specific to the application. For instance, an application may add an attribute called "User Birthplace". Another Application may add an attribute called "User SchoolName". The point is that; each application is unique and the Admins of that application can customize attributes specific to that application.

Authorization Server
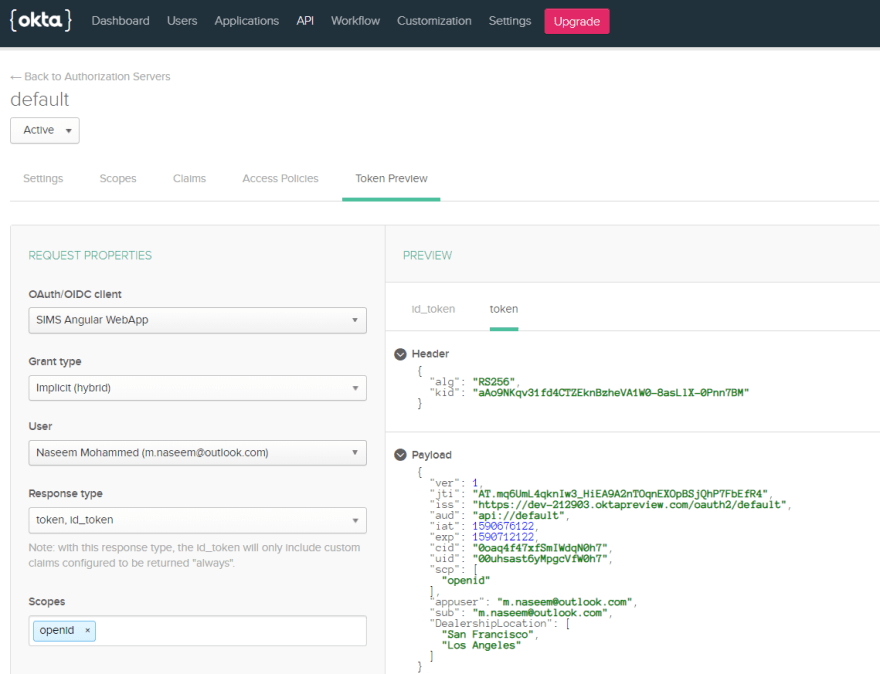
We talked earlier about the Access token. Authorization Server is the one that generates the Access Token. The below screenshot shows the configuration page of the Authorization Server. Here we can tell the Authorization server what all claims (user attributes) need to part of the Access token.
Okta provides an inbuilt utility where we can test the contents of the token.
Below is the screenshot for that.

SPA application receives this token after the user Authenticates against Okta.
This is the token received by my application =>
eyJraWQiOiJhQW85TktxdjMxZmQ0Q1RaRWtuQnpoZVZBMVcwLThhc0xsWC0wUG5uN0JNIiwiYWxnIjoiUlMyNTYifQ.eyJ2ZXIiOjEsImp0aSI6IkFULmhrckNOS092R3V4aE1IUGxSck9BbUhxYzRTZFpRdkN1c3hOelBhMng2MkkiLCJpc3MiOiJodHRwczovL2Rldi0yMTI5MDMub2t0YXByZXZpZXcuY29tL29hdXRoMi9kZWZhdWx0IiwiYXVkIjoiYXBpOi8vZGVmYXVsdCIsImlhdCI6MTU5MDY3NjQyNCwiZXhwIjoxNTkwNzEyNDI0LCJjaWQiOiIwb2FxNGY0N3hmU21JV2RxTjBoNyIsInVpZCI6IjAwdWhzYXN0NnlNcGdjVmZXMGg3Iiwic2NwIjpbIm9wZW5pZCJdLCJhcHB1c2VyIjoibS5uYXNlZW1Ab3V0bG9vay5jb20iLCJzdWIiOiJtLm5hc2VlbUBvdXRsb29rLmNvbSIsIkRlYWxlcnNoaXBMb2NhdGlvbiI6WyJTYW4gRnJhbmNpc2NvIiwiTG9zIEFuZ2VsZXMiXX0.OJmj-o0LHGtHtCtxLKtshwPK6IRQjDc6umZ_PBtGcZfXvE9afluOvfaqmLyYvyaA1uis3PK0jrZg8zSJFS-ryjYycbyJ8f7Mxhd5TyMxYpMRdPIEr3rG6KoByvhqLMJTnwKRV7sSp6af7R8DO7noFc1Wj7jolDRsb3iJmV7Z_g-IySqXKtU7BSpAI1nBoPG6SUsDfU18PoDT7z8_PPkvP7JpNWAzphcp1S3H0O_Z7RkaE04iqvboCjf3OHeBKFScx918bR4XtVh-dMdd84mL8xT7ez-IOpnoQvYCjXSTNmkJjEDUPYjgnA8VNgv3i9dBl4vxj7sDgQ5IXjslL5IYeQ
if you drop the above token at jwt.ms; you will see the below screenshot.

Now that we've got the token; we have to pass this in every API call we make to the Azure API Gateway. Because the Azure API Gateway checks each incoming request headers. It specifically looks for Header named "Authorization". It expects this header to have a valid Access token in it.
Azure API Gateway
Azure API Gateway sits in front of all our APIs. We have to configure our API Applications such that it allows traffic only from Azure API Gateway, whether the application is hosted in Azure Kubernetes, Azure WebApps, or Function Apps. Assuming we have done that; let us look at how Azure API Gateway is configured to allow only requests with the right Access Token.
Below is a screenshot of the Azure API Management Portal.

Every API has one more Operation within it. In the above screenshot, we can see that the "Vehicle Pricing" API has a single "GET" Pricing Operation in it. "GET" being the Http verb. Azure API Management allows us to place policies within it. Policies are nothing but a set of rules. These rules can be set at
- Product Level (A logical grouping of multiple APIs)
- API Level
- API Operation Level A policy defined at the Product is applicable to all APIs and API operations under it and similarly, a policy defined at API level is applicable to Operations under it.
Policies can be for
- Access Restriction
- Authentication Policies
- Caching Policies
- Cross-Domain Policies
- Transformation Polices.
More details can be found here => https://docs.microsoft.com/en-us/azure/api-management/api-management-policies
The policy we are interested in is the Validate JWT policy
https://docs.microsoft.com/en-us/azure/api-management/api-management-access-restriction-policies#ValidateJWT
JWT
JWT stands for JSON Web Token. This text is from Wikipedia "JSON Web Token (JWT, sometimes pronounced /dʒɒt/[1]) is an internet standard for creating data with optional signature and/or optional encryption whose payload holds JSON that asserts some number of claims. The tokens are signed either using a private secret or a public/private key. For example, a server could generate a token that has the claim "logged in as admin" and provide that to a client."
https://en.wikipedia.org/wiki/JSON_Web_Token
Validatge jwt policy
Now let's look at how we can configure the Validate JWT policy.

In the above screenshot, you can see a policy called Validate-jwt.
- The policy first looks for the header named "Authorization". The policy says that if the jwt validation fails, an Http Response code 401 should be returned with the message "JWT Validation failed." to the caller.
- The OpenId URL for the Okta Authorization Server keys are provided. These keys are used by Azure APIM to validate that the JWT Access Tokens is not a tampered or a fake token. That it really was issued by an Okta Authorization Server.
- The Access token issuer is the default Authorization Server. (We can have custom Authorization server also within Okta).
- If all the above passes; it knows the user has a valid token for the client App from Okta. So Authentication passed.
- Next us the Authorization part. The policy now checks whether the incoming token has the custom claim DealershipLocation and also the values of this is Los Angeles and San Francisco. If the custom claims are present in the incoming request's Access Token the API request is forwarded to http://dummy.restapiexample.com/api/v1/employees. ###Note#### You would see some values hardcoded within the APIM Policies. As a best practice, these should be placed in API Management's "Named Value" facility.


Top comments (0)