If you read my previous post about writing the first selenium script using code modular you will find that we tried to run our selenium script by downloading the chrome driver and geckodriver to our local machine and provided the location in our project.
So this process is very difficult and also a manual process. But we can manage all these web drivers using WebDriver Manager.
Cool right? Then lets go for it.
What is WebDriver Manager?
This is application or library that helps to automatically manage browser drivers for selenium. It is an awesome solution for setting up a selenium server for your end to end web tests.
If we are going to set the browser drivers for our project manually then we have to go to internet and download the relevant drivers and give the location in your project like this.
System.setProperty("webdriver.chrome.driver", "/path/to/chromedriver");
So you will know that we need to create a separate folder for drivers and give location path every time we use it.
Now all this can be handled by using WebDriver Manager. We can get WebDriver using Maven and lets try to sort out everything step by step.
1.Create a Maven Project in Eclipse
Right click on your package Explorer and create a new project. Search for maven and create a Maven project.
The Group Id is nothing but a unique identifier that owns the project.
Artifact Id will be the final name of the compilation unit of our project.
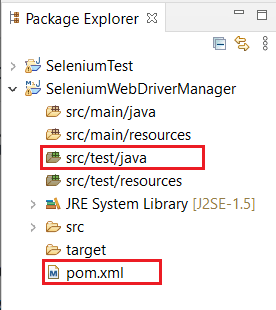
So this is is the tress structure of our project.
For this simple test we just need these marked folders and the most important one is "pom.xml".
<project xmlns="http://maven.apache.org/POM/4.0.0" xmlns:xsi="http://www.w3.org/2001/XMLSchema-instance" xsi:schemaLocation="http://maven.apache.org/POM/4.0.0 https://maven.apache.org/xsd/maven-4.0.0.xsd">
  <modelVersion>4.0.0</modelVersion>
  <groupId>test.webdriver</groupId>
  <artifactId>SeleniumWebDriverManager</artifactId>
  <version>0.0.1-SNAPSHOT</version>
</project>
2.Add dependencies to the pom.xml file
Now this is the file that we are going to add our all dependencies and plugins needed for the project.
So lets go to the Maven central repository and copy the following dependencies.
https://mvnrepository.com
First add selenium java maven dependencies by the latest versions. For here I used version 3.141.59
<!-- https://mvnrepository.com/artifact/org.seleniumhq.selenium/selenium-java -->
<dependency>
    <groupId>org.seleniumhq.selenium</groupId>
    <artifactId>selenium-java</artifactId>
    <version>3.141.59</version>
</dependency>
Then search for WebDriver Manager and get the maven dependencies by the latest release. Here I am using version 4.4.3
<!-- https://mvnrepository.com/artifact/io.github.bonigarcia/webdrivermanager -->
<dependency>
    <groupId>io.github.bonigarcia</groupId>
    <artifactId>webdrivermanager</artifactId>
    <version>4.4.3</version>
</dependency>
Make sure to add these dependencies within the "dependencies" tag.
And press CRTL + I to ident the code.
So we have added all the maven dependencies to our pom.xml file. So lets clean and build the project.
Project-->Clean
After build you should get a maven dependencies folder.
As you can see it contains all the selenium libraries and also the WebDriver Manager.
From here on we don't need to specify locations to the drivers. All those are now available in our WebDriver Manager.
Now we can go straight away to our test.
3.Create the test
Go to "src/test/java" and create a class called "SeleniumTest1" and copy this code.
import org.openqa.selenium.WebDriver;
import org.openqa.selenium.chrome.ChromeDriver;

import io.github.bonigarcia.wdm.WebDriverManager;

public class SeleniumTest1 {
public static void main(String[] args) {

    WebDriverManager.chromedriver().setup();
    WebDriver driver = new ChromeDriver();

    driver.get("https://ikman.lk");
    driver.close();
}
}
For this test I have used the chrome but you can use any other browser if you want.
You see that we don't need to give any path to drivers from our project. We just need to call them from the WebDriver Manager.
WebDriverManager.chromedriver().setup();
So this is how we use WebDriver Manager in our code and also we know how the pom.xml maven dependencies used in our project.
For your reference find my GitHub project here


Top comments (0)