I’ve never had the opportunity to work on an app with video calls, so when that requirement came up for a new project I got to work on, I wanted to try building a simple version to get familiar with it.
There are a lot of paid tools you can easily integrate and pay as you go, but there was a need for a solution that wouldn’t depend on third-party services. That’s why I decided to build this demo version with WebRTC. In a real production app, I’d use something like Jitsi, but for this simple version, let’s stick to WebRTC without anything on top of it.
What is WebRTC
WebRTC (Web Real-Time Communication) is a technology that lets you stream video, audio, and data directly between browsers or apps — no plugins, no extra software, just built-in magic. It’s what powers video calls, voice chats, and even some multiplayer games, all while keeping things fast and secure.
Think of it like this: instead of sending your video call through a central server (which can be slow and expensive), WebRTC allows your device to connect directly to another person’s device. This makes communication faster and reduces lag. Of course, things get tricky when devices are behind firewalls or different networks, but WebRTC can handle that too with the help of STUN and TURN servers.
At its core, WebRTC is what makes peer-to-peer communication possible on the web — whether you’re building a simple video chat or a full-fledged conferencing app.
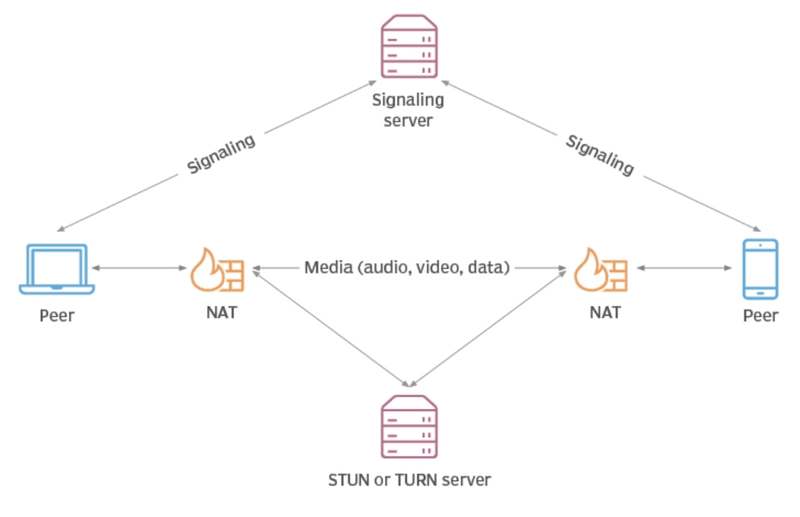
How WebRTC works
Creating simple WebRTC video chat app
For simple WebRTC video chat app I decided to use:
Vanilla JS
Firebase as Signaling server
Google STUN server
Free TURN server for this demo
Before we start with code, create new Firebase app and in Firestore create new collection called calls.
Now, let’s start by creating new Vanilla JS app using Vite, run the command bellow and select vanilla as type of app. After that install firebase in your app
npm init @vitejs/app
npm install firebase
User interface
For this app we nedd a simple UI which will display 2 video streams, one for you and one for remote connection. It should also allow you to start a webcam, start a call and answer some call.
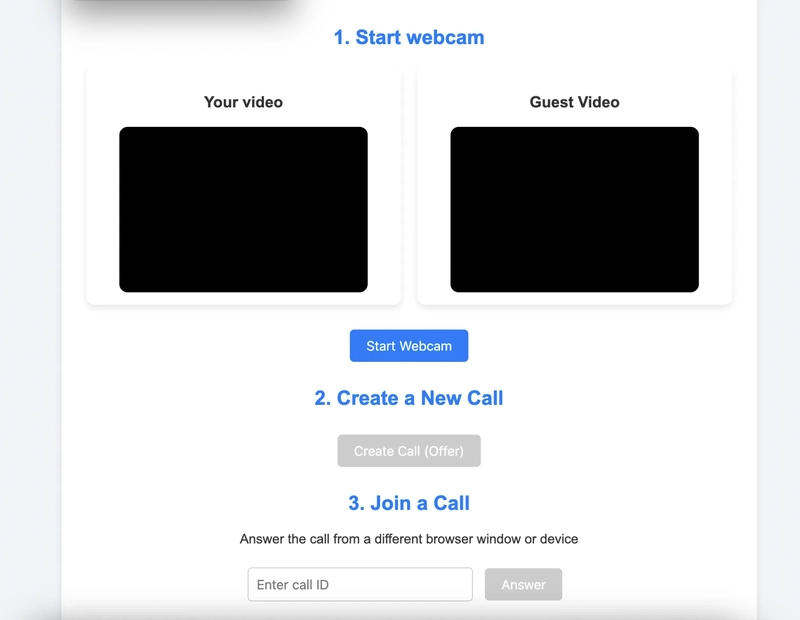
Simple UI for video chat app
I will not focus on explaining HTML and CSS in this post, code for this is bellow so you can copy/paste it, we will focus on JS part.
<!DOCTYPE html>
<html lang="en">
<head>
  <meta charset="UTF-8" />
  <link rel="icon" type="image/svg+xml" href="favicon.svg" />
  <meta name="viewport" content="width=device-width, initial-scale=1.0" />
  <title>WebRTC Demo</title>
</head>
<body>
<div class="container">
  <h2>1. Start webcam</h2>
  <div class="videos">
        <span>
          <h3>Your video</h3>
          <video id="webcamVideo" autoplay playsinline></video>
        </span>
    <span>
          <h3>Guest Video</h3>
          <video id="remoteVideo" autoplay playsinline></video>
        </span>
  </div>
  <button id="webcamButton">Start Webcam</button>
  <h2>2. Create a New Call</h2>
  <button id="callButton" disabled>Create Call (Offer)</button>
  <h2>3. Join a Call</h2>
  <p>Answer the call from a different browser window or device</p>
  <input id="callInput" placeholder="Enter call ID" />
  <button id="answerButton" disabled>Answer</button>
  <h2>4. Hang Up</h2>
  <button id="hangupButton" disabled>Hang Up</button>
</div>
<script type="module" src="/main.js"></script>
</body>
</html>
body {
  font-family: Arial, sans-serif;
  background-color: #f0f4f8;
  text-align: center;
  color: #333;
  margin: 0;
  padding: 20px;
}
h2 {
  color: #007bff;
}
.videos {
  display: flex;
  justify-content: center;
  gap: 20px;
  margin: 20px 0;
  flex-wrap: wrap;
}
.videos span {
  display: flex;
  flex-direction: column;
  align-items: center;
  background: #fff;
  padding: 15px;
  border-radius: 10px;
  box-shadow: 0 4px 8px rgba(0, 0, 0, 0.1);
  width: 100%;
  max-width: 350px;
}
video {
  width: 100%;
  max-width: 300px;
  height: 200px;
  background: black;
  border-radius: 10px;
}
button {
  background-color: #007bff;
  color: white;
  border: none;
  padding: 10px 20px;
  margin: 10px;
  font-size: 16px;
  border-radius: 5px;
  cursor: pointer;
  transition: 0.3s;
}
button:disabled {
  background-color: #ccc;
  cursor: not-allowed;
}
button:hover:not(:disabled) {
  background-color: #0056b3;
}
input {
  padding: 10px;
  border: 1px solid #ccc;
  border-radius: 5px;
  font-size: 16px;
  width: 250px;
}
.container {
  background: white;
  padding: 20px;
  max-width: 800px;
  margin: auto;
  border-radius: 10px;
  box-shadow: 0 4px 8px rgba(0, 0, 0, 0.1);
}
@media (max-width: 600px) {
  .videos {
    flex-direction: column;
    align-items: center;
  }
}
JS for functionality
Now le’t open main.js file and make this video chat app work.
Setting up project
import './style.css';

import firebase from 'firebase/app';
import 'firebase/firestore';
Import css file that was created in step above and import firebase and firestore which will be used for signaling.
Firebase Configuration
const firebaseConfig = {
  apiKey: "YOUR_API_KEY",
  authDomain: "YOUR_AUTH_DOMAIN",
  projectId: "YOUR_PROJECT_ID",
  storageBucket: "YOUR_STORAGE_BUCKET",
  messagingSenderId: "YOUR_MESSAGING_SENDER_ID",
  appId: "YOUR_APP_ID"
};

if (!firebase.apps.length) {
  firebase.initializeApp(firebaseConfig);
}
const firestore = firebase.firestore();
To connect to Firebase, we need to initialize it with a configuration object.
Replace
YOUR_*values with actual Firebase credentials.We initialize Firebase only if it hasn’t been initialized yet.
firestoreis our reference to the Firebase Firestore database.
Setting Up WebRTC Configuration
const servers = {
  iceServers: [
    {
      urls: ['stun:stun1.l.google.com:19302', 'stun:stun2.l.google.com:19302'],
    }
  ],
  iceCandidatePoolSize: 10,
};
We define the WebRTC RTCPeerConnection with ICE servers. STUN servers help discover public IP addresses behind NAT (used for peer-to-peer connections).
Then we can create global connection.
localStream: Holds the local webcam/microphone stream.remoteStream: Holds the incoming video/audio stream from the other peer.
const pc = new RTCPeerConnection(servers);
let localStream = null;
let remoteStream = null;
Get HTML Elements
const webcamButton = document.getElementById('webcamButton');
const webcamVideo = document.getElementById('webcamVideo');
const callButton = document.getElementById('callButton');
const callInput = document.getElementById('callInput');
const answerButton = document.getElementById('answerButton');
const remoteVideo = document.getElementById('remoteVideo');
These elements control video streaming, making/answering calls, and handling video display.
Accessing Webcam and Microphone
When the user clicks webcamButton, we request access to the webcam and microphone:
webcamButton.onclick = async () => {
  localStream = await navigator.mediaDevices.getUserMedia({ video: true, audio: true });
  remoteStream = new MediaStream();

  localStream.getTracks().forEach((track) => {
    pc.addTrack(track, localStream);
  });

  pc.ontrack = (event) => {
    event.streams[0].getTracks().forEach((track) => {
      remoteStream.addTrack(track);
    });
  };

  webcamVideo.srcObject = localStream;
  webcamVideo.muted = true;  // Mute local video to avoid echo
  remoteVideo.srcObject = remoteStream;
  webcamVideo.style.transform = "scaleX(-1)"; // Mirror effect for user preview

  callButton.disabled = false;
  answerButton.disabled = false;
  webcamButton.disabled = true;
};
navigator.mediaDevices.getUserMedia()requests video/audio.Tracks are added to the WebRTC connection (
pc.addTrack).When the remote peer sends a stream, we attach it to
remoteStream.
Two things to note here:
webcamVideo.muted = true; → If this is not set then there will be echo since browser will play audio from your own local stream and you will hear yourself in the browser. That’s why we mute webcam video. You will still be able to hear remote user but not yourself.
webcamVideo.style.transform = “scaleX(-1)”; → This is not needed but since most video chat apps mirror your image, I ‘ve also done this.
Creating a Call
When callButton is clicked, we:
Create a Firestore document for signaling: A new Firestore document is created in the
callscollection to store signaling data, including offer and answer descriptions.Store ICE candidates: ICE candidates from the WebRTC connection are stored in Firestore subcollections (
offerCandidatesandanswerCandidates) to facilitate NAT traversal and connectivity.Generate an offer and set it as the local description: The initiating peer creates an SDP offer using
createOffer(), sets it as the local description withsetLocalDescription(), and saves it to Firestore for the remote peer to retrieve.
callButton.onclick = async () => {
  const callDoc = firestore.collection('calls').doc();
  const offerCandidates = callDoc.collection('offerCandidates');
  const answerCandidates = callDoc.collection('answerCandidates');

  callInput.value = callDoc.id;  // Share this ID with the other person

  pc.onicecandidate = (event) => {
    event.candidate && offerCandidates.add(event.candidate.toJSON());
  };

  const offerDescription = await pc.createOffer();
  await pc.setLocalDescription(offerDescription);

  const offer = {
    sdp: offerDescription.sdp,
    type: offerDescription.type,
  };

  await callDoc.set({ offer });

  callDoc.onSnapshot((snapshot) => {
    const data = snapshot.data();
    if (!pc.currentRemoteDescription && data?.answer) {
      const answerDescription = new RTCSessionDescription(data.answer);
      pc.setRemoteDescription(answerDescription);
    }
  });

  answerCandidates.onSnapshot((snapshot) => {
    snapshot.docChanges().forEach((change) => {
      if (change.type === 'added') {
        const candidate = new RTCIceCandidate(change.doc.data());
        pc.addIceCandidate(candidate);
      }
    });
  });

  hangupButton.disabled = false;
};
Answering a Call
The other user enters the call ID and clicks answerButton:
answerButton.onclick = async () => {
  const callId = callInput.value;
  const callDoc = firestore.collection('calls').doc(callId);
  const answerCandidates = callDoc.collection('answerCandidates');
  const offerCandidates = callDoc.collection('offerCandidates');

  pc.onicecandidate = (event) => {
    event.candidate && answerCandidates.add(event.candidate.toJSON());
  };

  const callData = (await callDoc.get()).data();

  const offerDescription = callData.offer;
  await pc.setRemoteDescription(new RTCSessionDescription(offerDescription));

  const answerDescription = await pc.createAnswer();
  await pc.setLocalDescription(answerDescription);

  const answer = {
    type: answerDescription.type,
    sdp: answerDescription.sdp,
  };

  await callDoc.update({ answer });

  offerCandidates.onSnapshot((snapshot) => {
    snapshot.docChanges().forEach((change) => {
      if (change.type === 'added') {
        let data = change.doc.data();
        pc.addIceCandidate(new RTCIceCandidate(data));
      }
    });
  });
};
The answerer retrieves the offer, sets it as the remote description, and generates an answer: The answering peer fetches the offer from Firestore, sets it as its remote description using
setRemoteDescription(), then creates an answer withcreateAnswer(), sets it as its local description, and updates Firestore with the answer so the caller can retrieve it.ICE candidates are exchanged to establish a connection: Both peers generate ICE candidates — network connection details needed to traverse NAT and firewalls — and store them in Firestore. Each peer listens for new ICE candidates from the other side and adds them to the connection using
addIceCandidate(), allowing WebRTC to find the best available route for communication.
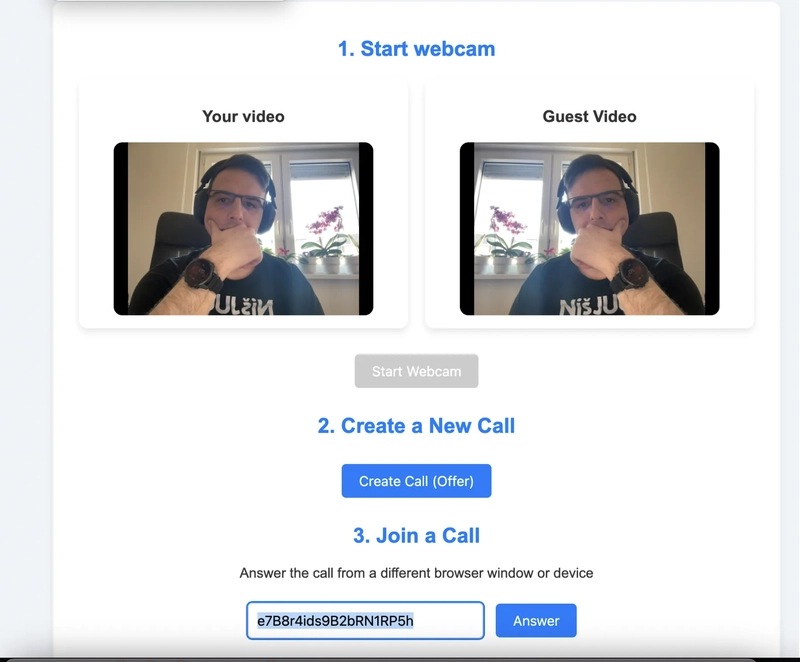
Let’s test it, run the app with npm run dev and opet it two browser. In one browser click Start webcam, give it a permission to acces a webcam and then click Create call offer.
In other browser, click Start webcam and give permissions, then paste code generated in first browser and clikc Answer call
The connection should be established an you should see bot video streams and call should work
Demo
Deployment
If you deploy this code on a server, like Vercel, and try to make a call with someone, you’ll encounter a problem — the peer-to-peer connection cannot be established. But why?
STUN vs TURN
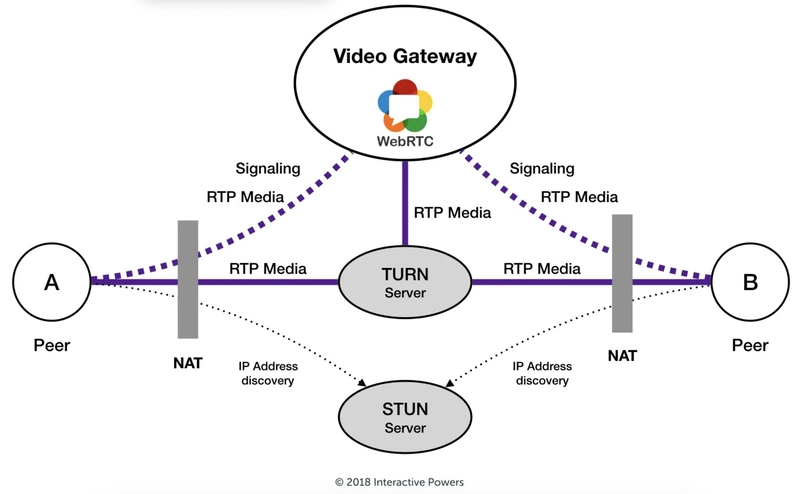
STUN (Session Traversal Utilities for NAT) helps devices discover their public IP address and determine how they are reachable from the internet. It works well when both users are on networks that allow direct peer-to-peer connections.
TURN (Traversal Using Relays around NAT) is used when a direct connection isn’t possible. It acts as a relay server that forwards data between peers, making it useful when users are behind strict NATs or firewalls.
Why Doesn’t STUN Work When Deployed on Vercel?
When your app is running locally, it often works because devices are on the same network or have NAT setups that allow direct communication. However, when deployed on Vercel:
Your WebRTC peers (users) are likely behind different networks and firewalls.
STUN alone can’t establish a direct connection if NAT or firewall rules block peer-to-peer traffic.
In such cases, a TURN server is required to relay the traffic and enable communication.
So now we need TURN server to make this work. You can host some open source TURN server (Coturn for example) or use some paid server. For this demo I used some TURN server that offers free tier (https://www.expressturn.com/). It offers 1000GB of traffic per month for free which is enough for demo app.
Create and account ad get your credentials, then add TURN server bellow STUN server in JS:
const servers = {
  iceServers: [
    {
      urls: ['stun:stun1.l.google.com:19302', 'stun:stun2.l.google.com:19302'],
    },
    {
      urls: 'turn:relay1.expressturn.com:3478',
      username: 'YOUR_TURN_USERNAME',
      credential: 'YOUR_TURN_CREDENTIAL',
    },
  ],
  iceCandidatePoolSize: 10,
};
Now you can redeploy the app and calls should work.
Building a video chat app with WebRTC is a great way to learn about real-time communication and create a proof of concept. In this post, we walked through signaling, establishing peer-to-peer connections, and handling ICE candidate exchanges. While this approach is perfect for learning and experimentation, for production-level apps, it’s better to use a more robust solution like Jitsi. Jitsi not only comes with built-in TURN servers for handling network issues but also offers SDKs for popular frameworks like React and React Native, making it easier to integrate and scale your video chat app.


Top comments (0)