Foreword
If you are new with NestJS or you have been worked with it for several projects, this post is for you. In this article, I'll share with you the real world process to build a Restful API from scratch with NestJS
Okie, let's start. Imagination, we've already have detail specifications.
This is our requirements in this sample:
Create Restful API for a image storage service that allow:
- Users can register to the system. They need to verify their account before using it (via email).
- Users can only use the system if they have an active account
- Users can upload images with png,jpg,jpeg format. The maximum size is 5MB
- User's images won't be public unless they created a shared link and share with other people.
- User's images can be used on other websites
- A user has maximum 100 images.
- A system will delete unused image(unused more than 1 year) automatically every weekends.
Infrastructure requirements:
- Local : Local Docker
- Staging: Run on VM with Docker
- Production: Host everything on AWS
First of all, we need to write down what we have to do.
- [x] Install NestJS CLI
- [x] Setup your dev tools: vscode, config for debug, code linter
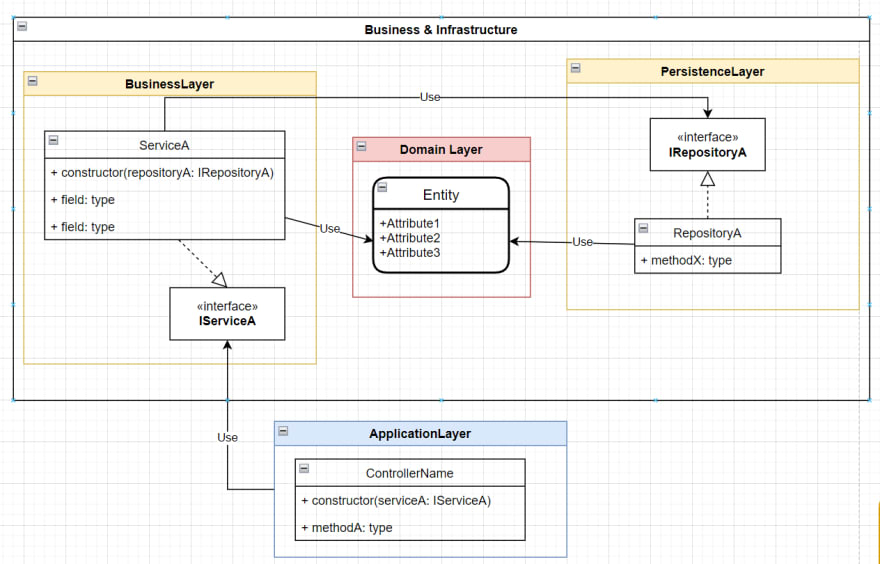
- [x] Design source code structure: seperate them into layers
- [x] Setup your local docker (database only)
- [x] Setup your application's configuration
- [x] Setup data access layer and configuration
- [x] Business Layer: define business models: inputModels, outputModels
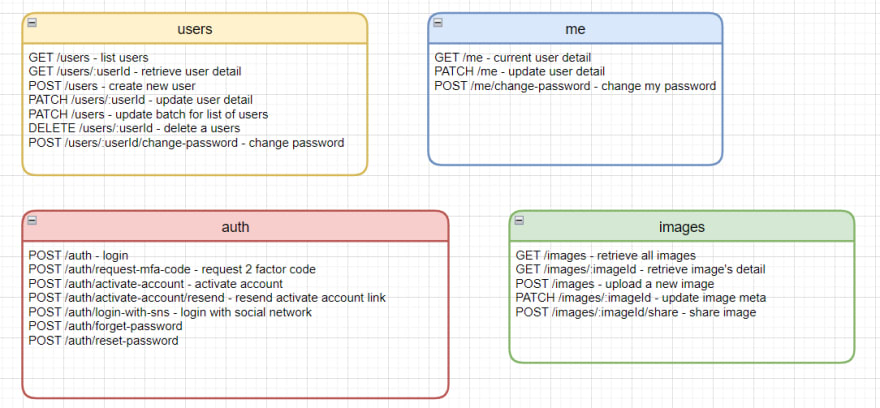
- [x] Presentation Layer: define controllers
- [x] Presentation Layer: integrate data validation from business models
- [x] Business Layer: define business service
- [x] Presentation Layer: integrate with business layer
- [x] Presentation Layer: create swagger - the api document
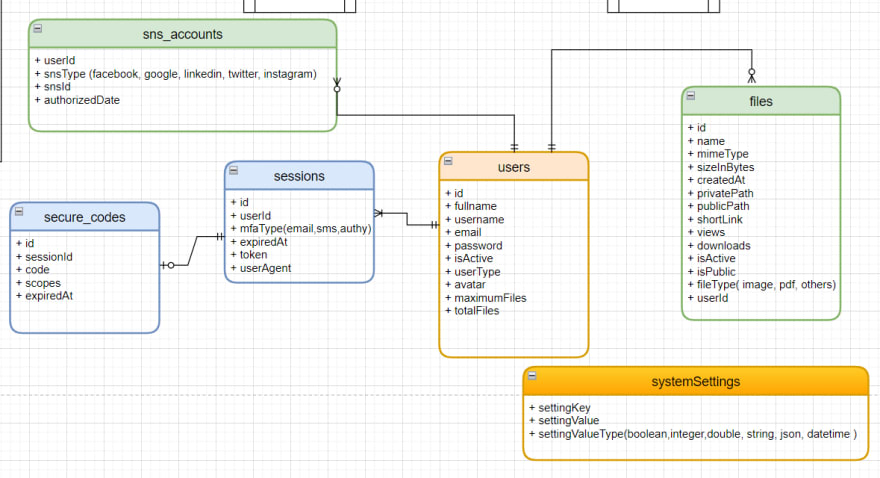
- [x] Persistence Layer: define database's entities, create and run migration scripts, seeds
- [x] Persistence Layer: define repositories
- [x] Business Layer: integrate repository with business layer
- [x] Setup your staging docker: dockerfile, docker compose, setup scripts
- [x] Setup your CI/CD flow and setup on your staging
- [x] Design and setup AWS Infrastructure
And assume that we already have the high level designs
Step 1 : Install NestJS CLI
npm i -g @nestjs/cli
nest new your-project-name
Step 2: Setup your dev tools
- How to debug NestJS in VSCode?
.vscode/launch.json
{
  "configurations": [
    {
      "name": "Debug API",
      "type": "node",
      "program": "${workspaceFolder}/src/application/api/main.ts",
      "runtimeArgs": [
        "-r",
        "ts-node/register",
        "-r",
        "tsconfig-paths/register"
      ],
      "console": "integratedTerminal",
      "request": "launch",
      "skipFiles": ["<node_internals>/**"],
      "outFiles": ["${workspaceFolder}/**/*.js", "!**/node_modules/**"]
    },
    {
      "name": "Debug remote api",
      "type": "node",
      "request": "attach",
      "remoteRoot": "/app",
      "localRoot": "${workspaceFolder}",
      "port": 9229,
      "restart": true,
      "address": "0.0.0.0",
      "skipFiles": ["<node_internals>/**"]
    }
  ]
}
Debug main app (file storage api)
F5 -> Select Debug API
Make sure your program path is your api's main file
Eg: "program": "${workspaceFolder}/src/application/api/main.ts",
Debug remote
Example: Start app in debug mode - debugger port 9229
F5 -> Select Debug remote API
npm run start:debug
Step 3: Design source code structure
Overview layers
- solutions
- deployment -> deployment scripts, dockerfiles, k8s, ...
- src
- src/application -> applications: file-storage-api, web, queues, ...
- src/domain -> Tables mapping
- src/business -> Business logic
- src/share -> Share/Common projects
- src/persistence -> TypeORM Core
- src/config -> config: log,environment, configuration
- test -> test configuration
This is the high level of the design.
You can visit Build Restful Api With Nestjs the Right Way for more detail examples.
Have a good day!
Made with love by Nextjs VietNam


Top comments (2)
^^ hay quá anh Sơn ơi :D
Bro you god?!!
Thank you very much 🙌