
Cover Photo by Gareth Davies on Unsplash.
An Angular application that demonstrates best practices for user authentication flow.
By @nikosanif
 nikosanif
/
angular-authentication
nikosanif
/
angular-authentication
An Angular application that demonstrates best practices for user authentication & authorization flows.
Angular Authentication
An Angular application that demonstrates best practices for user authentication & authorization flows.
By @nikosanif


Table of Contents
Live Demo
Live application: angular-authentication.netlify.app

Getting Started
Prerequisites
Setup & Usage
- Clone this repository:
git clone git@github.com:nikosanif/angular-authentication.git cd angular-authentication- Install dependencies:
npm install - Serve the Angular app:
npm start - Open your browser at:
http://localhost:4200
Useful Commands
-
npm start- starts a dev server of Angular app -
npm run build:prod- builds full prod build -
npm run lint- linting source code of this project -
npm run format:check- runs prettier to check for formatting errors -
npm run format:write- runs prettier to format whole code base -
npm run release- runsrelease-itto create new release
Features
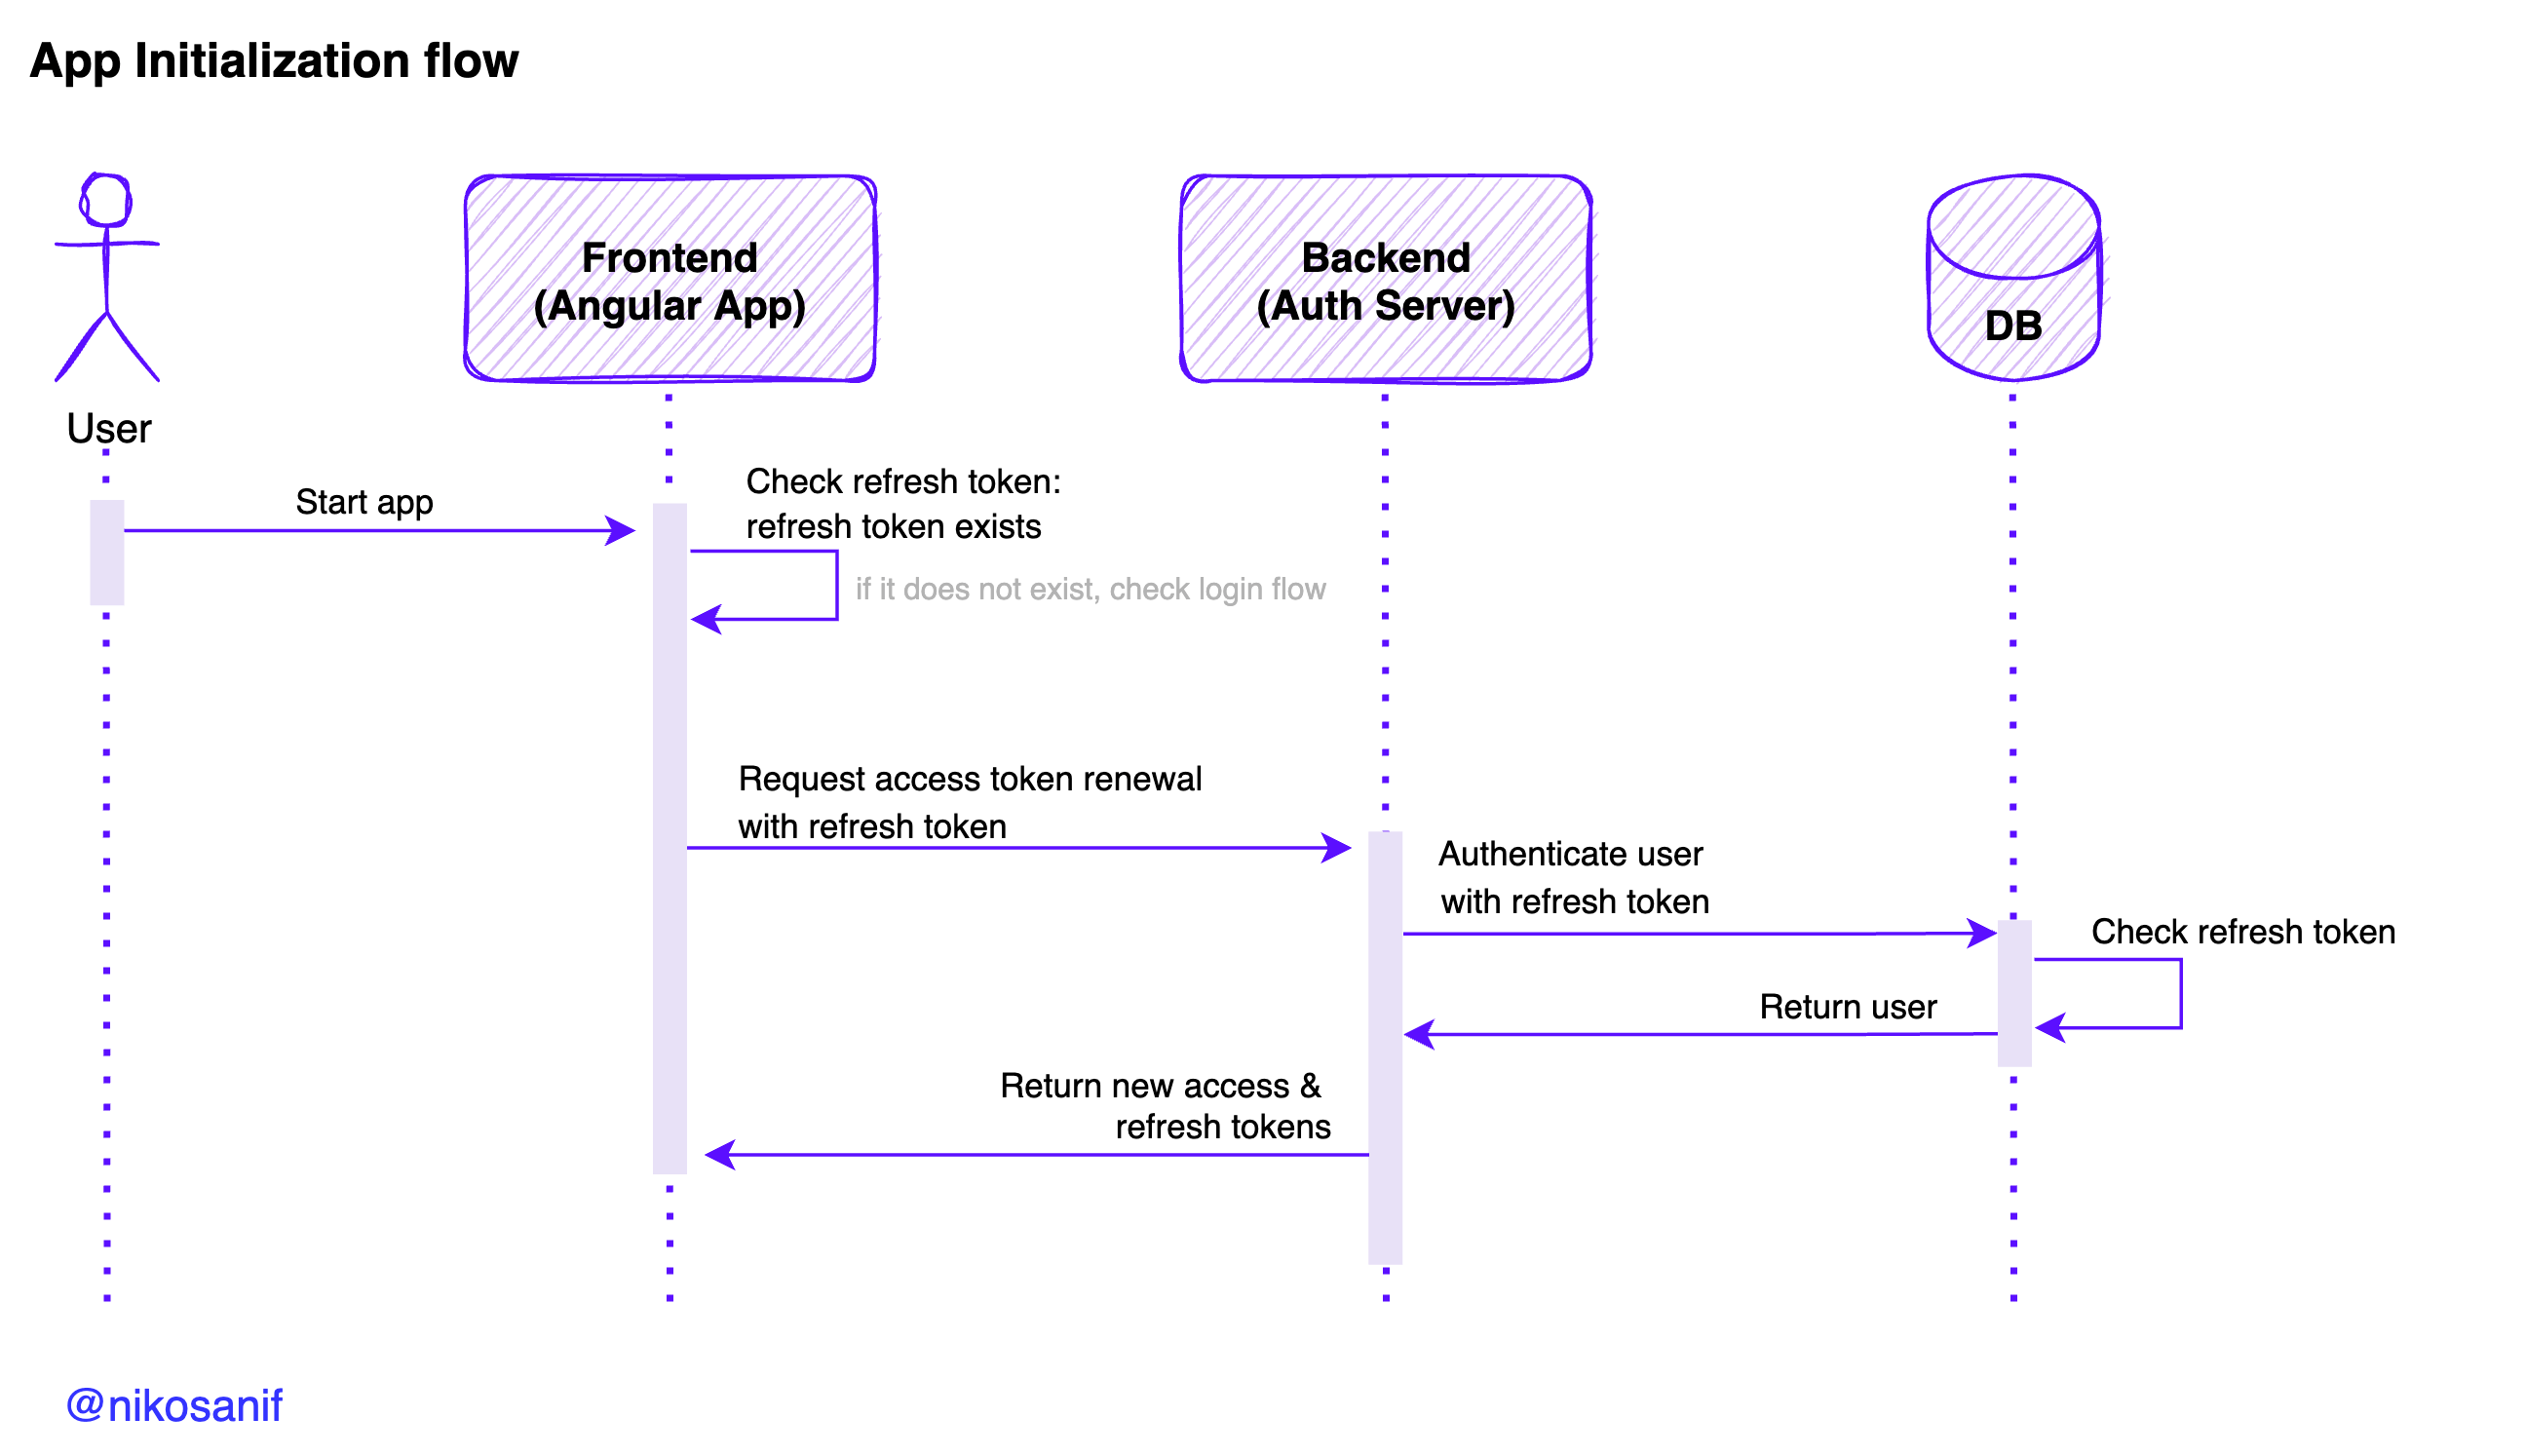
Authentication Flows

Other Features
- Lazy loading of Angular modules
- API requests with
@ngrx/effects - Responsive design
- Custom In-memory Web…
The Challenge 🤔
Three years ago, I created an open-source project called Angular Authentication to demonstrate authentication and authorization in Angular applications. The project was built with Angular 13 and featured user authentication & authorization flows, protected routes, etc. However, as Angular has evolved, new versions have been released with performance improvements, new features, and enhanced security. To keep the project up to date and leverage the latest advancements, I decided to upgrade it from Angular 13 to Angular 18.
Upgrading an Angular project can seem overwhelming, especially when spanning several major versions. However, the power of Angular CLI (ng update), the benefits of performance enhancements, new features, and improved security are well worth the effort. In this article, I'll walk you through the process I followed to upgrade an Angular auth open-source project from Angular 13 to Angular 18. We'll cover dependency updates, the adoption of new Angular features, and UI component migration.
TL;DR 🎯
- ✅ Angular Version: 13 ➡️ 18
- ✅ Dependencies: Update dependencies to the latest versions.
- ✅ UI Migration: Try new Angular Material Design Components (Material 3).
- ✅ Release Management: Migrate to
release-itfor versioning and changelog generation. - ✅ Features: Adopt new Angular 18 features.
- ✅ Built-in Control Flow: Migrate to the new control flow syntax.
- ✅ Standalone Components: Utilize standalone components for modularity.
- ✅ Route Guards: Refactor route guards to functions.
- ✅ Typed forms: Use typed forms for improved type safety.
- 🕣 Use Signal APIs: Try migrating to the new signal inputs, signal-based queries, and a new output syntax.
- 🕣 Zoneless change detection: Remove zone.js as dependency.
- 🕣 Deferrable views: Use the new shiny feature for deferrable views.
Step-by-Step Upgrade Process 🚀
Initial Setup
[Step.1] ⏩ Visit the Angular Update Guide:
- The Angular Update Guide provides detailed steps and information for each version upgrade.
[Step.2] ⏩ Install Dependencies for Node 16:
npm install
[Step.3] ⏩ Switch to Node 18: I used Node Version Manager (nvm) to switch to Node 18.
nvm use 18
Incremental Angular Updates
[Step.4] ⏩ Update to Angular 14:
ng update @angular/core@14 @angular/cli@14 --force
- The
--forceflag bypasses version compatibility checks. We'll manually fix issues later.
[Step.5] ⏩ Sequential Updates:
ng update @angular/core@15 @angular/cli@15 --force
ng update @angular/core@16 @angular/cli@16 --force
ng update @angular/core@17 @angular/cli@17 --force
[Step.6] ⏩ Switch to Node 20:
nvm use 20
[Step.7] ⏩ Update to the Latest Angular Version (v18):
ng update @angular/core@latest @angular/cli@latest --force
Adjustments and Comparisons
[Step.8] ⏩ Create a New Angular Project for Comparison:
- Generate a new Angular project with the latest version to compare configurations and identify necessary adjustments.
ng new new-angular-project
[Step.9] ⏩ Update Dev Dependencies:
- Update all packages to their latest versions.
- Fix any eslint issues.
- Test all commands in
package.jsonto ensure compatibility.
Final Angular Update
[Step.10] ⏩ Enforce Node Version 20:
- Update the
enginesfield inpackage.jsonto ensure Node 20.x is used.
"engines": {
  "node": "20.x"
}
[Step.11] ⏩ Isolate features and components:
- Isolate features and start migrating them one by one to Angular 18. This approach helps to identify issues and fix them incrementally. - Use Angular CLI schematics to generate new components and services with the latest Angular 18 features. For example:
ng g @angular/core:control-flow # Migration to the new control flow
UI and Dependency Migrations
[Step.12] ⏩ Migrate UI from TaigaUI to Angular MDC:
- Transition to Angular Material Design Components (MDC). Although TaigaUI is a great library, the new Material 3 components are now stable and I decided to try them.
- Replace TaigaUI components with MDC counterparts.
[Step.13] ⏩ Remove Deprecated Dependencies:
- Remove
angular-in-memory-web-apiand update the project to use alternative data mocking solutions or real backend services. - Implement a custom HTTP interceptor to handle API requests and responses.
[Step.14] ⏩ Adopt Standalone Components:
- Utilize Angular's standalone components feature to simplify module management and improve code modularity.
import { Component } from '@angular/core';
import { CommonModule } from '@angular/common';

@Component({
  selector: 'app-standalone',
  standalone: true,
  imports: [CommonModule],
  templateUrl: './standalone.component.html',
  styleUrls: ['./standalone.component.css'],
})
export class StandaloneComponent {}
[Step.15] ⏩ Use the new Built-in control flow:
- Use the new built-in control flow features introduced in Angular 18 to simplify asynchronous operations and improve code readability. More specifically, use the
@ifkeyword instead ofngIfand@forinstead ofngFor.
[Step.16] ⏩ Refactor guards to functions:
- Refactor route guards to functions to simplify the code and improve maintainability.
export const canActivate = (
  route: ActivatedRouteSnapshot,
  state: RouterStateSnapshot
) => {
  // Guard logic
};
[Step.17] ⏩ Typed Forms:
- Use typed forms to improve type safety and reduce errors in form handling.
loginForm = new FormGroup({
  username: new FormControl(/* ... */),
  password: new FormControl(/* ... */),
});
Other Enhancements
[Step.18] ⏩ Migrate Releases to release-it:
- Since the project
standard-versionis deprecated, I decided to migrate torelease-itfor versioning and changelog generation. - Simplify the release process with
release-it, which automates versioning and changelog generation.
npm install --save-dev release-it
- Configure
release-itwith a.release-it.jsonfile:
{

  "git": {

    "commitMessage": "chore(release): ${version}",

    "requireBranch": ["main"]

  }

  // ... other configurations

}
Future Enhancements 💡
- Adopt more new Angular Features: Explore new features and improvements introduced in Angular 18, such as enhanced performance, updated APIs, and improved tooling.
-
Use Standalone Components: Remove all
@NgModuledeclarations from components and use standalone components for better modularity. - Zoneless change detection: Consider migrating to zoneless Angular to improve performance and reduce overhead.
- Use Signal APIs: Explore the new Signal APIs introduced in Angular 18 to simplify asynchronous operations.
- Deferrable views: Implement deferrable views to improve rendering performance and user experience.
Conclusion ✅
Upgrading an Angular project from version 13 to 18 involves multiple steps, including updating dependencies, fixing issues, and adopting new features. By following this structured approach, you can ensure a smooth upgrade path and leverage the latest advancements in Angular.
If you found this article helpful, please support it with your ❤️ 🦄 🔖 to help it reach a wider audience. 🙏
Feel free to reach out if you have any questions—leave your comments below or DM me on X @nikosanif or LinkedIn.


Top comments (2)
I am facing issue with AuthGuard
Hi! What's your issue?
P.S. You always can submit a Githib issue here.