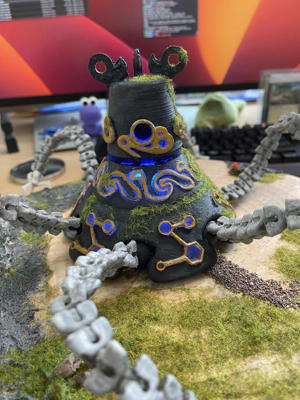
In the run up to the new Zelda release, I realized you can build a stationary guardian robot with a servo and a camera.
Adding a bit of machine learning, you can then make the guardian detect objects or people or pets and follow them around by rotating its head.
Luckily, I am not the first one to have the idea to build a guardian and there was already a brilliant guardian 3D model on Thingiverse with space for LEDs and a servo.
In this tutorial, I will walk you through the steps to build your own functional guardian with a servo, a camera, some LEDs and the ML Model service and vision service.
Here's a video of the finished guardian detecting me:
Hardware requirements
To build your own guardian robot, you need the following hardware:
| Hardware | Approximate price |
|---|---|
| Raspberry Pi + power cable | $60 |
| Raspberry Pi Camera v1.3 + 50cm ribbon cable: The default 15cm ribbon cable is not long enough. | $15 |
| 180 degree SG90 servo: Because of the camera ribbon, I restricted the servo to only 180 degrees. | $4 |
| 3x 10mm RGB LEDs with common cathode | $4 |
| cables | $5 |
| 4x M2 screws to attach the camera | $2 |
| speaker: Optional if you want music. I used a 4Ω 2W speaker with connected aux in. You can use any speaker you can connect to your Pi. | Optional |
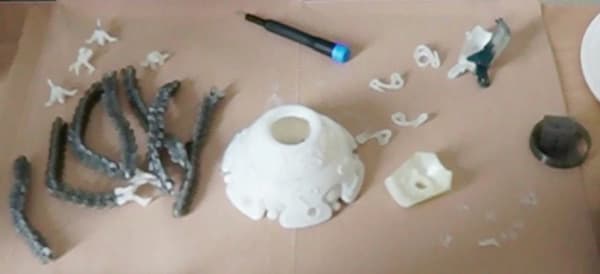
Print or order the following printed 3D parts:
- this head which fits the camera
- the decorations for the head from this Guardian Robot model
- the body, base cover, claws, and leg segments from the Guardian Robot, Hackable
To make the guardian's lights shine through its body, use filament that allows the light to shine through and paint the parts that shouldn't allow light to shine through.
Optionally, if you want to decorate your guardian, I recommend the following materials:
- primer: Vallego Surface Primer Grey or other brand.
- acrylic paint: I ordered armour modelling paint but found that mixing my own colors from a regular acrylic paint set worked best for me.
- modeling grass, stones, glue: The Army Painter makes a Battlefields Basing Set which comes with all of this.
-
a base for the guardian: I used a wooden disk with a hole cut in the middle and a box with a hole in the top underneath.
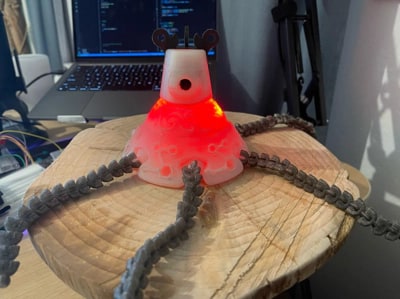
- ground texture: If you want the base to look more natural, you can use Vallejo Ground Texture Acrylic or something similar to create patches that look like stone.
- wire: To allow you to position the legs better, you can thread wire through them.
Software requirements
You will use the following software in this tutorial:
- Python 3
-
viam-server: Follow the installation instructions to installviam-serveron your Raspberry Pi.
Assemble the robot
You can view a timelapse of the robot assembly here:
https://imgur.com/gallery/3sCrNh4
Assemble for testing
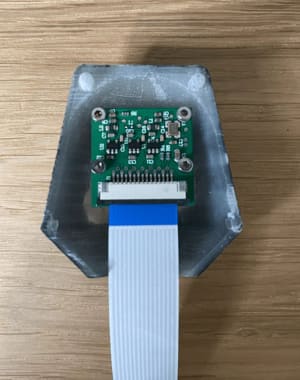
To assemble the guardian, start with the head and use four M2 screws to screw the camera with attached ribbon cable to the front half of the head.
Optionally, if the green of the camera is visible from the outside, use a marker to color the camera board.
Then put both parts of the head together.
Your servo probably came with mounting screws and a plastic horn for the gear.
Use the screws to attach the horn to the base of the head.
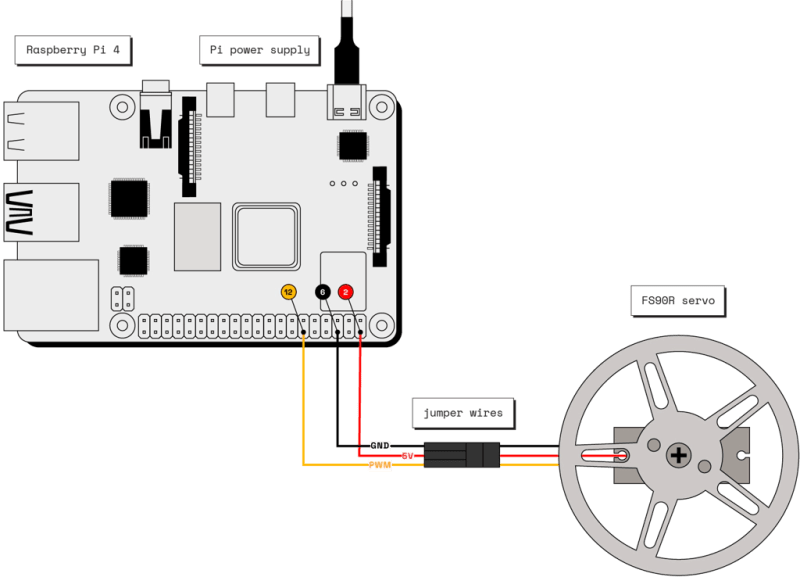
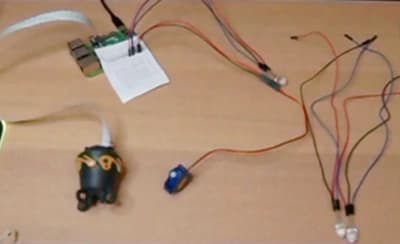
Next, get your Raspberry Pi and your servo and connect the servo to the Raspberry Pi by connecting the PWM wire to pin 12, the power wire to pin 2, and the ground wire to pin 8.
To make it easier for you to see which pin is which, you can print out this Raspberry Pi Leaf which has labels for the pins and carefully push it onto the pins or fold or cut it so you can hold it up to the Raspberry Pi pins.
If you use A4 paper, use this this Raspberry Pi Leaf instead.
If you are having trouble punching the pins through, you can pre-punch the pin holes with a pen.
Only attach the paper when the Pi is unplugged.
To make attaching the paper easier, use a credit card or a small screwdriver.
Then attach the head to the servo.
Next, get the three 10mm RGB LEDs ready.
Attach the common cathode of each LED to a ground pin on your Raspberry Pi.
Attach the wires for the red and the blue LEDs to GPIO pins.
Before continuing with assembly, you should test your components work as expected.
To be able to test the components, you need to install viam-server and configure your components.
Install viam-server and connect to your robot
Go to the Viam app and create a new robot called guardian.
Go to the Setup tab of your new robot's page and follow the steps to install viam-server on your computer.
Configure the components
Navigate to the Config tab of your robot's page in the Viam app.
Click on the Components subtab and navigate to the Create component menu.
-
Add the board.
Enter
localfor the name for your board component, select the typeboard, and select thepimodel.
Then click Create component. -
Add the camera.
Create a camera component with the name
cam, the typecameraand the modelwebcam.
Click Create Component to add the camera.
In the new camera panel, click the Video Path field to reveal a drop-down populated with camera paths that have been identified on your machine.
Selectmmal service 16.1 (platform:bcm2835_v4l2-0). -
Add the servo.
Create a servo component with the name
servo, the typeservoand the modelpi.
Click Create Component to add the servo.
Configure the attributes by adding the name of your board,local, and the pin number of the pin onlocalthat you connected your servo PWM wire to,12:
{
    "pin": "12",
    "board": "local"
}
Click Save config in the bottom left corner of the screen.
Test the components
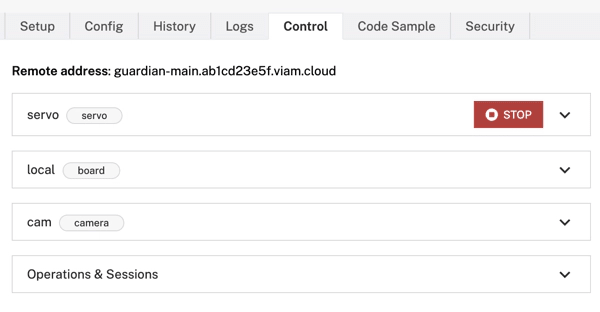
Navigate to your robot's Control tab to test your components.
Click on the servo panel and increase or decrease the servo angle to test that the servo moves.
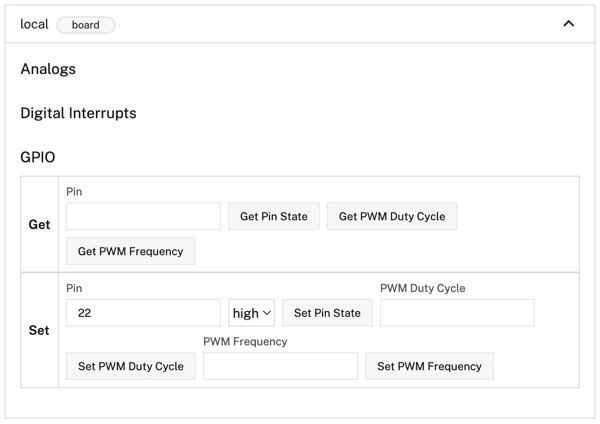
Next, click on the board panel.
The board panel allows you to get and set pin states.
Set the pin states for the pins your LEDs are connected to to high to test that they light up.
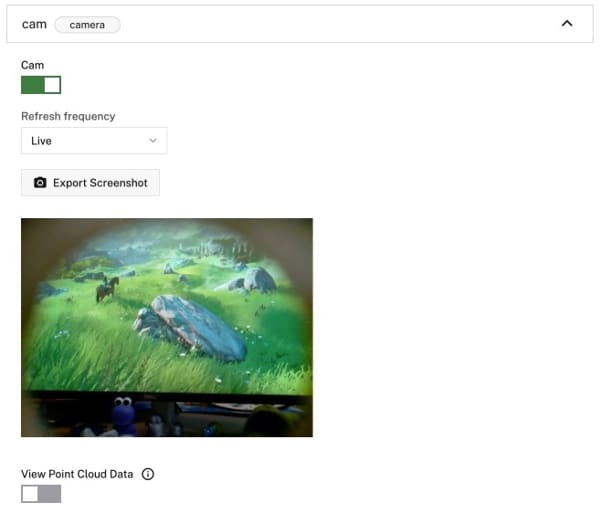
Next, click on the camera panel and toggle the camera on to test that you get video from your camera.
Assemble and decorate
Now that you have tested your components, you can disconnect them again, paint and decorate your guardian, and then put the rest of the guardian together.
Remove the servo horn, and place one LED in the back of the Guardian head, leaving the wires hanging out behind the ribbon camera.
Then place the servo inside the Guardian body and attach the horn on the head to the servo's gear.
Carefully place the remaining two LEDs in opposite directions inside the body.
Thread all the cables through the hole in the lid for the base of the guardian, and close the lid.
Use a suitable base with a hole, like a box with a hole cut into the top, to place your guardian on top of and reconnect all the wires to the Raspberry Pi.
At this point also connect the speaker to your Raspberry Pi.
Then test the components on the robot's Control tab again to ensure everything still works.
Detect persons and pets
For the guardian to be able to detect living beings, you can use this Machine Learning model.
The model can detect a variety of things which you can see in the associated labels.txt file.
You can also train your own custom model based on images from your robot but the provided Machine Learning model is a good one to start with.
To use the provided Machine Learning model, copy the effdet0.tflite file and the labels.txt to your Raspberry Pi:
scp effdet0.tflite pi@guardian.local:/home/pi/effdet0.tflite
scp labels.txt pi@guardian.local:/home/pi/labels.txt
Next, navigate to the Config tab of your robot's page in the Viam app.
Click on the Services subtab and navigate to the Create service menu.
Add a ML model service.
The ML model service allows you to deploy the provided machine learning model to your robot.
Create an ML model with the namemlmodel, the typemlmodeland the modeltflite_cpu.
Then click Create Service.
In the new ML Model panel, select Path to Existing Model On Robot for the Deployment.
Then specify the absolute Model Path as/home/pi/effdet0.tfliteand the Label Path as/home/pi/labels.txt.Add a vision service.
Next, add a detector as a vision service to be able to make use of the ML model.
Create an vision service with the namedetector, the typevisionand the modelmlmodel.
Then click Create Service.
In the new detector panel, select themlmodelyou configured in the previous step.
Click Save config in the bottom left corner of the screen.Add a
transformcamera.
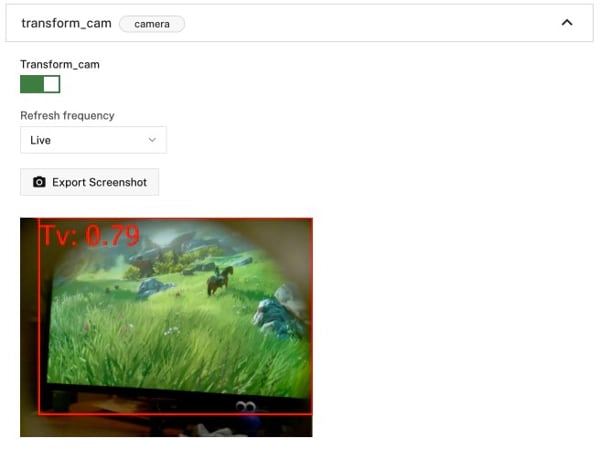
To be able to test that the vision service is working, add atransformcamera which will add bounding boxes and labels around the objects the service detects.
Click on the Components subtab and navigate to the Create component menu.
Create a transform camera with the nametransform_cam, the typecameraand the modeltransform.
Replace the attributes JSON object with the following object which specifies the camera source that thetransformcamera will be using and defines a pipeline that adds the defineddetector:
   {
   "source": "cam",
   "pipeline": [
       {
       "type": "detections",
       "attributes": {
           "detector_name": "detector",
           "confidence_threshold": 0.6
       }
       }
   ]
   }
Click Save config in the bottom left corner of the screen.
Navigate to your robot's Control tab to test the transform camera.
Click on the transform camera panel and toggle the camera on, then point your camera at a person or pet to test if the vision service detects them.
You should see bounding boxes with labels around different objects.
Program the Guardian
With the guardian completely configured and the configuration tested, it's time to make the robot guardian behave like a "real" guardian by programming the person and pet detection, lights, music, and movement.
The full code is available at the end of the tutorials.
Set up the Python environment
We are going to use Virtualenv to set up a virtual environment for this project, in order to isolate the dependencies of this project from other projects.
Run the following commands in your command-line to install virtualenv, set up an environment venv and activate it:
python3 -m pip install --user virtualenv
python3 -m venv env
source env/bin/activate
Now, install the Python Viam SDK and the VLC module:
pip3 install viam-sdk python-vlc
Connect
Next, go to the Code sample tab on your robot page and select Python, then click Copy.
This code snippet imports all the necessary packages and sets up a connection with the Viam app in the cloud.
Next, create a file named main.py and paste the boilerplate code from the Code sample tab of the Viam app into your file.
Then, save your file.
Run the code to verify that the Viam SDK is properly installed and that the viam-server instance on your robot is live.
You can run your code by typing the following into your terminal:
python3 main.py
The program prints a list of robot resources.
On top of the packages that the code sample snippet imports, add the random and the vlc package to the imports.
The top of your code should now look like this:
import asyncio
import random
import vlc

from viam.robot.client import RobotClient
from viam.rpc.dial import Credentials, DialOptions
from viam.components.board import Board
from viam.components.camera import Camera
from viam.components.servo import Servo
from viam.services.vision import VisionClient

async def connect():
    creds = Credentials(
        type='robot-location-secret',
        payload='LOCATION SECRET FROM THE VIAM APP')
    opts = RobotClient.Options(
        refresh_interval=0,
        dial_options=DialOptions(credentials=creds)
    )
    return await RobotClient.at_address('ADDRESS FROM THE VIAM APP', opts)
You will update the main() method later.
Lighting
Next, you'll write the code to manage the LEDs.
Underneath the connect() function, add the following class which allows you to create groups of LEDs that you can then turn on and off with one method call:
class LedGroup:
    def __init__(self, group):
        print("group")
        self.group = group

    async def led_state(self, on):
        for pin in self.group:
            await pin.set(on)
If you want to test this code, change your main() method to:
async def main():
    robot = await connect()
    local = Board.from_robot(robot, 'local')
    red_leds = LedGroup([
        await local.gpio_pin_by_name('22'),
        await local.gpio_pin_by_name('24'),
        await local.gpio_pin_by_name('26')
    ])
    blue_leds = LedGroup([
        await local.gpio_pin_by_name('11'),
        await local.gpio_pin_by_name('13'),
        await local.gpio_pin_by_name('15')
    ])

    await blue_leds.led_state(True)
You can test the code by running:
python3 main.py
Your Guardian lights up blue.
Detections
Now, you'll add the code for the Guardian to detect persons and pets.
If you are building it for persons or cats or dogs, you'll want to use Person, Dog, Cat, and, if you have a particularly teddy-bear-like dog, Teddy bear.
You can also specify different ones based on the available labels in labels.txt.
Above the connect() method, add the following variable which defines the labels that you want to look for in detections:
LIVING_OBJECTS = ["Person", "Dog", "Cat", "Teddy bear"]
Then, above the main() method add the following function which checks detections for living creatures as they are defined in the LIVING_OBJECTS variable.
async def check_for_living_creatures(detections):
    for d in detections:
        if d.confidence > 0.6 and d.class_name in LIVING_OBJECTS:
            print("detected")
            return d
Idling
Underneath the check_for_living_creatures() function, add the following function which gets images from the Guardian's camera and checks them for living creatures and if none are detected moves the servo randomly.
If a creature is detected, the red LEDs will light up and music will play.
async def idle_and_check_for_living_creatures(cam, detector, servo, blue_leds, red_leds, music_player):
    living_creature = None
    while True:
        random_number_checks = random.randint(0, 5)
        if music_player.is_playing():
            random_number_checks = 15
        for i in range(random_number_checks):
            detections = await detector.get_detections_from_camera(cam)
            living_creature = await check_for_living_creatures(detections)
            if living_creature:
                await red_leds.led_state(True)
                await blue_leds.led_state(False)
                if not music_player.is_playing():
                    music_player.play()
                return living_creature
        print("START IDLE")
        await blue_leds.led_state(True)
        await red_leds.led_state(False)
        if music_player.is_playing():
            music_player.stop()
        await servo.move(random.randint(0, 180))
Focus
There is one last function that you need to add before you can write the full main() function and that is a function to focus on a given creature.
The function calculates the center of the detected object and then checks if that center is close to the middle of the entire image.
If it is not near the middle of the entire image, the function moves the servo to the left or right to attempt to center the object.
Add the following function above your main() function:
async def focus_on_creature(creature, width, servo):
    creature_midpoint = (creature.x_max + creature.x_min)/2
    image_midpoint = width/2
    center_min = image_midpoint - 0.2*image_midpoint
    center_max = image_midpoint + 0.2*image_midpoint

    movement = (image_midpoint - creature_midpoint)/image_midpoint
    angular_scale = 20
    print("MOVE BY: ")
    print(int(angular_scale*movement))

    servo_angle = await servo.get_position()
    if (creature_midpoint < center_min or creature_midpoint > center_max):
        servo_angle = servo_angle + int(angular_scale*movement)
        if servo_angle > 180:
            servo_angle = 180
        if servo_angle < 0:
            servo_angle = 0

        if servo_angle >= 0 and servo_angle <= 180:
            await servo.move(servo_angle)

    servo_return_value = await servo.get_position()
    print(f"servo get_position return value: {servo_return_value}")
Main logic
The main logic for the guardian robot:
- initializes all the variables
- turns all LEDs blue
- loads a music file
guardian.mp3 - runs an infinite loop where it calls the
idle_and_check_for_living_creatures()function and when a creature is found calls thefocus_on_creature()function
Copy a suitable music file to the directory where your code is running and name it guardian.mp3.
Replace your main() function with the following:
async def main():
    robot = await connect()
    local = Board.from_robot(robot, 'local')
    cam = Camera.from_robot(robot, "cam")
    img = await cam.get_image()
    servo = Servo.from_robot(robot, "servo")
    red_leds = LedGroup([
        await local.gpio_pin_by_name('22'),
        await local.gpio_pin_by_name('24'),
        await local.gpio_pin_by_name('26')
    ])
    blue_leds = LedGroup([
        await local.gpio_pin_by_name('11'),
        await local.gpio_pin_by_name('13'),
        await local.gpio_pin_by_name('15')
    ])

    await blue_leds.led_state(True)

    music_player = vlc.MediaPlayer("guardian.mp3")

    # grab Viam's vision service for the detector
    detector = VisionClient.from_robot(robot, "detector")
    while True:
        # move head periodically left and right until movement is spotted.
        living_creature = await idle_and_check_for_living_creatures(cam, detector, servo, blue_leds, red_leds, music_player)
        await focus_on_creature(living_creature, img.width, servo)
    # Don't forget to close the robot when you're done!
    await robot.close()

if __name__ == '__main__':
    asyncio.run(main())
Now, run the code:
python3 main.py
If everything works, your guardian should now start to idle and when it detects humans or dogs or cats turn red, start music, and focus on the detected being.
Run the program automatically
One more thing.
Right now, you have to run the code manually every time you want your Guardian to work.
You can also configure Viam to automatically run your code as a process.
To be able to run the Python script from your Raspberry Pi, you need to install the Python SDK on your Raspberry Pi and copy your code onto the Raspberry Pi.
ssh into your Pi and install pip:
sudo apt install python3-pip
Create a folder guardian inside your home directory:
mkdir guardian
Then install the Viam Python SDK and the VLC module into that folder:
pip3 install --target=guardian viam-sdk python-vlc
Exit out of your connection to your Pi and use scp to copy your code to your Pi into your new folder.
Your hostname may be different:
scp main.py pi@guardian.local:/home/pi/guardian/main.py
Also copy your music file over:
scp guardian.mp3 pi@guardian.local:/home/pi/guardian/guardian.mp3
Now navigate to the Config tab of your robot's page in the Viam app.
Click on the Processes subtab and navigate to the Create process menu.
Enter main as the process name and click Create process.
In the new process panel, enter python3 as the executable, main.py as the argument, and the working directory of your Raspberry Pi as /home/pi/guardian.
Click on Add argument.
Click Save config in the bottom left corner of the screen.
Now your guardian starts behaving like a guardian automatically once booted!
Next steps
You now have a functioning guardian robot which you can use to monitor your pets or people. Or simply use to greet you when you get back to your desk.
Of course, you’re free to adapt the code to make it do something else, add more LEDs, or even train your own custom model to use.
Full Code
import asyncio
import random
import vlc

from viam.robot.client import RobotClient
from viam.rpc.dial import Credentials, DialOptions
from viam.components.board import Board
from viam.components.camera import Camera
from viam.components.servo import Servo
from viam.services.vision import VisionClient

LIVING_OBJECTS = ["Person", "Dog", "Cat", "Teddy bear"]


async def connect():
    creds = Credentials(
        type='robot-location-secret',
        payload='SECRET_FROM_VIAM_APP')
    opts = RobotClient.Options(
        refresh_interval=0,
        dial_options=DialOptions(credentials=creds)
    )
    return await RobotClient.at_address('guardian-main.vw3iu72d8n.viam.cloud', opts)


async def check_for_living_creatures(detections):
    for d in detections:
        if d.confidence > 0.6 and d.class_name in LIVING_OBJECTS:
            print("detected")
            return d


async def focus_on_creature(creature, width, servo):
    creature_midpoint = (creature.x_max + creature.x_min)/2
    image_midpoint = width/2
    center_min = image_midpoint - 0.2*image_midpoint
    center_max = image_midpoint + 0.2*image_midpoint

    movement = (image_midpoint - creature_midpoint)/image_midpoint
    angular_scale = 20
    print("MOVE BY: ")
    print(int(angular_scale*movement))

    servo_angle = await servo.get_position()
    if (creature_midpoint < center_min or creature_midpoint > center_max):
        servo_angle = servo_angle + int(angular_scale*movement)
        if servo_angle > 180:
            servo_angle = 180
        if servo_angle < 0:
            servo_angle = 0

        if servo_angle >= 0 and servo_angle <= 180:
            await servo.move(servo_angle)

    servo_return_value = await servo.get_position()
    print(f"servo get_position return value: {servo_return_value}")


class LedGroup:
    def __init__(self, group):
        print("group")
        self.group = group

    async def led_state(self, on):
        for pin in self.group:
            await pin.set(on)


async def idle_and_check_for_living_creatures(cam, detector, servo, blue_leds, red_leds, music_player):
    living_creature = None
    while True:
        random_number_checks = random.randint(0, 5)
        if music_player.is_playing():
            random_number_checks = 15
        for i in range(random_number_checks):
            detections = await detector.get_detections_from_camera(cam)
            living_creature = await check_for_living_creatures(detections)
            if living_creature:
                await red_leds.led_state(True)
                await blue_leds.led_state(False)
                if not music_player.is_playing():
                    music_player.play()
                return living_creature
        print("START IDLE")
        await blue_leds.led_state(True)
        await red_leds.led_state(False)
        if music_player.is_playing():
            music_player.stop()
        await servo.move(random.randint(0, 180))


async def main():
    robot = await connect()
    local = Board.from_robot(robot, 'local')
    cam = Camera.from_robot(robot, "cam")
    img = await cam.get_image()
    servo = Servo.from_robot(robot, "servo")
    red_leds = LedGroup([
        await local.gpio_pin_by_name('22'),
        await local.gpio_pin_by_name('24'),
        await local.gpio_pin_by_name('26')
    ])
    blue_leds = LedGroup([
        await local.gpio_pin_by_name('11'),
        await local.gpio_pin_by_name('13'),
        await local.gpio_pin_by_name('15')
    ])

    await blue_leds.led_state(True)

    music_player = vlc.MediaPlayer("guardian.mp3")

    # grab Viam's vision service for the detector
    detector = VisionClient.from_robot(robot, "detector")
    while True:
        # move head periodically left and right until movement is spotted.
        living_creature = await idle_and_check_for_living_creatures(cam, detector, servo, blue_leds, red_leds, music_player)
        await focus_on_creature(living_creature, img.width, servo)
    # Don't forget to close the robot when you're done!
    await robot.close()

if __name__ == '__main__':
    asyncio.run(main())





Top comments (0)