A slight exaggeration, but you get the idea.
Code formatting: it’s not just for sticklers and grammar nazis
This post is for all the JavaScript developers out there who’ve ever developed any application with another person (or plan to). If that’s you, keep reading. If you’re a solo, rockstar, ninja developer, you can go on about your day.
Now that I’ve got everyone else’s attention, let me give you a hypothetical (real-life) example of what you might encounter upon opening an existing JavaScript codebase that a team of developers has put together.
You may see some (or all) of the following:
- Missing semi-colons.
- Tons of whitespace between some lines and no whitespace between others.
- Run on lines that cause you to scroll right for ages to see everything they contain.
- Seemingly random indentation.
- Commented out code chunks.
- Initialized but unused variables.
- Some files that use “strict” JS and others that don’t.
- Blocks of code with no spaces or comments anywhere making reading them and deciphering what’s happening that much harder.
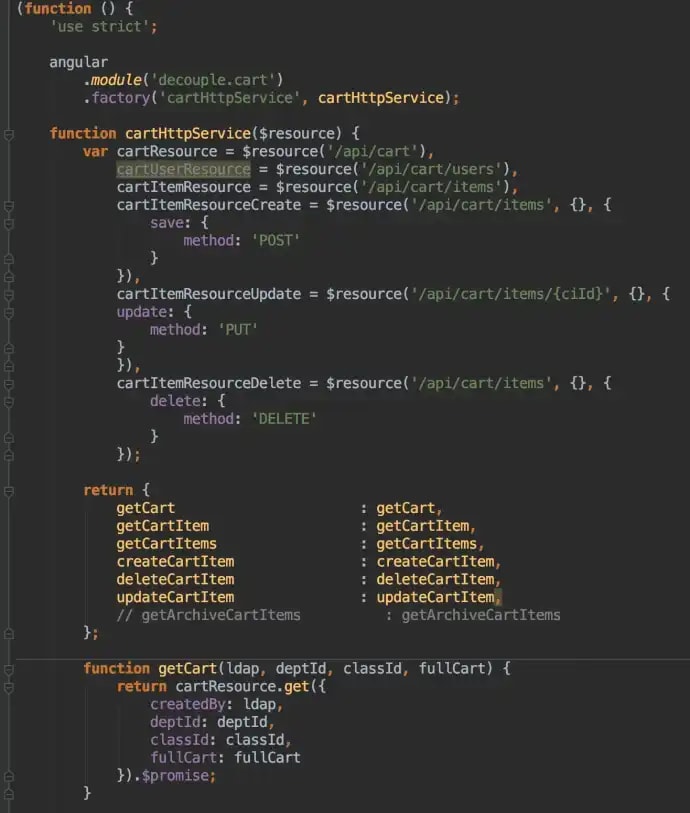
Take this piece of code from a codebase I’m currently working in:
This is an example of poorly formatted code. Isn’t that painful to look at? Yeah...
Does this sound at all familiar to you? Congrats, you’re on a working dev team, and everyone has their own preferences for how they like to code.
As you might already be able to imagine, what one developer is perfectly fine with (no whitespace anywhere), probably drives another one nuts. And while one dev might indent every line perfectly every time, another dev probably doesn’t care (and knows JavaScript doesn’t care too much either, so s/he can get away with it).
This is a recipe for a hard-to-follow codebase, and I don’t know about you, but I find the act of understanding and writing good, functional code hard enough without having to worry about indentation, spacing, keeping track of variables and simple punctuation fixes.
Not to mention, I hate being that person who makes comments all over a pull request asking for things like that to be cleaned up. Nobody wants to be that person.
Which is what brings me to today’s post.
Today, I’m going to magic away the code inconsistencies of a bunch of different developers with the help of Visual Studio Code, Prettier and ESLint, and leave you with beautiful, uniform code that your development team won’t even have to think about formatting.
Sounds too good to be true? It’s not. I promise.
VS Code & Plugins to the Rescue
Right, so let’s get straight to the solutions to your code formatting problems. In case you’re not familiar with it, VS Code is the de facto JavaScript IDE today.
And for good reason: it’s free, it’s easy to get up and running, and it’s just an absolute pleasure to work with. That’s just the tip of the iceberg, but there’s a million other articles expounding on the awesomeness of VS Code, so I’ll leave that to them.
Before this, I was a supporter of all things JetBrains like WebStorm and IntelliJ, but after giving Visual Studio Code a try, I’m sold.
Which leads to...
Step 1: If you haven’t downloaded it yet, download VS Code now. It’s a critical piece of our puzzle to solve this formatting and code consistency problem.
Step 2: Getting started with plugins. One of my favorite things about VS Code is the extremely robust plugin ecosystem it has, and the ease of integrating said plugins. You set them up once, then you can forget about them, and they just keep working, project after project.
There’s two plugins you need in your arsenal today: Prettier and ESLint.
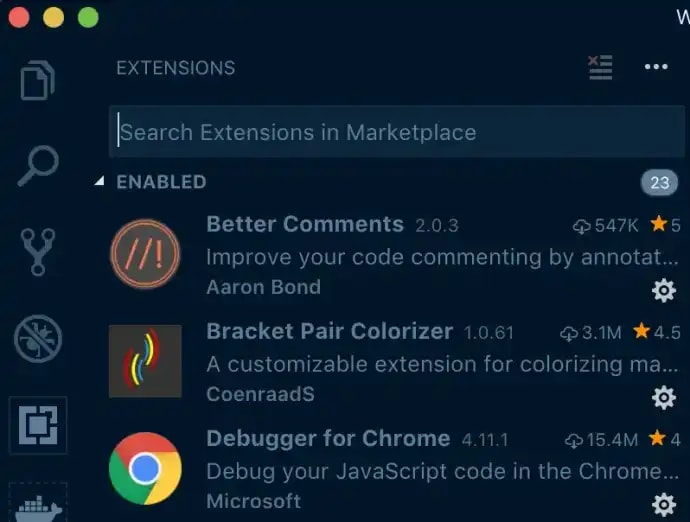
If you open up your Extensions tab on the side of your VS Code window, you’ll see a host of extensions made for VS Code.
See that square thing on the far left? Click that to open up the plugin search for VS Code.
But before I have you download these plugins, let me give you a quick overview of what these extensions can do for you.
Prettier
Very simply, Prettier is a "VS Code package to format your JavaScript / TypeScript / CSS" - Prettier site
In practice, Prettier is an opinionated code formatter that does all sorts of useful things like:
- Changes all single quotes to double quotes.
- Adds missing semicolons.
- Puts spaces between curly braces or brackets and variables.
- Sets standard tab width.
This is only a small fraction of what Prettier cares about, and in VS Code it’s really easy to override any rules that you’re not a fan of, which I’ll get to in a bit.
Prettier is made for keeping code formatting consistent, and the VS Code plugin, it works based on a .prettierrc file in the root of a project. It will keep your code clean and easy to read, and the same across all developers on the team.
One of the biggest selling points for me?
Prettier can be set up in VS Code to auto-format code on every save.
I don’t have to think about it, I don’t have to set up complicated file watcher tasks, I change one setting in VS Code and it just works. Every time. Period. The end.
I’ll show you how to do this too, but before I get there, I need you to download Prettier for VS Code.
Open up the Extensions Marketplace in your VS Code window (it’s the little square looking doodad under the debugger).
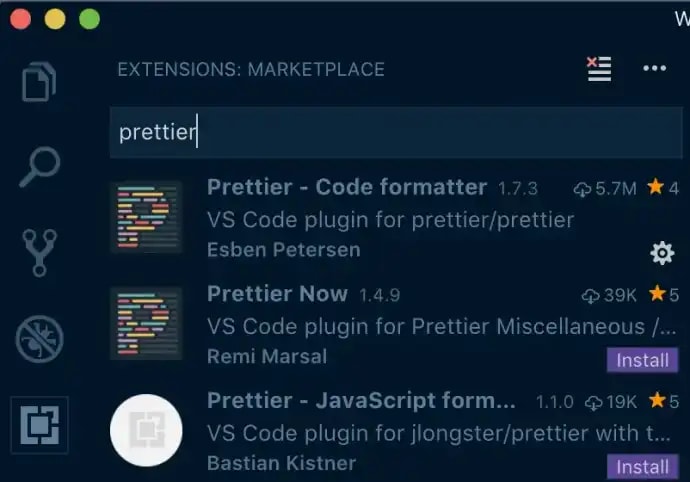
This is the first plugin you’ll be searching for in VS Code’s extensions. If you type "Prettier" into the search bar, your results should look something like this:
Go for Prettier - Code Formatter. This is the one you want.
You see the first result? The one with 5.7 million downloads and counting? That’s the one you want to install. When in doubt, look for the extension with the most downloads that’s closest to what you think the name of the extension is, and go with it.
If you think the "Install" buttons on VS Code look like labels or banners instead of finished, clickable buttons, I agree with you. But that’s a debate for another day.
Once the Prettier extension is installed, we’re ready to move on to our second plugin: ESLint.
ESLint
The thinking behind ESLint is: “JavaScript, being a dynamic and loosely-typed language, is especially prone to developer error. Without the benefit of a compilation process, JavaScript code is typically executed in order to find syntax or other errors. Linting tools like ESLint allow developers to discover problems with their JavaScript code without executing it.” — ESLint site
ESLint is great for the more specific, less generic code styles that you want your development team to adhere to. Unless you specifically set it up, ESLint won’t autofix or rewrite your code, but it will let you know in a straightforward way that there’s “rules” being broken.
Whether those rules include commented out code, unused variables or missing prop-types is up to you and your team, but with an .eslintrc file in place in your project, it sets up guardrails around the project to ensure each JavaScript file written adheres to the same standards as the others, regardless of who’s working on it.
The ESLint plugin for VS Code is an extension of the official, open source ESLint utility used by the likes of Google, Facebook, Netflix and more.
If ESLint is good enough for them, it’s certainly good enough for me.
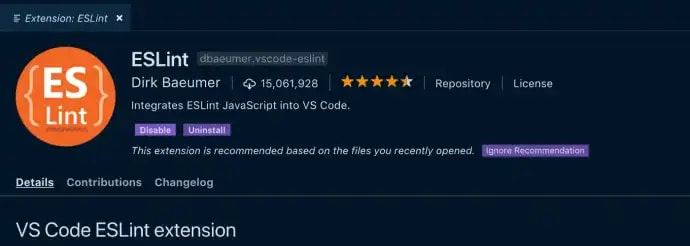
Here’s what you’ll see when searching for ESLint in the VS Code extension marketplace:
The one with 15 million downloads - that’s the one you want.
One of the biggest benefits to ESLint is that each “rule” set in ESLint is entirely standalone. Every one can be turned on or off, new rules can be added, unnecessary rules can be ignored, and there’s a ton of rules that are already documented to be included with just a line of code.
No rules are enabled by default, so you’re free to add them as you see fit, but a lot of development teams like to start with something like Airbnb’s ESLint file, which is packaged as a handy NPM module(npm i eslint-config-airbnb), and adjust as they need to suit their needs.
As an aside: Airbnb’s whole style guide is a great example of how to approach writing JavaScript, in general. I figure, 79,000+ stars on Github is a pretty good indicator of quality. But again, that’s a tangent for another post.
For now, let’s download Prettier and ESLint, and move on to getting them running in VS Code.
Setting up and configuring Prettier and ESLint
This is the fun part. It’s the super, super easy part, too. You’ll be amazed just how painless it is, and it just makes me even happier that VS Code exists.
Once you’ve downloaded these plugins, it’s time to enable them.
To check that your new plugins are installed and enabled, while still in the extensions screen, you can click the three dots at the top right of the search input and click the "Show Installed Extensions or "Show Enabled Extensions" selection from the dropdown, and if your new extensions are downloaded/enabled ESLint and Prettier will show up there.
Both ESLint and Prettier are installed and enabled for my VS Code workspaces.
If either is not enabled, just click the extension and click the "Enable" button (yep, it looks like a label, but it’s a button). Then restart your VS Code program for the changes to take effect.
If ESLint was not enabled, the Disable button would say "Enable" and I could click it to turn it on from there.
Default user settings
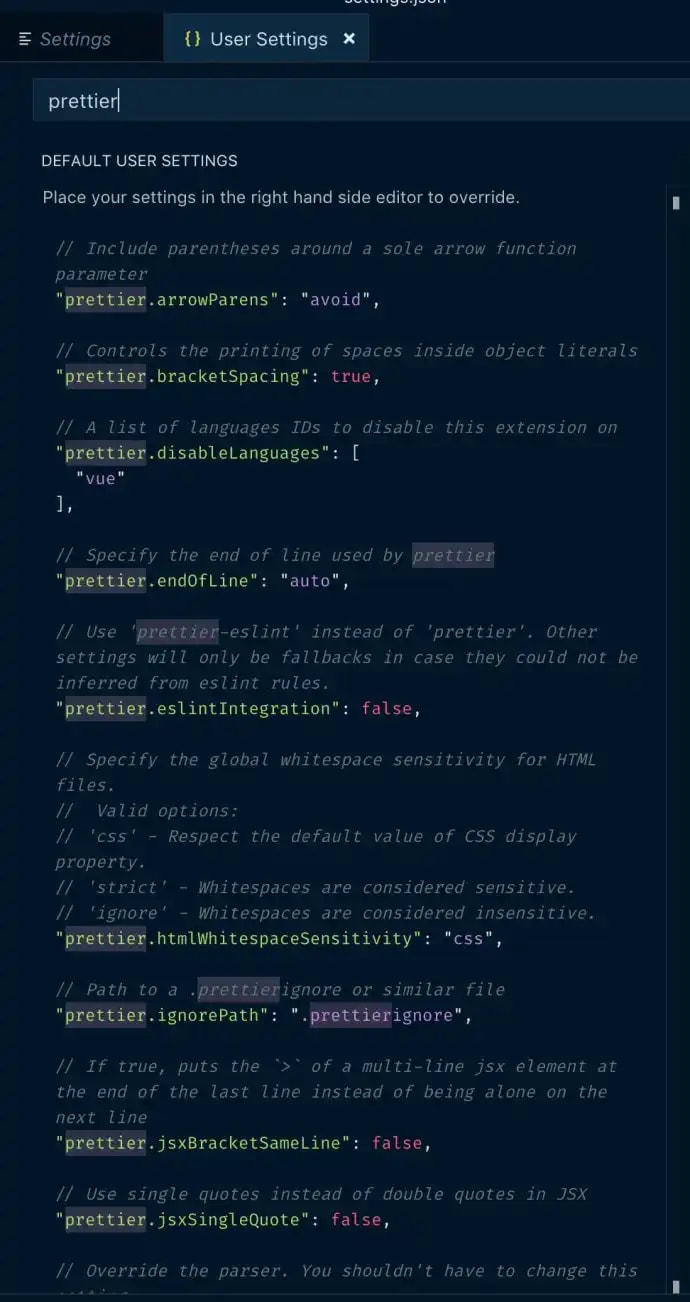
Great, now both plugins should be enabled and we’re ready to get started. As I said before, Prettier has lots of settings enabled by default, and you can see exactly what’s enabled / disabled and make any changes you’d like to take effect globally, here.
To get to these settings, go to Code > Preferences > Settings and then search "prettier" in the input box. Once you’re in general Settings, click the curly braces in the top right corner of the window and it will take you to the "Default User Settings", where you can see all the Prettier settings and what they default to.
Default Prettier configuration settings in my VS Code.
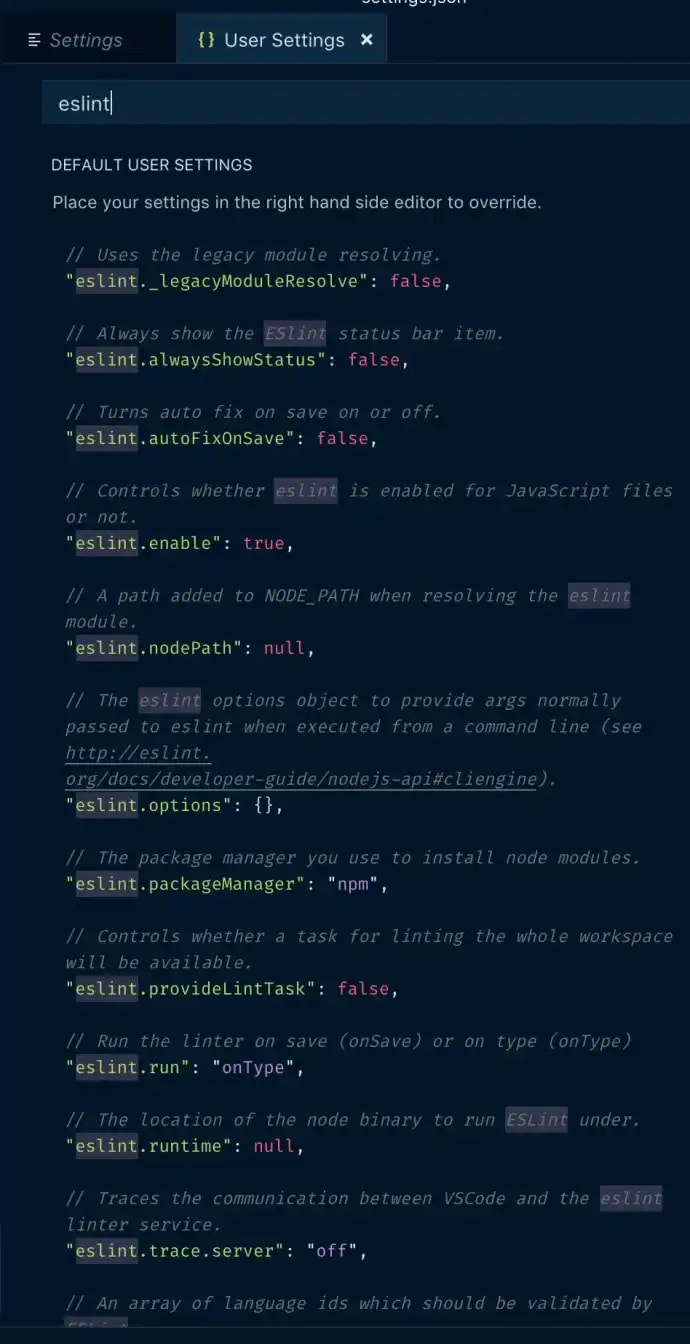
From here, you can do the same thing by putting "eslint" in the search box, and see all the rules in place by default for that extension.
Default ESLint configuration settings in my VS Code.
And that’s the defaults. Good, now let’s customize it a little bit, because I want to make my development life even easier.
Custom user settings
VS Code offers this really handy way to override any default settings of specific extensions with what it calls "User Settings".
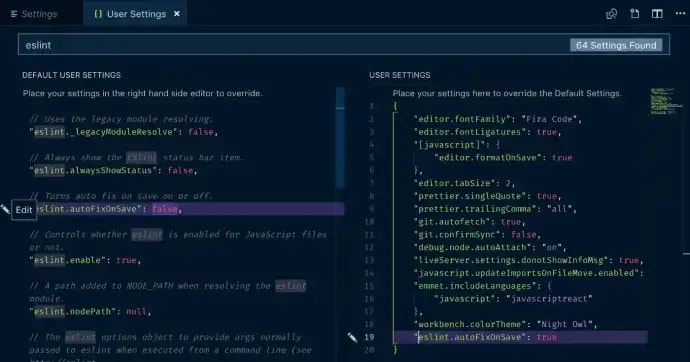
All this is, is a file that VS Code generates with settings that are specific to your text editor. If you want to override a specific rule, just hover your cursor over the rule to modify, then click the pencil that appears at the left, and a new window titled "User Settings" will open up and add that rule as a modifiable setting there.
Here’s an example of what my user settings look like on the right in the screenshot below. I’ve overwritten a couple of the Prettier settings: singleQuote and trailingComma, and I’ve enabled ESLint’s autoFixOnSave() function.
By far, the best thing I enabled, though, is Prettier’s formatOnSave(), so I don’t even have to think about it. This was done through the following code snippet.
"[javascript]": {
    "editor.formatOnSave": true
}
Click the Edit pencil on the left, and the rule gets added to your custom "User Settings" on the right.
Prettier’s formatOnSave() is on a per-language basis, so if you want to add in formatting for CSS or HTML or some other language, you just need to add it here. And then it’s ready to go.
Make a change in a JavaScript file, save the change, and the code reformats itself according to Prettier. It’s glorious. Truly, one of my favorite features, by far.
Project-specific config files
And finally, the project specific configuration files.
I find the default settings straight through the VS Code extension to be enough for me when I’m coding my own projects, but for a dev team, to be absolutely sure everyone’s coding to the same standards, that file could be included to take out all the guesswork.
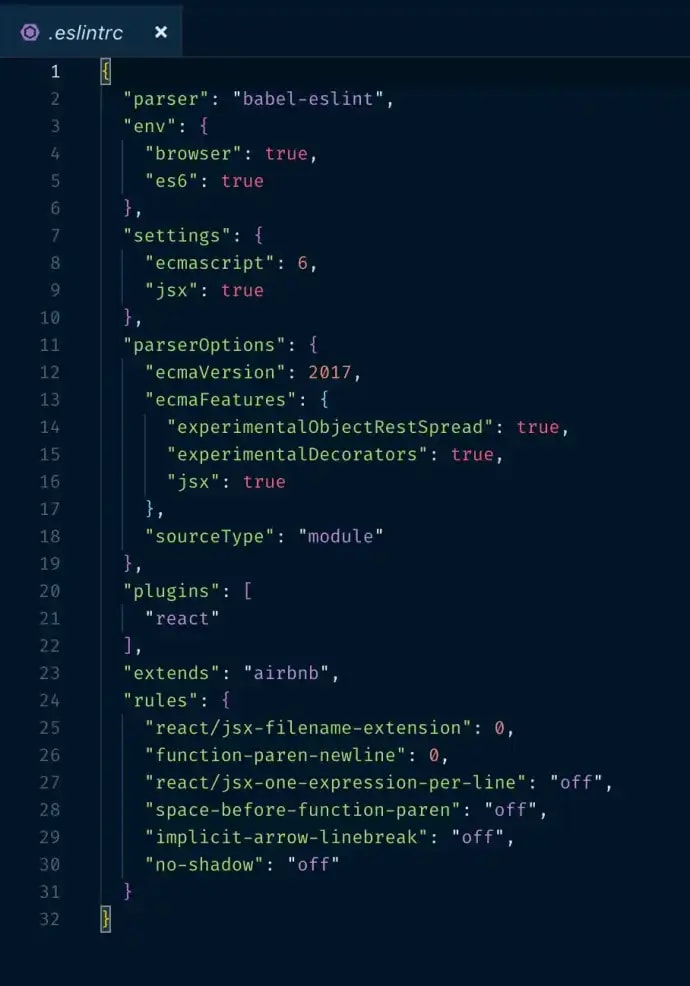
Anyway, for ESLint to work best, it needs an .eslintrc file at the root of the project. Here’s an example of what that file could look like.
Example of an .eslintrc file.
This is a pared down one, but you get the idea. Any rules to be linted against are added at the bottom of the file.
And once this file is present, if there’s a rule that’s being broken, it will appear in the "Problems" section where the built-in terminal runs in the VS Code window.
ESLint doing its linting.
Without a project specific .eslintrc file, unless you have a lot of hard and fast rules you want to set in your custom User Settings, you won’t get a lot of assistance from ESLint. Personally, I like the project specific ESLint file, it makes it crystal clear what the rules and standards are, and unlike Prettier, which is very opinionated by default, ESLint won’t complain unless you tell it to.
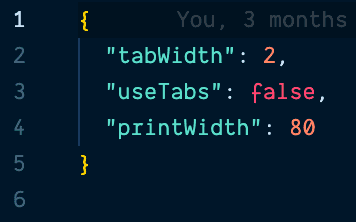
And here's a basic .prettierrc file.
Example of a .prettierrc file.
To wrap it up, the configuration settings in VS Code are a little like CSS and its specificity rules— the more specific the settings file, the higher the priority it is given by VS Code. If there’s no project specific config file, VS Code falls back to the custom user settings, and if there’s no custom user settings it looks for default settings last of all.
Conclusion
There you have it. Your dev team is now set up for success — at least when it comes to consistent, well-formatted, and clean JavaScript code. VS Code makes it so simple to implement thorough code linting and opinionated code formatting with little effort on the developer’s part. There’s no reason not to get on board with that.
These simple tips will speed up development and keep everyone’s code looking consistent, even with all of their unique coding styles.
Check back in a few weeks, I’ll be writing reading really large files in Java (a follow up to my two part series on reading really large files with Node.js or something else related to web development.
If you’d like to make sure you never miss an article I write, sign up for my newsletter here: https://paigeniedringhaus.substack.com
Thanks for reading, I hope this gives you an idea of how to easily keep your code consistent with Prettier and ESLint.








Top comments (0)