Feature toggles: the preferred way to test new UI features
Have you ever said to yourself: “Gee, I wish I could deploy this new feature to just a few of my users at a time. I want to test if they like it and it works well, before I open it up to the entire user base.”?
Then you shrug, deploy to production, and the site crashes when 250 users find that one unhappy path you didn’t even contemplate it was so far outside the scope of how to logically use the site (because that’s what users excel at).
This kind of scenario (and the ensuing mad scramble to code up a fast fix) could have been prevented with feature toggles.
So what are feature toggles?
Aside from the scenario I described above, according to Wikipedia:
A feature toggle is a technique in software development that attempts to provide an alternative to maintaining multiple source-code branches (known as feature branches), such that a feature can be tested even before it is completed and ready for release. Feature toggle is used to hide, enable or disable the feature during run time. For example, during the development process, a developer can enable the feature for testing and disable it for other users.
Feature toggles allow developers to introduce new features to a small group of users (beta testers), ensure that all the kinks and bugs are worked out, and the feature is solid and well liked by the users before letting everyone have access to it.
It also allows for multiple versions of an application to exist at once. Although feature toggles are generally thought of as impermanent - used for testing features then releasing them to the general public once they’ve been vetted - they could also be used maintain multiple versions of an application, with different versions available to different users.
If you’d like to read more about how to go about setting up a config server, you can read an article I wrote a while back about setting one up with the help of Spring Boot’s Cloud Configuration package.
And if you’d like to see another way of setting up feature toggles in a slightly older JavaScript application, I wrote an article about that as well. That implementation though, required a redeployment of the total application every time a new user or group was added with a feature toggle, but with this new solution that’s unnecessary.
In this blog, I’ll show you how to add new information to existing feature toggles in a React UI without having to redeploy the whole application.
The best part? It’s not terribly complicated.
NOTE: this article does not eliminate the need to modify and redeploy UI code to implement brand new feature toggles, but it does make it possible to modify existing feature toggles with new information (like new users or user groups).
Rebuilding and redeploying UIs is not always a must
Back in the olden days of JavaScript development, when Grunt and Gulp tasks rebuilt jQuery fueled applications, if you wanted to modify feature toggles in the UI with new information, the whole application had to be rebuilt from the Node.js server up. Recompiled, re-minified, re-uglified, rebuilt and redeployed to the server or the cloud.
It didn’t really take too long in the grand scheme of things, but it was still a pain. And for my business partners who wanted the relative ease of clicking a button to enable or disable a feature toggle for certain user groups, it made that impossible.
If only it were that easy.
Now, with newer tools at our disposal like Webpack and hot reloading in the browser with frameworks like React, it doesn’t have to be that way anymore.
You can simply update the information being provided to the UI from the config server, refresh it via the Node.js server, and voilà — the modifications are picked up in the browser.
Feature toggle setup
Enabling feature toggles with the Cloud Config Client npm package
In order to set up our JavaScript application to connect to the Spring Cloud Config server, I used a package called cloud-config-client from npm.
There’s a dozen packages like this made for connecting Node.js applications to Spring Boot cloud configuration servers, but this one is one of the more popular, well-documented packages on npm, so it’s the one I chose to go with this time.
I broke these steps down into server side and client side so you can see where the Node.js files are in play versus the React files.
Server side: configure in server.js
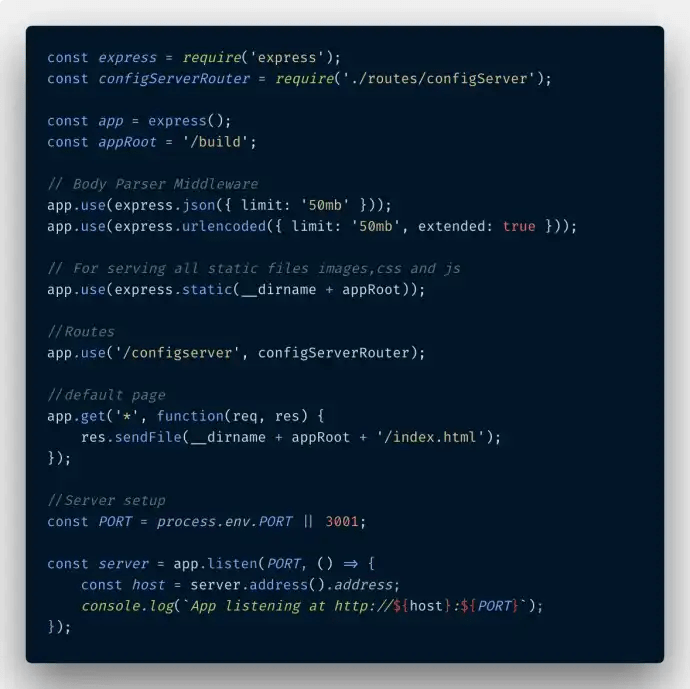
After initially installing the cloud-config-client package with npm i --save cloud-config-client, it’s time to configure the Node’s server.js file. The place where every good Express-powered Node application begins.
My server.js file is relatively small, as a lot of the routes, loggers, and other Node server extras have been split off into their own folders to keep it more organized.
The only adjustments needed to this file are requiring the route to the config server at the top of the file:
const configServerRouter = require('./routes/configServer');
And then making sure that when the React client’s request comes to the Node server and includes /configserver/ in the URL path, it routes to the configServer.js file, where the logic to access the Spring Cloud Config server is stored. Like so:
app.use('/configserver', configServerRouter);
server.js
There’s not much to update in the Node’s server.js file to make it able to access the cloud config server.
Next, I move on to the configServer.js file, which resides inside my routes/ directory on the server side.
Server Side: Connect to the Spring Cloud and Create The Two Node Config Server Endpoints
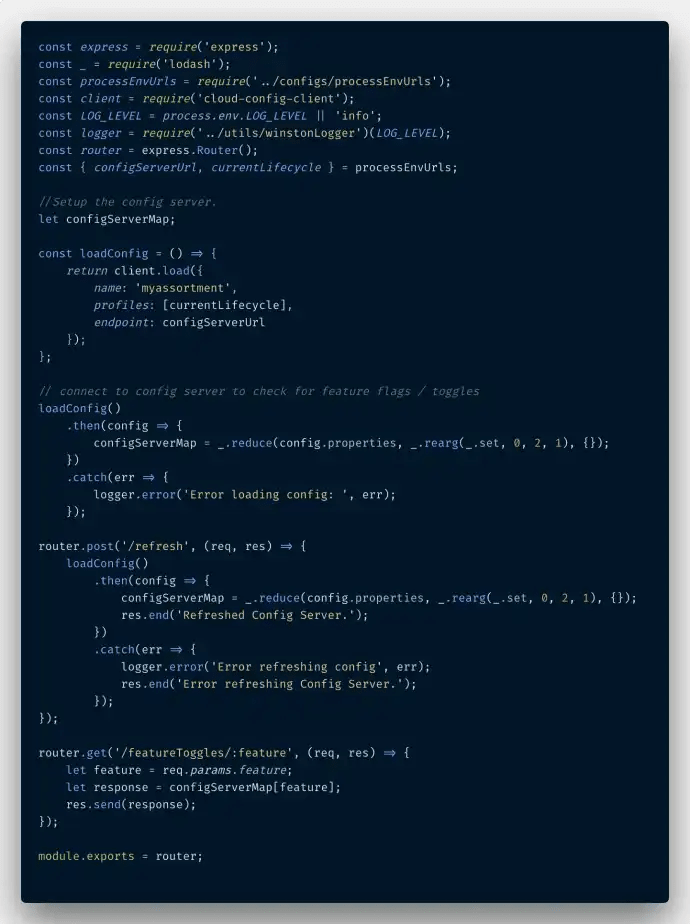
The configServer.js file contains the majority of the connection information to the Spring Cloud config server running in the cloud.
Below, is a screenshot of the whole file — I’ll go over each section in detail, but at a high level, it contains a function call to initially connect to the config server and load any feature toggle info that may be present: loadConfig().
There’s an endpoint to refresh the info supplied to the config server with the /refresh endpoint. This is the key to enabling or disabling feature toggles without having to rebuild and redeploy the whole JavaScript application every time.
And finally, there’s the actual /featureToggles/:feature endpoint, which is how the React UI calls to the Node.js server to figure out which feature toggles are available.
Ok, now let’s get in to the details of each function.
configServer.js
Here’s my whole configServer.js file for checking and refreshing feature toggles.
Server side: feature toggle endpoint
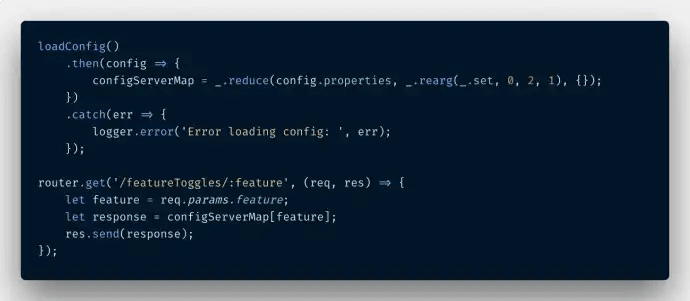
Here’s a close up of the loadConfig() and /featureToggles/:feature functions that are used to:
- Fetch any feature toggle info from the Spring Cloud config server, and
- Handle calls from the UI to check if certain feature toggles are available for user groups.
For the actual loadConfig() function, I just followed the documentation supplied by the cloud-config-client package.
Once the initial connection is made from that function, there’s a good bit of Lodash functions being used to massage the config server data into a map of keys and values for each individual feature toggle. If that’s a little hard to follow, it might make more sense when I show an example of the feature toggle in action. For now, keep reading.
The router.get(/featureToggles/:feature) function is the endpoint that will handle the call from the React client, check if that :feature exists as a key in the previously created configServerMap and if it does, return a positive 200 HTTP response to the client side.
That’s all there is to it for this bit.
configServer.js
A close up of both the initial loadConfig() call that gets the info from the Spring Cloud server, and the feature toggle call sent from the client side checking the configServerMap.
Server side: feature toggle refresh endpoint
The other function to be aware of here is the router.post(/refresh) endpoint. This endpoint can be called from either the browser, or (more likely) an API REST client like Postman or Insomnia.
This is how changes made to the config server files get updated and pulled into the UI.
This ‘/refresh’ endpoint is the key to modifying the information provided to already existing feature toggles in the React UI.
As you can see, the very same loadConfig() function that’s called as soon as the Node.js server starts up the first time, is called again when the /refresh endpoint is triggered. And to let users know the refresh worked, a simple JSON message is sent back when the POST is successful: res.send("Refreshed Config Server.");.
configServer.js
The refresh endpoint triggered to bring in new information related to feature toggles already implemented in the UI application. This is the key.
Client side: feature toggle call
Now, we get to the client side in the React UI, and it’s dead simple. On the UI side of things, I have a folder inside of React called /services where all the shared business logic files live and there’s one file concerned with the config server, appropriately called configServerService.js.
This serves as the connection point between the React UI client and the Node.js server.
As you can probably tell from the screenshot below, this example feature toggle is called "status-pilot" and it checks a user’sldap (username), which is provided by the Spring Cloud config server through the /configServer/featureToggles/status-pilot endpoint. Then it checks the client supplied ldap against the list of users from the config server and if one of them matches the names in the list, it returns a truth-y boolean.
With this confirmation the user is allowed to see certain features currently being tested out in the app with a small, select group of users. And that’s it.
Just call the isStatusPilotUser() function wherever the React app is checking the user’s permissions in the UI and set the boolean of isStatusPilotUser to true or false after the Node server gives its response based on the info from the config server.
This same sort of function set up can be added to this service file for multiple feature toggles at once, as well.
configServerService.js
This is the function on the client side: isStatusPilotUser() that communicates with the Node server that’s holding feature toggle information provided by the config server.
Feature toggles in action
Right, so now that I’ve walked through how to connect the Node server to the Spring Cloud config server, and connect the React client to the Node server, it’s time to show a feature toggle in action.
The first thing needed is a simple: an updated configuration YAML file for the Spring Cloud config server to consume.
Continuing with the "status-pilot" example from above, here’s a YAML file, with a list of LDAPs (usernames). The highlighted username "AM00002"is a new addition to the list that the Node.js server isn’t yet aware of.
This change won’t immediately be registered by the config server itself, I’ll have to trigger it manually to update (or set up a cron job) and get the new information from the file, but I’ll come to that in a minute.
Update the config file for the Spring Cloud config server
Here’s the simple YAML file I mentioned above. The highlighted user "AM00002" is a new addition to the file (and the status-pilot list).
status-pilot-example.yml
Here’s an example YAML file. "AM00002" is a new user who’s been added to the ‘status-pilot’ feature toggle.
Verify the config info being sent to the Node server
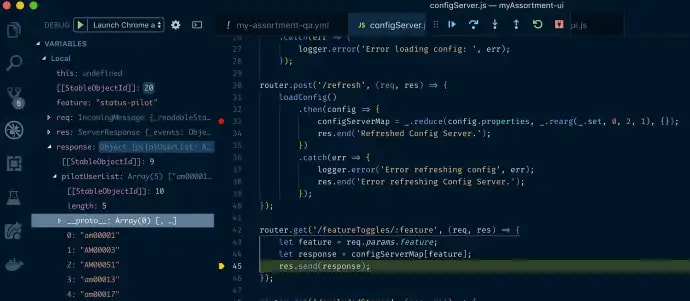
Currently, when I start up the Node server connected to the Spring Cloud server and the React UI client, it pulls in the previously existing list of info from the Spring Cloud config server. Because the Spring server’s not aware the info it is supplying has changed, it continues to supply the previously cached configuration info to the client.
If you look carefully in the screenshot on the right hand side, you can see that user "AM00002" is not present in the pilotUserList. That’s fine, this will be updated soon.
configServer.js
Just confirming who is and is not currently considered as part of the pilotUserList by the UI’s Node server. Notice "AM00002" is not in that list yet...
Hit the Node server’s /refresh endpoint with Postman
Time to tell the Spring server to update the files it’s serving. Open up the Postman REST client and type in the URL of your app’s /refresh endpoint and send a POST request to it.
If the refresh trigger is successful, the following success message will appear as the response from the server side in Postman.
This is what a successful call from Postman looks like to the config server endpoint.
Check that the React UI now sees "AM00002" as a Status Pilot User
Finally, I can verify the changes have taken effect after refreshing the Spring Cloud server’s info via Postman, by putting a breakpoint in the Chrome DevTools on the client’s isStatusPilotUser() function in the configServerService.js.
When the browser pauses on the breakpoint, I can see the usernames contained in the ldapListsupplied to the Node server from the Spring config server. And if you look closely, you can see "am00002" is now there; clear as day.
The refresh to the UI’s feature toggle info worked, and all without having to rebuild or redeploy the JavaScript application. And I’m done, now this user is also part of the status-pilot program in this particular UI feature toggle.
configServerService.js
By using these breakpoints, I can tell the modifications to the status-pilot feature toggle took effect, and now "AM00002" is part of the status-pilot as well.
Conclusion
The update to the existing feature toggle "status-pilot" worked, and all without having to rebuild or redeploy the JavaScript application.
With just a few additions to the Node server using the cloud-config-client and a call to a /refresh REST endpoint, the React UI’s existing feature toggles can be modified and updated in short order.
Check back in a few weeks — I’ll be writing about JavaScript, React, IoT, or something else related to web development.
If you’d like to make sure you never miss an article I write, sign up for my newsletter here: https://paigeniedringhaus.substack.com
Thanks for reading, I hope you can use this implementation to update your own JavaScript application’s feature toggles, and be able to test new features more easily with a subset of your own users.


Top comments (0)