Written by John Nguyen
Effortlessly Deploying CDK Stacks Across Multiple Accounts: A Guide to Maximizing CDK-Pipelines Efficiency
Excellent! You have developed your product using AWS and now you are looking to implement effective CI/CD strategies. You already know about AWS Codepipeline and you have a fair comprehension of AWS Codebuild. Nevertheless, if your infrastructure is constructed using CDK, you might want to explore CDK pipelines as an alternative option.
CDK pipelines integrate with other AWS services, such as AWS CodePipeline and AWS CodeBuild, to enable you to use their functionality within your CDK pipelines. For example, you can use AWS CodePipeline to manage the release process for your application, and AWS CodeBuild to build and test your application.
Overall, CDK pipelines provide an easy way to automate the deployment of your CDK-based applications, helping you to save time and effort, and ensure that your applications are deployed consistently and reliably.
In this blog, I will show you how to use CDK pipelines to create a Codepipeline for deploying CDK Stack into multiple accounts.
Why Have Multiple AWS Accounts?
Using multiple AWS accounts can help you to effectively manage your resources, isolate your environments and business units, and control access to your resources. In addition, it can enhance your security and help you comply with regulatory requirements. It is recommended to use separate accounts for different purposes from the start or gradually migrate your resources from a single account to multiple accounts.
Here are some key reasons to use multiple accounts
- Improved resource management
- Increased security
- Compliance with regulations
The Setup
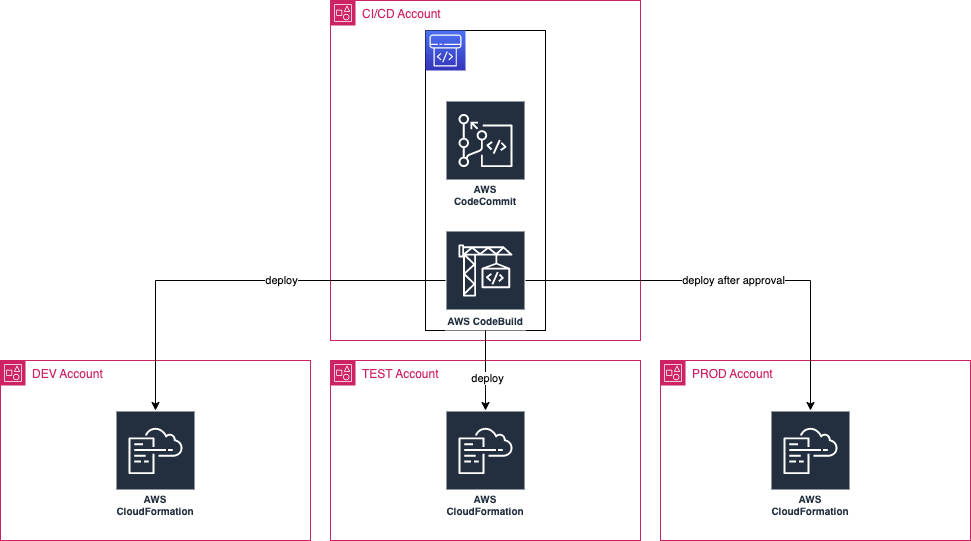
If you're setting up Landing Zones, consider using superwerker. This tool helps set up AWS Control Tower and AWS Organization for account management, and follows best practices. It's also best practice to have separate accounts for Dev, Staging, and Prod for your application, as well as an account for your CI/CD, which may contain your Git repository and AWS ECR for your Docker images.
Assuming you've set up separate accounts, you can develop a CDK stack and push the code to your CI/CD account. From there, any CI/CD pipeline should be triggered. To enable this, use AWS CodePipeline and the CDK library: CDK pipelines.
Below you will find the setup for this blog.
The CDK pipeline Stack
It's important to note the difference between the Codepipeline module and CDK Pipelines. While CDK Pipelines uses CodePipeline for deploying stacks created with CDK, CodePipeline is a more general-purpose tool that allows you to customize your own pipeline as you would when setting up a new CI/CD pipeline.
With CodePipeline, you can define your entire release process for your application, including building, testing and deploying your code. This flexibility allows you to tailor your pipeline to your specific needs, which can be especially useful if you have specific compliance or security requirements.
On the other hand, CDK Pipelines provide a more streamlined approach to deploying CDK-based applications. They automate the deployment process and integrates with other AWS services, such as CodeBuild, to help you build, test, and deploy your applications.
Overall, both CodePipeline and CDK Pipelines provide valuable tools for automating the deployment of your applications. Understanding the differences between them can help you choose the best tool for your specific use case. You can find more information about Codepipeline in the official AWS CDK documentation.
Defining a CDK pipeline
To define a CDK pipeline in our PipelineStack, we will use the CodePipeline construct from aws-cdk-lib/pipelines. While there are more properties available (which can be found in the documentation), this blog post will focus on deploying a simple CDK stack into multiple accounts. The only required property is synth.
The build step that produces the CDK Cloud Assembly.
I must admit that I'm not sure what that means. Plus, simply reading the name IFileSetProducer doesn't provide much context. However, based on the example provided, it appears that the ShellStep is leveraging the functionality of the IFileSetProducer interface. Another option could be to use a CodeBuildStep since the pipeline is using CodeBuild for both installation and building. For the sake of this blog, we'll stick with the ShellStep.
The ShellStep requires an input of type CodePipelineSource, which represents the source of our CodePipeline. The source could be Github, CodeCommit, or S3. In this case, we will use an existing CodeCommit repository.
For the commands, there are default commands yarn install and yarn build. You can add testing or linting commands, or change the package manager as needed. The pipeline uses CodeBuild with all the necessary tools for deploying CDK stacks such as yarn.
One important property for cross-account deployment is crossAccountKeys. It is a Boolean and should be set to true, even if you are not doing cross-account deployment eventually you might plan to do cross-account deployment.
Create KMS keys for the artifact buckets, allowing cross-account deployments.
The stack has a property pipeline which you can then access later.
import { Stack, Fn, StackProps } from 'aws-cdk-lib';
import * as codecommit from 'aws-cdk-lib/aws-codecommit';
import { CodePipeline, CodePipelineSource, ShellStep } from 'aws-cdk-lib/pipelines';
import { Construct } from 'constructs';

export class PipelineStack extends Stack {
  readonly pipeline: CodePipeline;
  constructor(scope: Construct, id: string, props: StackProps) {
    super(scope, id, props);
    // Existing CodeCommit
    const repository = codecommit.Repository.fromRepositoryName(this, 'CodeCommit', 'my-cool-codecommit');
    this.pipeline = new CodePipeline(this, 'CdkPipeline', {
      synth: new ShellStep(`${props.pipelineName}Synth`, {
        input: CodePipelineSource.codeCommit(repository, props.branch),
        commands: props.commands ?? [
          'yarn install',
          'yarn build',
        ],
      }),
            crossAccountKeys: true,
    });
  }
}
Adding a Stage for Deploying Stack
Now we can put our PipelineStack to the main.ts . Since we added a readonly pipeline, we can now add stages to the pipeline.
The method addStage() requires a class that extends from Stage. Here we named it MyApplication and it only has StackProps. Now inside MyApplication , we can add a new Stack, MyStack , in which you define your resources. These can then be deployed to a different account later. The MyApplication requires an env- object to deploy to different stages by giving it an account number and a region.
// In main.ts

import { App, Stage, Stack } from '@aws-cdk/core';
import { PipelineStack } from './pipeline-stack';
import { ManualApprovalStep } from 'aws-cdk-lib/pipelines';

const app = new App();

const cicd = new PipelineStack(app, 'PipelineStack', {
  env: { account: 'MySharedAccount', region: 'us-east-2' },
});

class MyApplication extends Stage {
  constructor(scope, id, props) {
    super(scope, id, props);

    new MyStack(this, 'MyStack');
  }
}

export class MyStack extends Stack {
  constructor(scope, id) {
    super(scope, id);

        /* My resources */
  }
}

cicd.pipeline.addStage(new MyApplication(app, 'DevDeployment', {
  env: {
    account: 'DEV_ACCOUNT',
    region: 'eu-west-1',
  },
}));

cicd.pipeline.addStage(new MyApplication(app, 'TestDeployment', {
  env: {
    account: 'TEST_ACCOUNT',
    region: 'eu-west-1',
  },
}));

cicd.pipeline.addStage(new MyApplication(app, 'TestDeployment', {
  env: {
    account: 'PROD_ACCOUNT',
    region: 'eu-west-1',
  },
}, {
  pre: [
    new ManualApprovalStep('PromoteToProd'),
  ],
}));

app.synth();
Bootstrapping
Let's take a look at what we have achieved up to this point. We have multiple accounts set up and we will deploy the CDK from above in our CI/CD- account. This account will then deploy to our Dev, Test, and Prod - environment.
In order to do that, each development environment needs to trust the CI/CD- account. The following script should be executed once to allow the CI/CD- account to deploy to each development account. Below you find a command how to trust a different account. In this case, you trust the CICD_ACCOUNT from a DEV_ACCOUNT , TEST_ACCOUNT , and PROD_ACCOUNT .
MY_SERVICE_ACCESS_POLICY can be for example AWSCodeDeployFullAccess, AWSEcsFullAccess or a custom policy. You can chain them accordingly with a comma (see below).
# Replace *_ACCOUNT accordingly to your account number
CICD_ACCOUNT="replace-this"
DEV_ACCOUNT="replace-this"
TEST_ACCOUNT="replace-this"
PROD_ACCOUNT="replace-this"
MY_SERVICE_ACCESS_POLICY1="replace-this"
MY_SERVICE_ACCESS_POLICY2="replace-this"

npx cdk bootstrap \
  --profile dev-account-profile \
  --trust CICD_ACCOUNT \
  --cloudformation-execution-policies arn:aws:iam::aws:policy/MY_SERVICE_ACCESS_POLICY1,arn:aws:iam::aws:policy/MY_SERVICE_ACCESS_POLICY2 \
  aws://DEV_ACCOUNT/eu-west-1

npx cdk bootstrap \
  --profile test-account-profile \
  --trust CICD_ACCOUNT \
  --cloudformation-execution-policies arn:aws:iam::aws:policy/MY_SERVICE_ACCESS_POLICY1,arn:aws:iam::aws:policy/MY_SERVICE_ACCESS_POLICY2 \
  aws://TEST_ACCOUNT/eu-west-1

npx cdk bootstrap \
  --profile prod-account-profile \
  --trust CICD_ACCOUNT \
  --cloudformation-execution-policies arn:aws:iam::aws:policy/MY_SERVICE_ACCESS_POLICY,arn:aws:iam::aws:policy/MY_SERVICE_ACCESS_POLICY2 \
  aws://PROD_ACCOUNT/eu-west-1
Deploy Stack
Now, run cdk deploy --profile CICD_ACCOUNT to deploy the PipelineStack in the correct account. It gets triggered whenever a code change happens on CodeCommit.
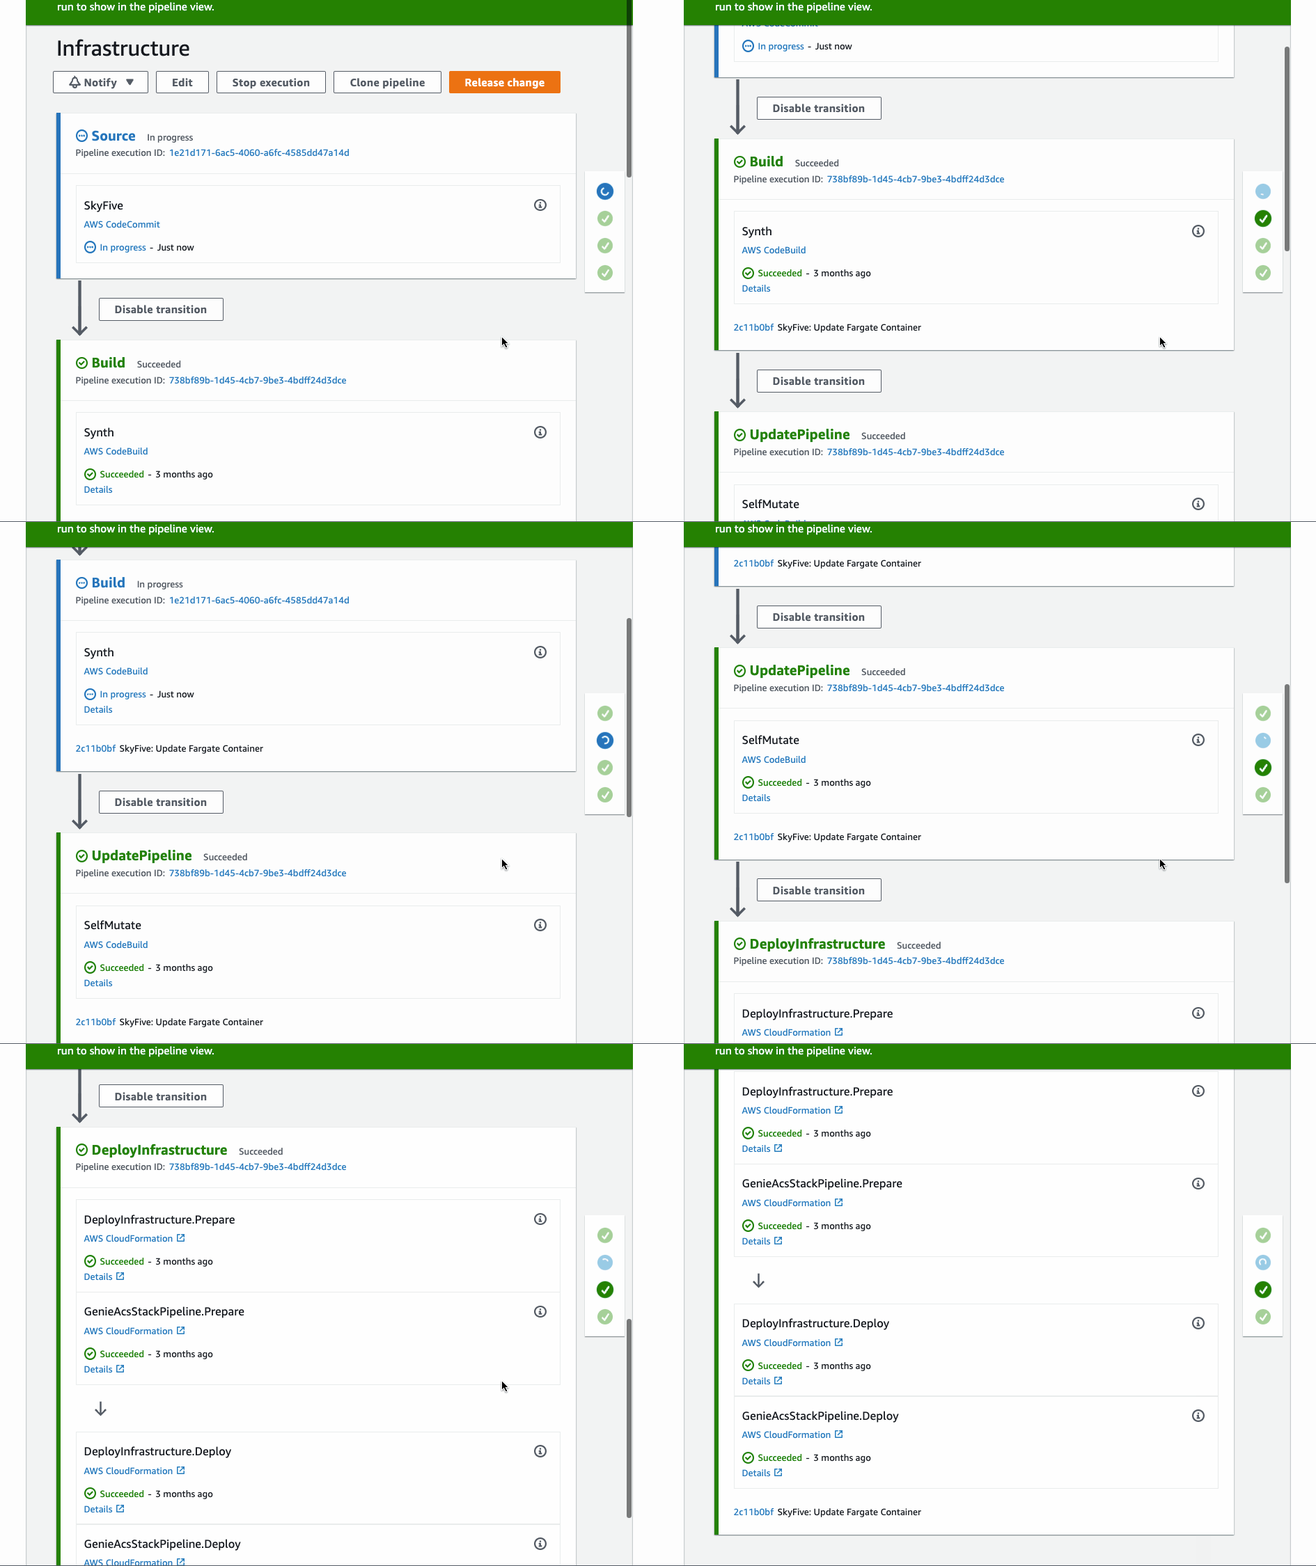
This is the result for deploying to one account. Even though, we defined just one ShellStep, CDK pipeline created all the necessary stages for us.
Conclusion
In this blog post, you have seen how to deploy to several accounts with CDK pipelines in a multi-account setup. The CDK pipelines provide an easy and efficient way to automate the deployment of CDK-based applications.
As always, the setup is always a bit tedious, but once you’ve done all that, you have a good process when deploying CDK stacks to multiple accounts. This will save a lot of time and effort and can help your organization scale its cloud operations. Plus, thanks to CDK, you can build a CDK library and share the construct with your developers.
Thanks for reading and happy coding!


Top comments (0)