Bridging and why?
What is a Bridge? well as the name suggests, its a link between one place and another, in this case, its linking messaging platforms of different kinds, to one messaging platform.
Why do this? theres a few reasons why.
One place, if you bridge your chats, then everyone who messages you will be in one place, you only have to open one app, to get all your messages, you might not want this for everyone everywhere, some accounts you want to keep seperate, but for those chats who you wish where just on one app, its easy, when you get a new phone, or computer, you just have to login to one app, you dont need to download loads of apps.
Storage space and battery life, applications take up storage space, they all have there little jobs running in the background, each waking up your phone, or taking a bit of energy, slowing your phone down, or wasting battery life, and data.
Avoid using dodgy apps, Facebook apps, are known for their obtrusive nature, how they send weird data, if you want to talk to your friends on facebook, but you want control over your data, you can't do it without bridges.
Freedom of movement, many messaging apps limit where you can use them, some apps only work on desktop, others only on phone, some don't work on windows phone, Ubuntu Touch, sailfish, etc, with a matrix bridge, anything that can connect to a matrix client will let you read your messages, you don't have to be on your phone, to message your whatsapp friends, you can message your facebook friends on Plasma mobile.
The Set Up.
I started with creating a Linode server, 1gb of ram with 25 GB of storage, on CentOS7 (CentoOS 8 is not supported by the playbook we are using) depending on how many messages you want to send on the services, you may need a much bigger server, I plan on keeping an eye on how much the server uses, and upgrade it when/if I need to, if I only get a handful of messages through a bridge, that just use standard text then a low end server should be fine.
CentOS7 uses yum, so using yum we will update and restart the server
$ sudo yum update
$ reboot
From there I will be following this readme https://github.com/spantaleev/matrix-docker-ansible-deploy/blob/master/docs/README.md
On centOS 7, or at least the version on Linode, python and cronie are already installed, so we can bypass installing them
I already have a server running ansible, so I can just ssh into that machine.
Then we need to buy a dns, I bought a cheap one from namecheap, this doesn't need to be anything easy to remember, as no one is going to use this except you, it doesn't have to be a .com or anything to recognizable, so I went with the cheapest, using a .xyz
NameCheap to Linode
This is how I set up NameCheap DNS with Linode, however if you're using different services, you may want to read there documentation.
Go to your dashboard, then click manage on the DNS page, go to the NAMESERVERS secotion, and use a Custom DNS, and add the linode server's
ns1.linode.com
ns2.linode.com
ns3.linode.com
ns4.linode.com
ns5.linode.com
Then click the green tick, you may need to be pacient because it can take up to 24 hours to make the Name servers change.
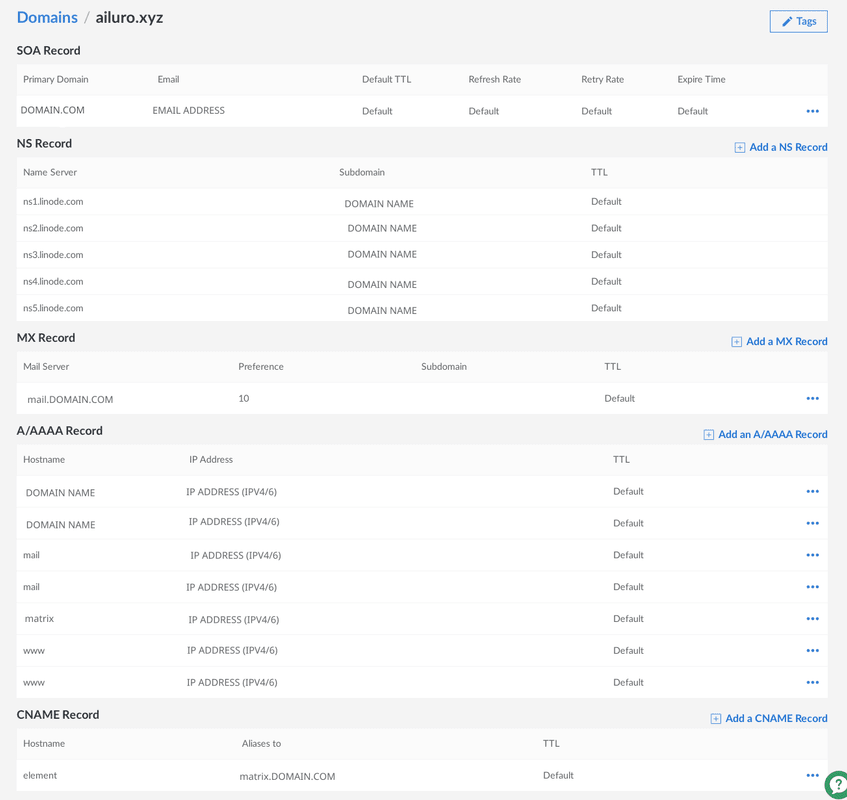
Go to your linode cloud service, then click Domains, and make the Master domain, the Domain is the url you bought, and the SOA Email address is just the accountable, so in short, your email, if you get an error saying that the domain isn't valid, you might just have your finger on the button to quickly.
Now its time to set up your DNS.
| Type | Host | Priority | Weight | Port | Target |
|---|---|---|---|---|---|
| A | matrix | - | - | - | matrix-server-IP |
| CNAME | element | matrix. | |||
| CNAME | dimension (*) | matrix. | |||
| CNAME | jitsi (*) | matrix. | |||
| SRV | _matrix-identity._tcp | 10 | 0 | 443 | matrix. |
The ones marked with >(*) are optional, and since we are only using this as a bridge server, we will not be setting them up.
To add the A type, just click add an A/AAAA Record, make the Hostname matrix, and the matrix-server-IP, is just the IP address of the server.
Do similarly with the CNAME and SRV's.
This is roughly what your set up should look like if you're not using some of the extra features offered in the playbook!
Playbook
Now its time to configure the Ansible and the playbook.
so lets ssh into the Ansible server.
first I had to install git as it didn't git preinstalled
$ sudo yum install git
$ sudo yum install python-dns
$ git clone https://github.com/spantaleev/matrix-docker-ansible-deploy.git
cd into the new folder and set up with some simple commands.
$ cd matrix-docker-ansible-deploy
$ mkdir inventory/host_vars/matrix.
$ cp examples/host-vars.yml inventory/host_vars/matrix./vars.yml
$ nano inventory/host_vars/matrix./vars.yml
in this file you just add your websites URL, your email address and add two secrets.
however, you can also set up some bots quite easily here to get a list of all the options use
$ ls roles
for this set up we're going to use the instagram, facebook and some other services.
So first you'll want to see what the defaults are using
$ less roles//defaults/main.yml
At the start I'm just running them as default as possible, editing them if I need to change a config option, to do that we edit our var file
$ nano inventory/host_vars/matrix./vars.yml
We also need to configure the hosts file, this just points the Ansible playbook, to the server we want to change.
$ cp examples/hosts inventory/hosts
$ nano inventory/hosts
Also to make this a bit easier, it might be a good idea to generate a ssh key so generate a ssh using ssh-keygen,
$ ssh-keygen
$ cat $HOME/.ssh/id_rsa.pub
Then copy that output to your other servers authorized keys
nano .ssh/authorized_keys
once that's done, go back to our ansible server and run
$ ansible-playbook -i inventory/hosts setup.yml --tags=setup-all
Mine still didn't work, so I had to open a few ports.
$ firewall-cmd --zone=public --add-port= --permanent
$ firewall-cmd --reload
After getting kicked out of the facebook room and told that I don't have permission to use my bots, I asked how to fix my issue, turns out in the var.yml you have to tell the service that you have to whitelist servers which aren't your own.
To fix that, I just added the following to the vars.yml
matrix_mautrix_facebook_configuration_extension_yaml: |
bridge:
permissions:
# Keep the default used by the playbook, referencing the current domain
' matrix_mautrix_facebook_homeserver_domain ': user
another-server.com: usermatrix_mx_puppet_instagram_provisioning_whitelist:
- "@.*: matrix_domain|regex_escape "
- "@.*:another-domain.com"
matrix_mx_puppet_discord_provisioning_whitelist:
- "@.domain.com"
This is roughly how it should look depending on how you plan to organzise your vars.yml page, with your personal data in.

then run the following commands to update the matrix server.
$ ansible-playbook -i inventory/hosts setup.yml --tags=setup-all
$ ansible-playbook -i inventory/hosts setup.yml --tags=start
This fixed Instagram and Discord bridging, however Facebook refused to work, for now I've decided to ssh into the server which hosts my matrix bridges directly, this is a bad idea, as its extra leg work, and something that's easy to forget when updating your Ansible config file.
$ nano /matrix/mautrix-facebook/config/config.yaml
scroll down to bridge, in that subgroup, near the bottom, you'll see permissions, this will have your url: user, just change that to be the domain you wish to use, with : user, for example/
permissions
matrix.org: user
This allows anyone with a matrix.org account to message your Facebook bot, and use it as a bridge, if you don't want that you can configure it to be more strict by specifying the user.
when you've configured this, you then go back to your Ansible server and run.
$ ansible-playbook -i inventory/hosts setup.yml --tags=start
However remember that every time that you run ansible-playbook with the tags "setup-all" you'll have to ssh into your matrix server to change the Facebook config file.
Setting up and Logging in.
Now its just a matter of logging in, to login you have to start a chat with the bot, and usually give login details, however sometimes its a bit more complicated.
@_instagrampuppet_bot:DOMAIN.COM
for Instagram, I just plain logged into this one, it even works with 2FA, to login just type
link $USERNAME $PASSWORD
Wait for it to ask you for your 2fa code then just type that, and you're in.
Discord
Before you run the ansible commands, you have to get yourself a discord client ID as well as a Client Secret, but how do you do that?
First go to the developer website then create a new application, create app, then find the create bot button, and click that, "Yes Do it".
Now you'll be on a page that shows you the Client ID, copy and paste that to the vars.yaml in between the quote marks here.
matrix_mx_puppet_discord_client_id: "CLIENT ID"
Next to that will be the client secret, click copy and then paste it to the vars.yml, in between the quote marks here.
matrix_mx_puppet_discord_client_secret: "SECRET ID"
Now use the Ansible commands to setup and start the services.
join the room @_discordpuppet_bot:DOMAIN.COM
Now we can't login by using our username/email, or password, we actually have to use an ID.
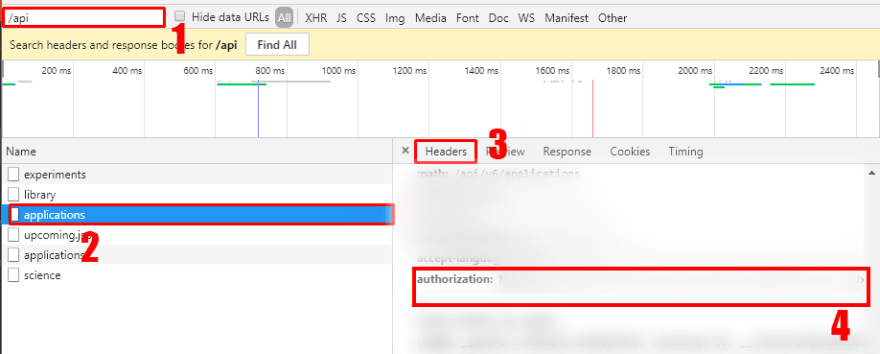
Press CTRL+SHIFT+I in the discordapp, and then click on the network tab on the client, press f5 to reload, so that the page can store the information needed.
In the search box, type /api, and click applications, then in headers, search for the autherzation title, copy the code in there.
Then to login just use
link user AUTHCODE
and you'll be in, though be warned its against the discord terms and services to use the Auth code like this.
Facebook isn't as difficult as discord, however it's not as simple as instagram either.
first start a chat with the facebook bot @facebookbot:DOMAIN.COM
message the bot with
login-cookie
and follow the instructions from there, make sure you use messanger.com, and dont go to facebook.com and open messanger in full screen, if you use facebook.com/messanger then you'll get a failed login!


Top comments (1)
Hello, can you help me to do dns setup in AWS?