User registration is probably one of those things you've done dozens of times if you're an experienced software developer having worked for some time in the industry. The problem is pretty simple; Have the user provide his or her email address, choose a password, click a button, for then to send the user an email to confirm the email address before the user is given any access rights on your site. Still, the complexity of the problem might sometimes be daunting for a junior developer since it implies long transactions, double optin emails, some basic cryptography theory, etc. For instance, how do you make sure only the owner of the email address can verify his or her email address, while at the same time eliminate as much "state" as possible in your backend? This is actually much harder to implement (correctly) than what you might think at first. However, today is your lucky day since all of these things are simply "taken care of" with Magic. More specifically, Magic provides the following HTTP endpoints for you that you can directly consume from Angular, React, Vue, or any other frontend framework for that matter - Resulting in that the problem is arguably reduced down to a pure CSS, HTML, and JavaScript problem, allowing you to completely ignore its backend parts.
- POST - "magic/system/auth/register" - Registers a user in your backend
- POST - "magic/system/auth/verify-email" - Confirms the registered user's email address
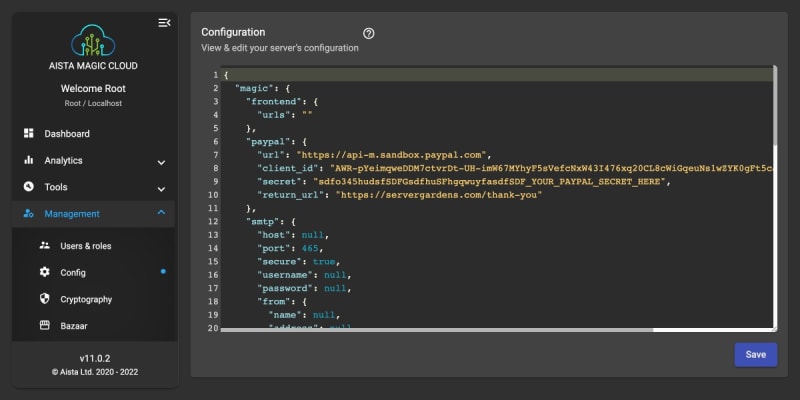
However, before you can truly take advantage of these endpoints, you'll first have to configure an SMTP server that Magic can use to send emails as users are registering. This is done by using the "Config" menu in your Magic dashboard and replace its existing "smtp" parts as follows. The following is an example of how it would look like if you're using GMail as your SMTP server, but you can of course use any SMTP server you have access to, including SendGrid for instance.
    "smtp":{
      "host":"smtp.gmail.com",
      "port":465,
      "secure":true,
      "username":"username@gmail.com",
      "password":"gmail-password",
      "from": {
        "name":"John Doe",
        "address":"john@doe.com"
      }
    }
Below is a screenshot of how this configuration process would look like if you're using Magic's dashboard to edit your configuration settings. You can find the "Config" navbar item as a sub menu item beneath "Management" for the record.
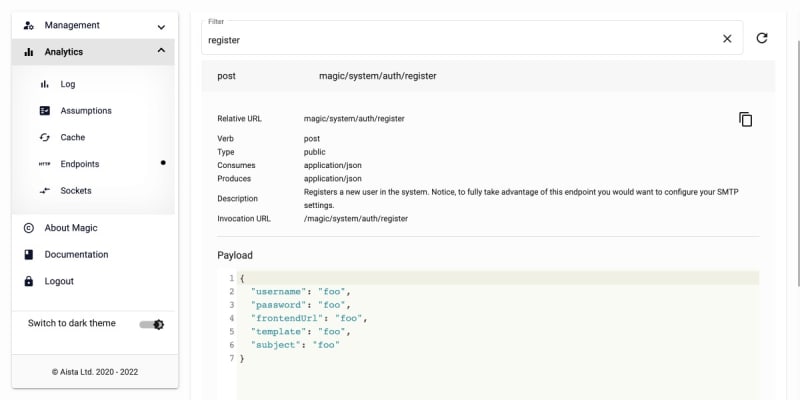
Once you've configured your SMTP server, you can start consuming the above endpoints in Magic. The easiest way to play around with the endpoints to test the flow is to use the "Endpoints" menu item in Magic's dashboard. Below is a screenshot showing how this component allows you to invoke the register endpoint from your dashboard.
Find the "magic/system/auth/register" endpoint, fill in its payload, and click the "Invoke" button to get an email. Below is more details about how to (correctly) fill in the payload to your invocation.
Registering users
The way to correctly implement registrations is to send the user an email as he or she registers. This ensures that the user must confirm he or she actually owns the email address used while registering, and prevents stuff such as maliciously impersonating others, etc - While also creating at least some sort of minimum "accountability" for users in regards to what actions they perform on your site, since you know for a fact that users provided a real email address as they registered and that the user actually owns this email address. Adding tiny amounts of cryptography theory to this makes your problem much simpler. For Magic's purpose this implies using your existing JWT secret, append it to the email address the user supplies, create a cryptographic hash from the combined result, and use this as a "verify ticket" when the email is sent. This makes it impossible for anybody else besides the person who received the email sent by Magic to verify the email address, while also eliminating state in your backend, reducing the amount of data you need to keep track of during the process. Basically, this results in a URL resembling the following sent to the user as he or she registers at your site.
https://your-frontend-url.com?
token=e3b0c44298fc1c149afbf4c8996fb92427ae41e4649b934ca495991b7852b855&
username=john@doe.com&
url=https://your-backend-url.com
The "url" argument can be ignored here, but the important parts is "your-frontend-url.com", "token", and "username". These values are dynamically and automatically created by Magic as you invoke its "register" endpoint with a payload resembling for instance the following.
{
  "username": "john@doe.com",
  "password": "some-password",
  "frontendUrl": "https://your-frontend-url.com",
  "template": "/some/path/to-some-email-template.html",
  "subject": "Subject line of registration email"
}
Notice how the "frontendUrl" JSON field and the "username" field above resembles the query arguments Magic automatically creates for you in its verify email address URL. The "template" argument and the "subject" argument are optional values that allows you to instruct Magic of the subject of the email being sent, and what email template to use as it sends the "verify email address" email. This gives you perfect control over how your register email looks like. However, as you create your emails it is important that you keep the variable arguments for the url parts since this is dynamically substituted by Magic as it sends emails. If you use Hyper IDE in Magic's dashboard, you choose "System files", and you open up the "system/auth/email-templates/register.html" file, you can see the default email template used if you don't provide your own registration template. It's probably smart to start out with this template as you create your own, since it contains the correct semantics, and also ensures correct rendering in most modern email clients. Below is a screenshot of how the default template looks like from Hyper IDE. Notice, you should not edit this template directly, but rather copy it into a new file and put into for instance your "etc" folder somewhere as your own template to ensure it is kept as you update your Magic server.
Double optin
Double optin implies your users have to prove they own the email address used as they registered. Magic's "verify-email" endpoint is what allows you to finish this verification process. This endpoints requires a payload resembling the following.
{
  "username": "john@doe.com",
  "token": "e3b0c44298fc1c149afbf4c8996fb92427ae41e4649b934ca495991b7852b855"
}
The token above is the "token" query parameter Magic sent in its URL. Implying if you can create an Angular or React frontend page that somehow retrieves these query parameters and submits these to your "verify-email" endpoint, Magic will make sure your user becomes associated with the "guest" role, implying the user has confirmed his or her email address. The "token" part above is of course the sha256 hash value created automatically by Magic as it sends the verify email, making it impossible for anybody else besides the owner of the email address to actually confirm the ownership of the email address. The whole process is broken down below to explain what happens.
- The user types his or her email address into your registration form, chooses a password, and clicks submit
- Magic creates a user and adds the user to the "unconfirmed" role before it sends a confirm email
- The user clicks the URL in the email to confirm his or her email address
- Your frontend parses the username and token query parameters and transmits these to the backend
- The backend verifies the token and email exists and is valid, before it adds the user to the "guest" role giving the user access to your site
The only parts left for you to do in the above flow is the following parts.
- Create a frontend page where the user can type his or her email address, choose a password, and click submit to transmit the registration form to the "register" endpoint
- Create a frontend page that parses the "token" and "username" query parameters and transmit these to the backend's "verify-email" endpoint
In a later article we will look at an example of how to implement the above in Angular.
Wrapping up
Assuming you have access to an SMTP server, you understand how to parse query parameters in Angular or React, and you know how to invoke HTTP POST requests from said frameworks, you can now easily create a highly professional and secure "registration form" to allow users to register at your site, without having to write a single line of backend code to achieve it. And as an additional bonus, you've know got a highly secure user database and administration dashboard allowing you to administrate your users as you see fit. Below is a screenshot of the latter.
Magic also contains other helper endpoints, such as "forgot password" endpoints, authenticate endpoints, etc. If you want to read more about these endpoints you can find a more complete list here. In addition Magic takes care of everything related to security, such as hashing your passwords (correctly) using BlowFish and per record based salts, making your users database highly secure and impossible to hack in any ways - Allowing you to exclusively focus on the frontend parts of your problem, having Magic take care of everything related to your backend - And Magic is (ofc) 100% open source and free of charge to use in your own proprietary projects. Below is a link to getting started with Magic if you want to create your own registration forms with it. In a later article we will go through the process of creating our frontend in Angular to allow for registering users, but for now you can download Magic locally and play around with it as you see fit using the link below.


Top comments (0)