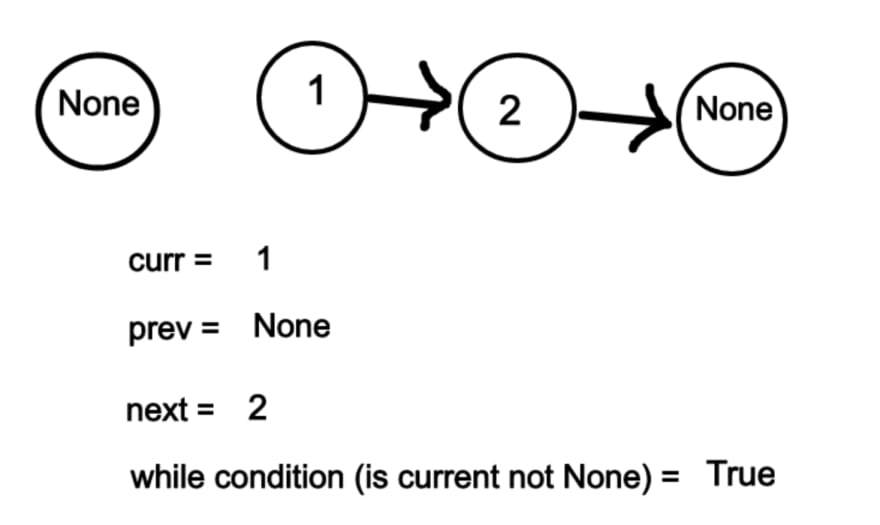
Okay, raise your hand if you have ever been personally victimized by these ridiculously convoluted little data structures.
Okay, maybe that’s a bit dramatic but it sure felt like I was being victimized the first few (or 30) times I had to come up with a solution in an impossible amount of time. Let's add to that the pressure of being watched and judged for the inability to follow one's own logic. If you're like me you may have cried a little... a couple of times.
Nevertheless, in the words of my favorite philosopher, Ron Swanson, “Keep your tears in your eyes, where they belong.”
I have written this article for beginners who have trouble visualizing the solution, turning it into pseudocode, and then coding a working solution.
In it, I will cover what a linked list is, why it’s so confusing, and how to skillfully yet artfully arrange nodes and their pointers to solve one of the most common linked list problems I have seen so far: reversing a linked list.
Let's start by taking a look at the following class definition of a linked list:
# Definition for singly-linked list.

class ListNode:
    def __init__(self, val=0, next=None):
        self.val = val
        self.next = next
So, is it a 'ListNode' or List of Nodes?
To make a linked list, you need something that can hold a value and point to other values. We call these instances list-nodes or just nodes.
The name “linked list” itself is confusing because it is not in fact, a list at all. At least not like a list in Python or an array in JavaScript, which both include indexes and are therefore ordered.
A linked list is a way of storing values and linking them together like a chain. It can be defined as a class with a head and a tail property which correspond to the starting and ending nodes, but this is not always so.
Technically, just one node is a linked list, even if it’s pointed to a None value.
For example, using the class from above, let’s create a linked list:
linked_list = ListNode(1)

print(linked_list)
# this is what it would look like printed to the terminal:
# <class ListNode object>

# to access the data
linked_list.val   # 1
linked_list.next  # None
Drawn out, our linked_list looks like this:
# 1 -> None
Seriously, what is this? A list for ANTS? It needs to be at least... THREE TIMES BIGGER THAN THIS?!
Haha, nope that’s all it takes. You can keep creating nodes and then connect them:
node2 = ListNode(2)
linked_list.next = node2
# or simply:
node2.next = ListNode(3)
Now, if we draw it out, our entire linked_list looks like this:
# 1 -> 2 -> 3 -> None
But linked_list is still just a single node with a val (1), and a next (node2).
A lot of the confusion comes from the fact that there is no list, so getting the value of all the nodes is not as easy as writing a good ol’ for loop. Most times all you get is just a reference to a starting node. As long as you have the starting node, you can still move through all the nodes by traversing.
Traversing a Linked List
For Loops? Where we’re going we don’t need for loops! Given a starting node, to get to the next node, the node after next, and all the other nodes, what you need to do is traverse.
# start with the given node
curr = node

    # while loop that keeps going as long as current never becomes NONE
    while curr is not None:

        # do something with this node's value or pointer
        # this will be where we do the logic to reverse
        print(curr.value)

        curr = curr.next # set the curr pointer to next node
This gem of a while loop is something you will use often in many LL problems, so practice it and know it like the back of your hand!
Reversing A linked List
If you google the algorithm for this you might see something like this:
Initialize three pointers prev as NULL, curr as head and next as NULL.
Iterate through the linked list. In loop, do following.
// Before changing next of current,
// store next node
next = curr->next
// Now change next of current
// This is where actual reversing happens
curr->next = prev
// Move prev and curr one step forward
prev = curr
curr = next
DO NOT make the mistake I did thinking you can solve this a few times and remember it later. You might find yourself in an interview saying: “FIRST, I made some pointers. Then I simply set this pointer to that pointer’s next and prev to current’s next, or was it prev to next’s next.. Shoot I can’t remember...”.
Really the only thing you need to remember is that to reverse a linked list iteratively you need THREE different pointers.
Then, even if you can’t remember how to reverse exactly, you can just figure it out by moving the pointers around. Practice “figuring it out” without looking at the pseudocode as many times as you can. For me, “figuring it out” means visualizing it.
How to Visualize the Solution and Turn it into Code
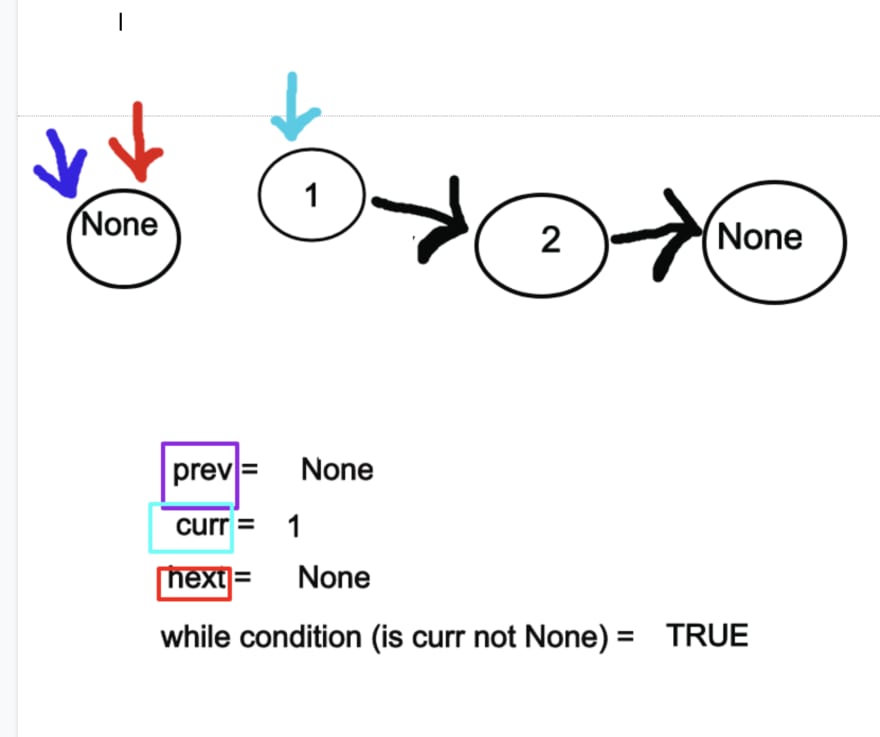
1.) Figure out your starting point i.e if you have 1 > 2 -> None, the starting values will be
prev = None, curr = 1, and next = None
2.) Draw it out, EVERYTHING. Including:
Nodes with their next pointers (I drew them as circles with black arrows)
All None values
PREV, CURR, and NEXT pointers ( I color-coded mine )
prev, curr, and next values at the start of each loop
while condition at the start of each loop
3.) Figure out what the arrows need to point to in order for the list to be reversed. You should only move the arrows and not the nodes. Before you move around arrows, make sure you can write this step as code. For example, in this case, we know that all colored pointers are where they need to be except the next one. If we want the red arrow to point to 2, the logic for that would be ‘next = curr.next’.
Since we are not dealing with lists, we can’t just say next + 1 or next[1] = 20 or anything like that. We can only “move around", or get to nodes, using the pointers we have.
4.) Before moving on to a new loop update the values (the ones at the bottom of figure 2) for prev, curr, and next values to wherever the corresponding arrow is pointing to.
5.) At the start of a new loop, go through the code you wrote for the first loop, making sure the logic still applies and achieves the desired effect.
Check out my video of how I do this.
Really follow each step and then try drawing it out yourself without any help. It helps to have a whiteboard or a pencil because you will need to erase and redraw arrows. This takes practice, patience, and iterations. Before I recorded this video I erased my steps and started over at least 3 or 4 times. Sometimes your logic works in the first loop but then when you keep going you realize the pseudocode won’t work further down the line. That’s okay, just take your time and take a 5 min break if you feel like you're getting nowhere.
You’ll notice at the end there, the starting node of our reversed list is now accessible by the prev pointer variable. This is the value we want to return.
Let’s go ahead and code it out!
The code:
class Solution:
    def reverseList(self, head):
        prev = None
        curr = head
        nxt = None
        while curr is not None:
            nxt = curr.next

            # // This is where actual reversing happens
            curr.next = prev

            prev = curr
            curr = nxt

        return prev
There is one edge case that might break our code and that is if we pass in a None value, or in other words an empty list, as a parameter. Let's fix that with a conditional.
class Solution:
    def reverseList(self, head):
        if head is None:
            return head

        prev = None
        curr = head
        nxt = None

        while curr is not None:
            nxt = curr.next

            # This is where actual reversing happens
            curr.next = prev

            # then we update values to traverse
            prev = curr
            curr = nxt

        return prev
Takeaways
Linked list problems are common interview challenges, they can be very confusing at first, so practice working with linked lists as much as you can.
Do not try to memorize the logic, it may cause confusion, and moreover, it won't always be the same exact challenge. The best thing to do is get comfortable drawing out nodes and making visual aids.
When reversing a list iteratively, you need 3 pointers: PREV, CURR, and NEXT.
If you haven’t watched Mean Girls, you are missing out on an iconic film, and you should watch it! Only after mastering linked list reversals, that is.
I hope you found this article helpful and enjoyed my pop culture movie references! I’m almost all out of clever ways to fit in movie quotes but I’ll leave you with an age-old classic that has absolutely nothing to do with linked lists or Mean Girls. It doesn’t even go here, so it can’t sit with us!
Okay, really, that was the (second to) last one.
Life moves pretty fast. If you don’t stop and look around once in a while, you could miss it.
Ferris Bueller’s Day Off


Top comments (0)