
✨ What are ::before and ::after?
They are pseudo elements in CSS that are used to insert content, as their name says, either before or after the targeted element.
Syntax 👇
 element::before {
   content: /* value */;
 }

 element::after {
   content: /* value */;
 }
The content property specifies the type of content to be displayed within an element or pseudo-element. It accepts a string, image URL or Unicode characters as values.
⚠️ For pseudo-elements, it is important to specify the content property with a valid value otherwise they are not rendered. Values like normal and none also don't display pseudo-elements.
✨ What are pseudo elements?
Pseudo elements are CSS selectors that allows us to select and style specific parts of an HTML element. They behave as if we have added an additional element into the markup that is not a part of the DOM tree.
Let’s take an example and understand it in more detail. Consider the below code.
HTML
I have a <p> tag with a class "quote".
 <p class="quote">
      The mind is not a vessel to be filled, but a fire to be kindled.
 </p>
Now let's add some styling.
CSS
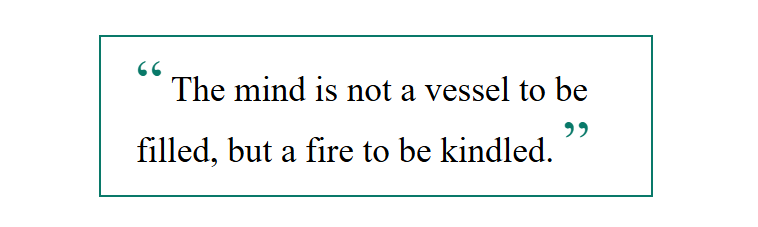
The <p> tag is given some basic style properties. A ::before and an ::after pseudo-element on "quote" class defines a content property with some type of code as its value.
 .quote {
      border: 2px solid #097969;
      padding: 0.5em 1em;
      font-size: 1.75rem;
      line-height: 1.5em;
   }

 .quote::before {
      content: '\201C';
      color: #097969;
      font-size: 3rem;
   }

  .quote::after {
      content: '\201D';
      color: #097969;
      font-size: 3rem;
   }
This sample code adds and styles quotation marks around a paragraph using pseudo elements — ::before and ::after.
\201C and \201D are Unicode characters for opening and closing double quotation marks.
✨ Inspecting ::before and ::after in Chrome Developers Tool
When we inspect our previous example of quotation marks in Chrome Developers Tool, we see the HTML markup like this 👇
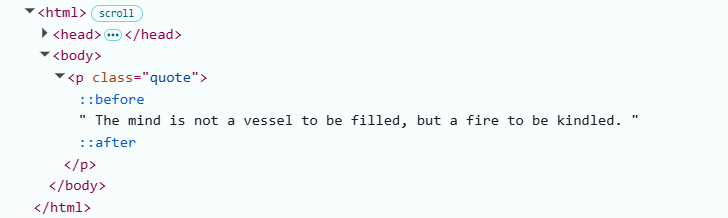
Notice how the ::before and ::after pseudo-elements appear before and after the content of their parent tag - <p> tag in this case.
MDN defines ::before as the first child of the selected element and ::after as the last child of the selected element. Their names might suggest that ::before comes "before" the main element and ::after comes "after" it, but they actually appear within their parent element before and after its content or child elements.
Since pseudo-elements appear within their parent element, they can only be defined for container elements and not for empty elements.
Container Elements are elements which have both an opening and a closing tag like
<div>,<p>,<section>etc.Empty Elements are those elements which only have an opening tag like
<br>,<hr>,<img>etc.
There is still a way that allows us to use ::before and ::after with empty elements. Let's see how 👇
✨ Using ::before and ::after on Empty elements
Prime use case of ::before and ::after is adding hover effects on web page components with minimal HTML markup. Images are a popular choice for it.
Images in HTML are defined by <img> tag which is an empty element.
💭 How do you think we can use ::before or ::after on <img> tag?
We can not directly use pseudo-elements on <img> but we can do a small hack by wrapping the <img> element in a <figure> or <div> parent element and then use the pseudo-elements on parent tag to create beautiful hover effects!
Like we can see in the below example, I have wrapped an <img> tag within a <div> tag to use as a container. ::before pseudo-element is added to the parent <div> tag to create the flip hover effect displaying the image description.
::after pseudo-element is used to animate the image title on hover.
✨ What is attr()?
You might have noticed the content property in previous example of image hover effect uses attr() with a string as value.
  .image-container::after {
        content: attr(data-title);
  }
attr() is a CSS function that allows us to use the value of an attribute from the selected element inside the CSS Stylesheet. We can use data attributes to define additional content for an HTML element and then display them inside ::before or ::after pseudo-elements via attr() function.
   <div data-title="Birdbill Dayflower">
      <!-- child elements -->
   </div>
✨ Important pointers about ::before and ::after
When
::beforeand::afteroverlap each other,::afteris placed on top of::beforein a stack. We can use z-index property to change this stacking order.Since these pseudo-elements are not a part of DOM tree, they are inaccessible by screen readers. It is advised to not add any important content inside them and only use them for cosmetic content, decorations and hover effects.
They are
display: inlineby default. They flow with the text content of their parent element.
✨ Conclusion
Throughout this article, we learnt about pseudo-elements ::before and ::after, how they are displayed within their parent elements and looked at some of their use cases.
That's all for this article. Thank you for reading!! 😊
I hope you found this article helpful! Feel free to comment down your feedbacks!! I would love to read them and improve.
Buy me a coffee to show your support! ☕
For more content around Web Development, follow me on Twitter/X or view my projects on GitHub.


Top comments (11)
Nice work!
Thank you Eleftheria!
Just a thought... I wonder if attr() can see counter-increment() values? If so, it can be used as a pure CSS unique ID system that would be universally helpful.
that's an interesting idea 🤔 need to see if it works
Yet another good read!
Thanks Sumit!
Great explanation!
Thank you @ramk777stack!
It was good to read blog!!
Thanks Charukirti!
Great guide on ::before and ::after!
The examples, like adding quotation marks and hover effects, really clarify their use.
Well-structured and beginner-friendly—thanks for sharing!