
In the ever-evolving world of web development, Next.js has proven to be a game-changer, much like how TypeScript revolutionized JavaScript. One area where Next.js truly shines is in its approach to handling authentication. Managing user credentials, such as usernames, passwords, and email identities, can be a complex and critical aspect of web application development.
In this comprehensive tutorial, we will delve deep into Next-Auth, an open-source authentication library designed to fortify authentication systems, especially for web applications built with the Next.js framework. By the end of this tutorial, you'll have a robust client-side authentication system in place, complete with passwordless login capabilities, thanks to NextAuth.js. We'll also incorporate Shadcn CSS for styling and Toast notifications to enhance the user experience.
Prerequisites:
Before we dive in, make sure you meet the following prerequisites:
A basic understanding of JavaScript and React.
Node.js is installed on your local machine.
- A GitHub account.
- A Gmail account.
Now, let's embark on our journey to supercharge authentication with Next-Auth in Next.js.
What is Next.js?
Next.js is a JavaScript framework that has transformed the process of building modern web applications. It offers a powerful toolkit, including features like server-side rendering, client-side routing, automatic code splitting, static site generation, and serverless API routes. These capabilities simplify web application development, boost performance, and elevate the overall developer experience.
Next-Auth and Its Features:
Next-Auth.js seamlessly integrates with Next.js, making it a formidable choice for handling authentication in web applications. It is designed to work with multiple authentication providers, particularly those using OAuth services. OAuth enables passwordless sign-ins and facilitates integration with various databases.
Getting Started: Setting Up Your Next.js App
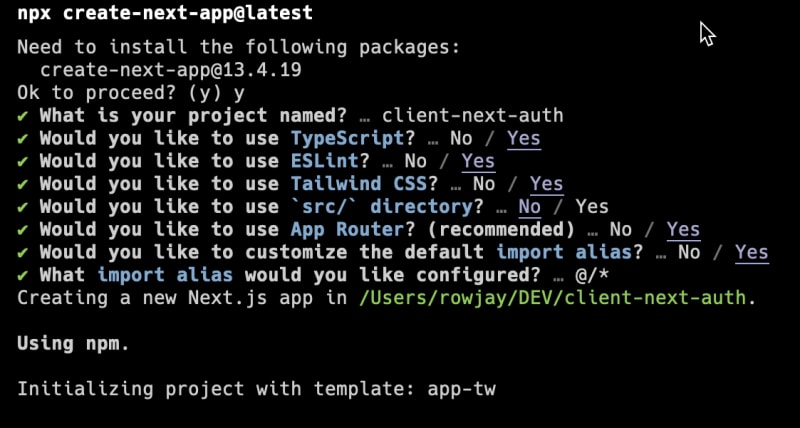
We'll kick things off by creating a Next.js application called "client-next-auth" using the following settings:
npx create-next-app@lates
Next, we'll add the Next-Auth library to our project:
npm install next-auth
# or
yarn add next-auth
Additionally, we'll incorporate Shadcn for styling, toast run npm run dev to spin up our application running on http://localhost:3000
pm install shadcn
# or
yarn add shadcn

To ensure the security of our application, we'll set up environment variables. Create a .env.local file in the root folder of your app and populate it with the following code, replacing placeholders with your provider's secrets:
NEXTAUTH_URL=http://localhost:3000
NEXTAUTH_SECRET=d9Fsl6rZfeoVIzexy47HVy8QJiHcXgvkv3UI84v8FPI=
GITHUB_CLIENT_ID=<GITHUB_CLIENT_ID>
GITHUB_CLIENT_SECRET=<GITHUB_CLIENT_SECRET>
You can generate a secure NEXTAUTH_SECRET by using OpenSSL:
openssl rand -base64 32

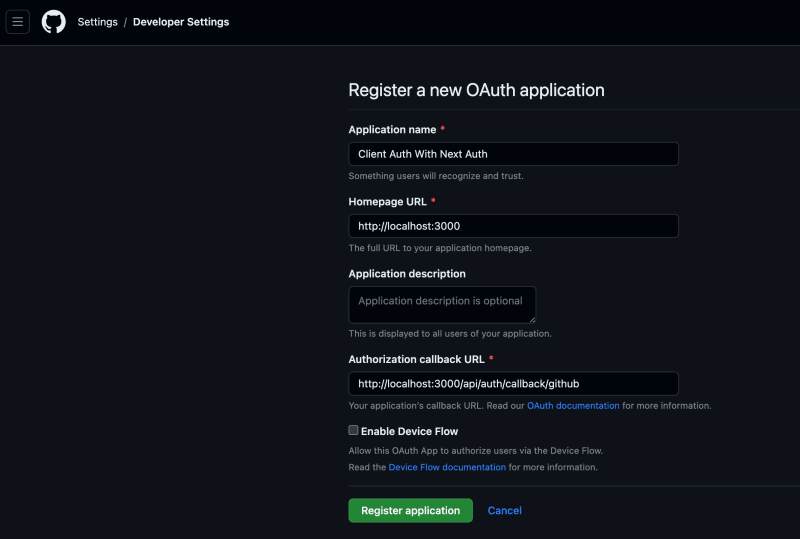
Configuring GitHub OAuth Authentication:
Now, let's configure GitHub OAuth authentication. To obtain OAuth credentials from GitHub:
Navigate to your GitHub account's Developer settings.
Under "OAuth Apps," create a new OAuth App, providing the necessary app details and permissions.
Copy the highlighted Client ID into GITHUB_CLIENT_ID and generate a client secret to place in GITHUB_CLIENT_SECRET.
Creating the Authentication Handler:
Next, we'll create an authentication handler by adding a new file named api/auth/[...nextauth]/route.ts and populating it with the following code:
import NextAuth from "next-auth";
import type { NextAuthOptions } from "next-auth";
import GitHubProvider from "next-auth/providers/github";
export const authOptions: NextAuthOptions = {
  providers: [
    GitHubProvider({
      clientId: process.env.GITHUB_CLIENT_ID ?? "",
      clientSecret: process.env.GITHUB_CLIENT_SECRET ?? "",
    }),
  ],
};
export const handler = NextAuth(authOptions);
export { handler as GET, handler as POST };
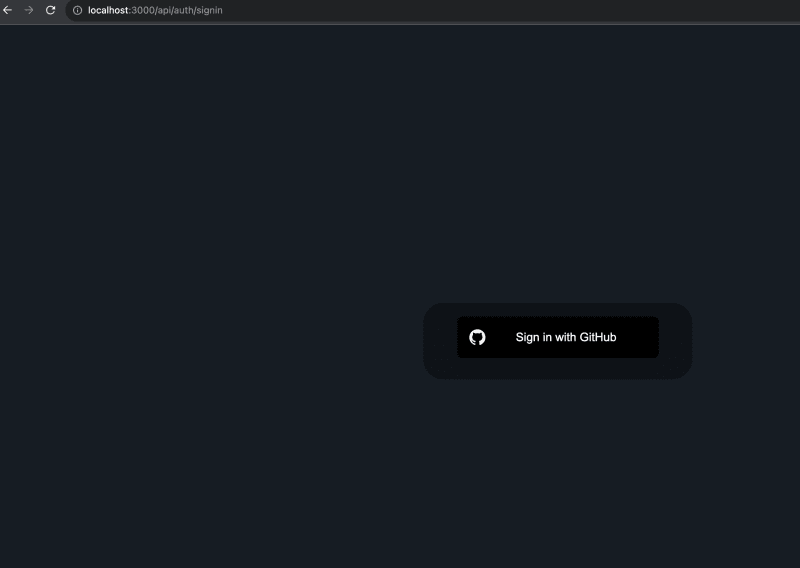
To test our authentication setup, visit http://localhost:3000/api/auth/providers

Let's try signing up at http://localhost:3000/api/auth/signin. Your authentication should be up and running!
Implementing Session Management:
To ensure proper session management, we'll create a SessionProvider.tsx component. This component will handle our session.
"use client";

import { SessionProvider } from "next-auth/react";
export default SessionProvider;
Now, let's make changes to the layout.tsx file. This update will enable us to display the authenticated user's information.
 <html lang="en">
      <body
        className={`bg-gray-100 min-h-screen flex items-center justify-center ${inter.className}`}
      >
        <SessionProvider session={session}>
          <main className="max-w-screen-xl mx-auto p-4">
            <NavRoute />
            {children}
          </main>
          <Toaster />
        </SessionProvider>
      </body>
    </html>
In your page.tsx file, you can use getServerSession to display the authenticated user's information:
import { getServerSession } from "next-auth/next";

export default async function Home() {
  const session = await getServerSession();

  return (
    <div className="flex flex-col justify-center items-center bg-gray-100">
      <div className="mt-8 p-8 bg-white rounded-lg shadow-md text-center">
        <p className="text-xl font-semibold mb-4">
          You are currently signed in as
        </p>
        <div className="text-2xl font-bold text-blue-500">
          {session?.user?.name ? session?.user?.name : "Not signed in"}
        </div>
      </div>
    </div>
  );
}
Creating a Navigation Route Component:
To handle user authentication status and navigation, we'll create a NavRoute.tsx component:
"use client";
import { usePathname } from "next/navigation";
import Link from "next/link";
import { signIn, signOut, useSession } from "next-auth/react";
import { useToast } from "@/components/ui/use-toast";

const activeRoute =
  "block px-4 py-2 text-blue-500 bg-blue-100 hover:bg-blue-200";
const inactiveRoute = "block px-4 py-2 text-gray-500 hover:text-gray-700";

function AuthSession() {
  const { toast } = useToast();
  const { data: session } = useSession();

  const handleSignOut = async () => {
    await signOut();
    toast({
      description: "You have been signed out.",
    });
  };

  const handleSignIn = async () => {
    await signIn();
    toast({
      description: "You have been signed in.",
    });
  };

  return (
    <div className="text-center">
      {session ? (
        <>
          <p className="text-xl font-semibold">
            Signed in as {session?.user?.name}
          </p>
          <button
            className="mt-2 px-4 py-2 bg-blue-500 text-white hover:bg-blue-600 rounded"
            onClick={handleSignOut}
          >
            Sign out
          </button>
        </>
      ) : (
        <>
          <p className="text-xl font-semibold">Not signed in</p>
          <button
            className="mt-2 px-4 py-2 bg-blue-500 text-white hover:bg-blue-600 rounded"
            onClick={handleSignIn}
          >
            Sign in
          </button>
        </>
      )}
    </div>
  );
}

export default function NavRoute() {
  const pathname = usePathname();
  return (
    <div className="bg-gray-100 p-4">
      <AuthSession />
    </div>
  );
}
Creating a Protected Route Component:
To create a protected route, add a page.tsx file in the app folder with the following code:
import { getServerSession } from "next-auth";
import { redirect } from "next/navigation";

export default async function ProtectedPage() {
  const session = await getServerSession();
  if (!session || !session.user) {
    redirect("/api/auth/signin");
  }

  return (
    <div className=" flex items-center justify-center bg-gray-100">
      <div className="bg-white p-8 rounded shadow-md">
        <h1 className="text-3xl font-bold mb-4">Protected Page</h1>
        <p className="text-gray-700 mb-4">This is a protected page.</p>
        <p className="text-gray-700">You can see if you are authenticated.</p>
      </div>
    </div>
  );
}
Updating the Navigation Route Component:
Now, update the NavRoute.tsx component to account for the new protected route:
export default function NavRoute() {
  const pathname = usePathname();
  return (
    <div className="bg-gray-100 p-4">
      <AuthSession />
      <hr className="my-4" />
      <ul>
        <li>
          <Link
            href="/"
            className={pathname === "/" ? activeRoute : inactiveRoute}
          >
            Enter Protected Route
          </Link>
        </li>
        <li>
          <Link
            href="/protected"
            className={pathname === "/protected" ? activeRoute : inactiveRoute}
          >
            Inactive Protected Route
          </Link>
        </li>
      </ul>
    </div>
  );
}
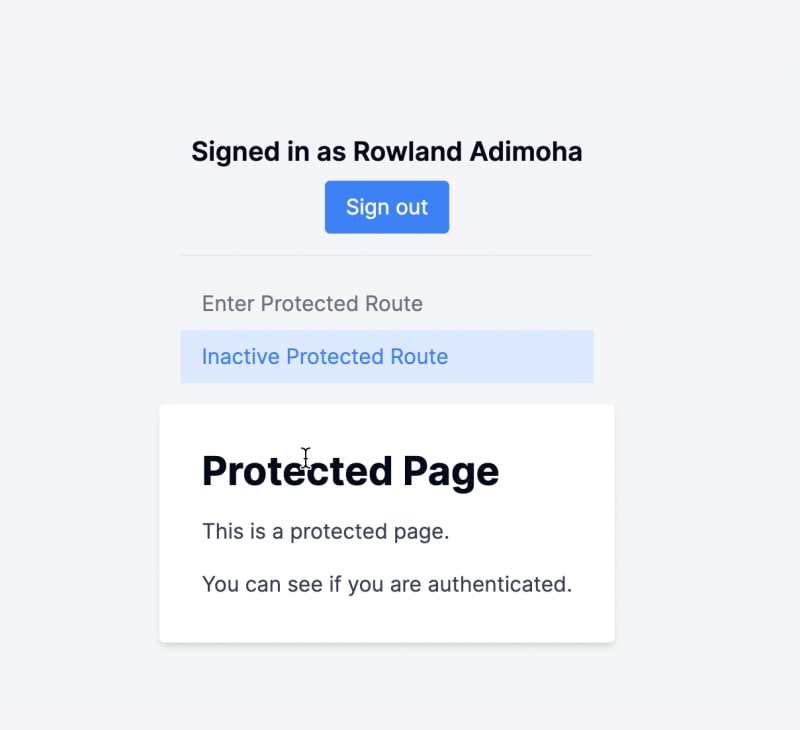
With these changes, we now have a new user-friendly interface that enhances the accessibility of our application, allowing users to seamlessly navigate between various routes on our pages.
Let's take a look at the updated landing page.

This is the access page for authenticated users.
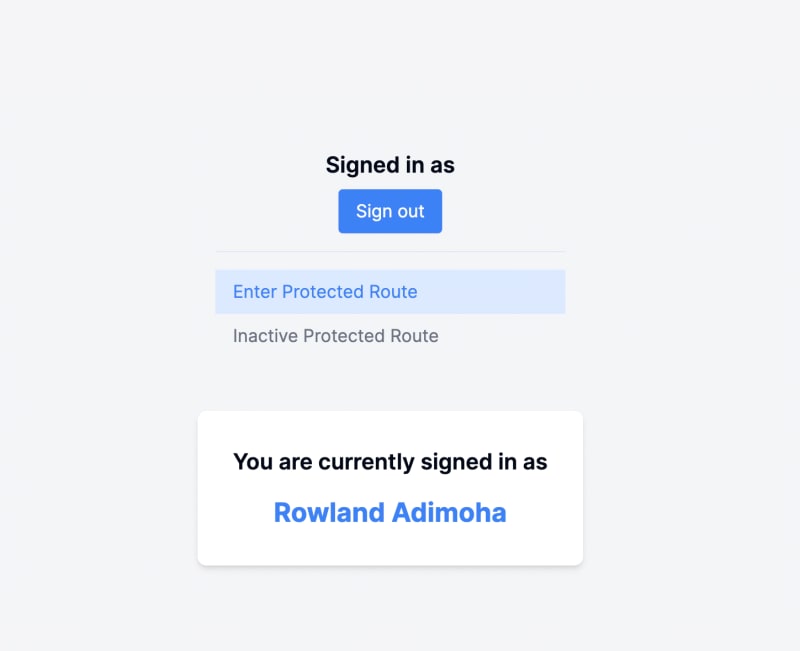
Authenticated users now have access to the newly added protected route.
Conclusion:
With Next-Auth, you've successfully implemented multiple OAuth authentication providers along with protected routes and middleware, ensuring the best security and accessibility for your web application.
Feel free to customize and expand upon this foundation to build robust and secure authentication systems for your Next.js projects.
I'd like to give credit to the following resources that provided valuable insights and assistance throughout this tutorial:
LogRocket Blog - How to Use NextAuth.js for Client-Side Authentication in Next.js
NextAuth.js Official Documentation


Top comments (0)