This is the seventh article in this series on Azure Functions. In this article we will take a look at output bindings.
The general pattern of a function is: receive data from some source, process it in some way and send it to some destination. Bindings are a way for Azure Functions to connect to data sources and destinations. They allow our code to receive data from some source (HTTP request, Storage Queue, etc.) and optionally send data to some destination (Storage Queue, Storage Blob, etc.).
There are two types of bindings:
- input binding - connection to input data source
- output binding - connection to output data destination
Output binding
Let's consider an example. We have an HTTP endpoint and the data posted to this endpoint must be put into a Storage Queue. Here the trigger is HTTP request and output binding is Storage Queue. HTTP is the implicit input binding in this case.
First, let's go to Visual Studio code and start Azurite from the Command Palette.
Then start Azure Storage Explorer and create a new queue called binding-queue.
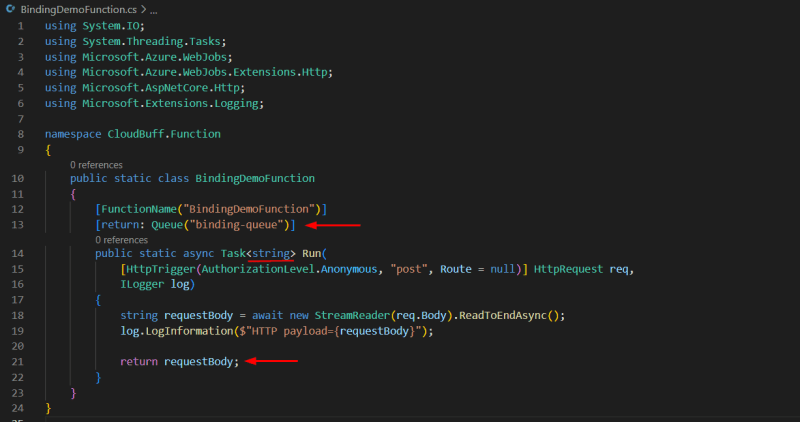
Let's add a new function called BindingDemoFunction as shown below (source code is available on GitHub).
This function is similar to the SimpleHttpFunction we had created in a previous article but there are some important differences.
Under FunctionName declaration, we have line [return: Queue("binding-queue")]. This declares an output binding of type Queue and queue name binding-queue.
Return type for Run method is Task<string> instead of Task<IActionResult>.
And the function returns a string instead of OkObjectResult object.
The method returns an string, the output binding takes the string, creates a message and puts it into binding-queue Storage Queue. Simple and straight forward.
Test the function
Now, let's run the function. We should see the function URL in the logs displayed in VS Code terminal. 
We will use the popular Postman tool to test our function. Create a POST request with http://localhost:7071/api/BindingDemoFunction as URL and a simple JSON as the body. We should get back 200 status when the function runs successfully.
Let's go over to Storage Explorer and verify that the message has been put into the queue. We may have to click the Refresh button for the message to be visible.
Note: We have previously set
AzureWebJobsStorageproperty asUseDevelopmentStorage=trueinlocal.settings.jsonfile. Hence the message is created correctly in the queue.
Conclusion
In this article, we saw how to create an output binding for a Storage Queue and send a message to the queue from our Function. In the next article, we will see how to use Azure Key Vault to protect sensitive information such as connection strings, so our Function does not have direct access to it.


Top comments (0)