What is the Module Registry and Why Do I Care?
The Spacelift module registry provides a private Terraform module registry that is fully compatible with Terraform. The module registry allows you to define reusable Terraform modules and share them with various different audiences. This includes sharing modules with multiple Stacks in your Spacelift account but also includes sharing modules with other accounts.
The module registry is available to all Spacelift accounts regardless of tier, although certain functionality, like the ability to share modules with other Spacelift accounts, is only available on the Enterprise tier.
Using the Registry
Using the module registry involves the following steps:
- Declaring the module source.
- Adding the module to your Spacelift account.
- Deploying a version of that module.
- Consuming that version.
1. Declaring the module source
Creating a module is simple, and if you already have an existing Terraform module, you’re almost ready to go. The only additional steps you need to take are defining a config.yml file that describes the module as well as pointing Spacelift at your module source.
The basic folder structure of a Spacelift module looks like this:
- /
 + - .spacelift/
   |
   + - config.yml
 + - examples/
   |
   + - example-1/
   + - example-2/
 + - main.tf
 + - ...
 + - something-else.tf
As you can see, as well as any Terraform definitions your module requires, there’s also a .spacelift folder. This folder contains a single file: config.yml. This config file defines certain pieces of information about your module, including its version, along with any test cases.
A minimum example of a config.yml file looks like this:
# version defines the version of the config.yml configuration format. Currently the only option is 1.
version: 1

# module_version defines the version of the module to publish.
module_version: 0.0.1
The folder structure above also includes an examples folder. This folder is not required, and also does not need to be called examples. It would typically contain one or more test cases that can double as usage examples for your module.
2. Adding the module to your Spacelift account
There are two main ways to add a module to your Spacelift account: using the UI, or using the Terraform provider. The following steps will show how to add the module via the UI, but if you prefer to manage your account via Terraform, take a look at the spacelift_module resource for more information.
The first step is to navigate to the modules section of the Spacelift UI and click the Add module button:

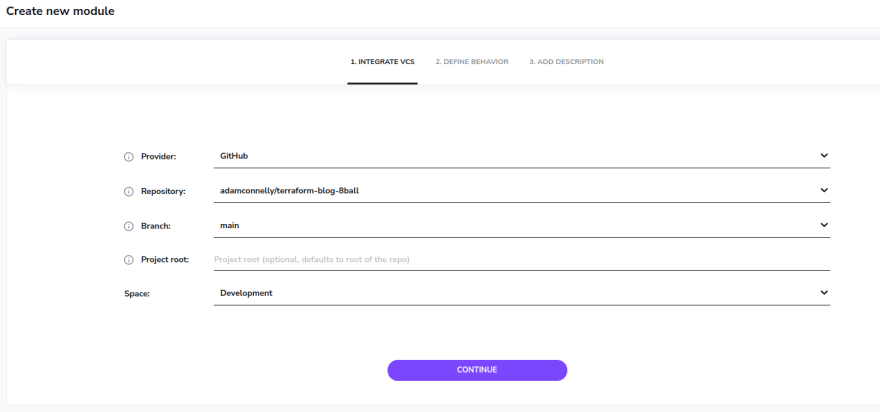
Next, choose the repository containing your module along with your main branch.
For now, we’ll assume that your repo only contains a single module, so the project root can be left empty:
For simple use-cases, you should be able to use the default behavior settings:
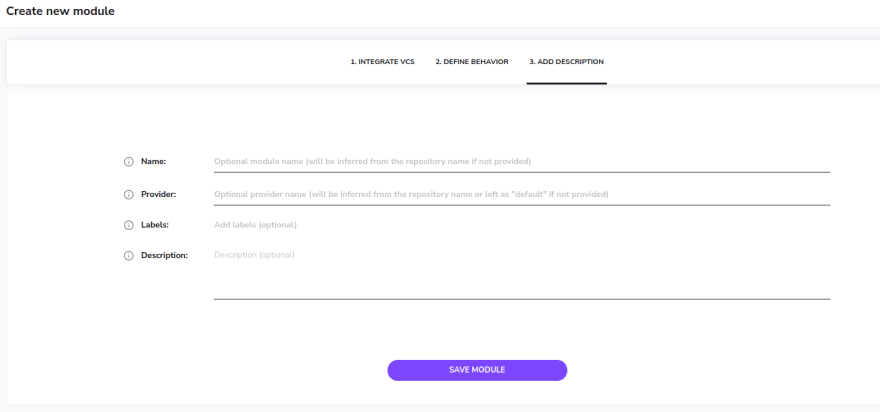
Finally, fill out the description settings:
For simple situations where your repository contains a single module and is named using HashiCorp’s module repository naming scheme of terraform-<PROVIDER>-<NAME>, Spacelift will automatically infer the Name and Provider for you, meaning that you don’t need to enter anything on this screen.
For example, the repository used in the screenshots above was named terraform-blog-8ball, giving it a name of 8ball and a provider of blog.
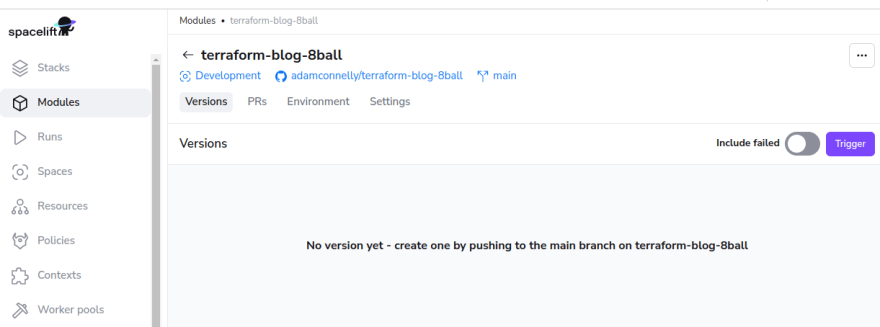
Congratulations – you now have a module:
3. Publishing a version
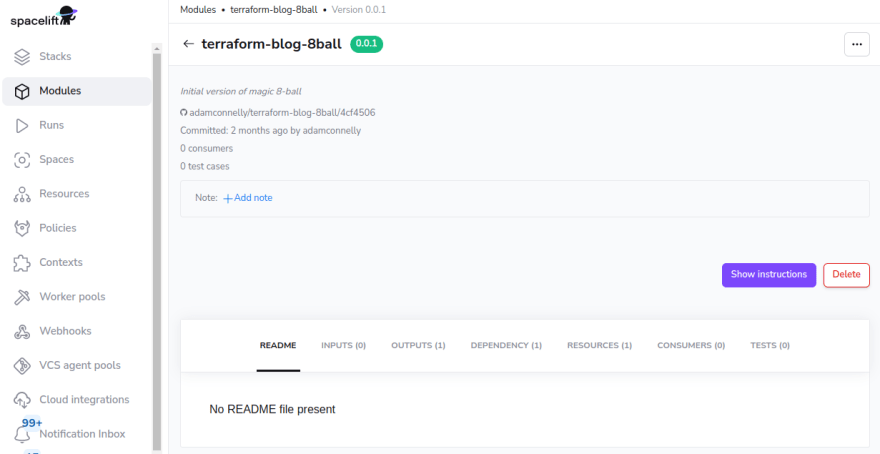
Before you can actually use your module, you need to publish a version. To publish the initial version of your module, click on the Trigger button. Once the version has been published, it should look something like this:
Further versions can be published simply by pushing changes to your Git repository. The only thing to be aware of is that new versions will only be published if you update the module_version in your config.yml file. Another approach to module versioning using git tags is described later in this post.
4. Consuming that version
OK great – we’ve got a version! Now what?
Now that you have a version published, you need to consume that version from a stack. Consuming a Spacelift module is exactly the same as consuming a module from the Terraform registry. The only difference is you need to specify a different source:
module "8ball" {
 source  = "spacelift.io/adamconnelly/8ball/blog"
 version = "0.0.1"
}
In fact, if you click the Show Instructions button in the Spacelift UI, it will give you a usage example:
NOTE: in order to be able to access your module, Terraform needs to be authenticated with the Spacelift module registry. This happens automatically for you when running Terraform inside a Spacelift stack.
If you want to be able to use a module from outside Spacelift, for example, if you want to test a module out locally, there are a few more steps involved. A few approaches are outlined later in this post.
Testing
One of the pieces of functionality that the Spacelift registry provides that isn’t part of the standard Terraform module registry is testing functionality. Each module can contain one or more test cases.
Test cases serve two purposes: they provide you with confidence that any changes you make haven’t broken your module, and they serve as usage examples for any consumers.
Defining a test case
Each test case is like a mini stack that uses your module, making sure that it can be applied and then destroyed correctly. To add a test case, create a Terraform file that references your module:
module "basic_example" {
 source  = "../../"
}
And then reference that test case in your config.yml file:
version: 1
module_version: 0.0.2

tests:
 - name: Basic Example
   project_root: examples/basic-example
Note, when referencing the module, you should use a relative reference (for example source = “../../”) and avoid specifying a version constraint. This ensures that your tests are run against the current version of your module code rather than a previously published version.
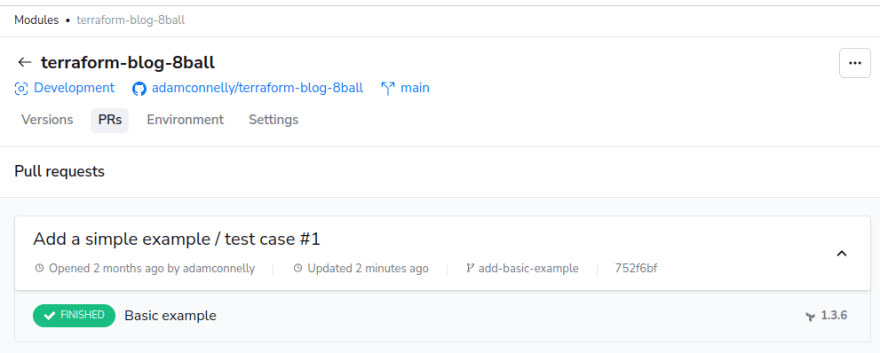
Now that your test case has been defined commit your code, push and create a pull request. After opening your PR, you should be able to see it along with any test cases defined in the PRs tab for your module:
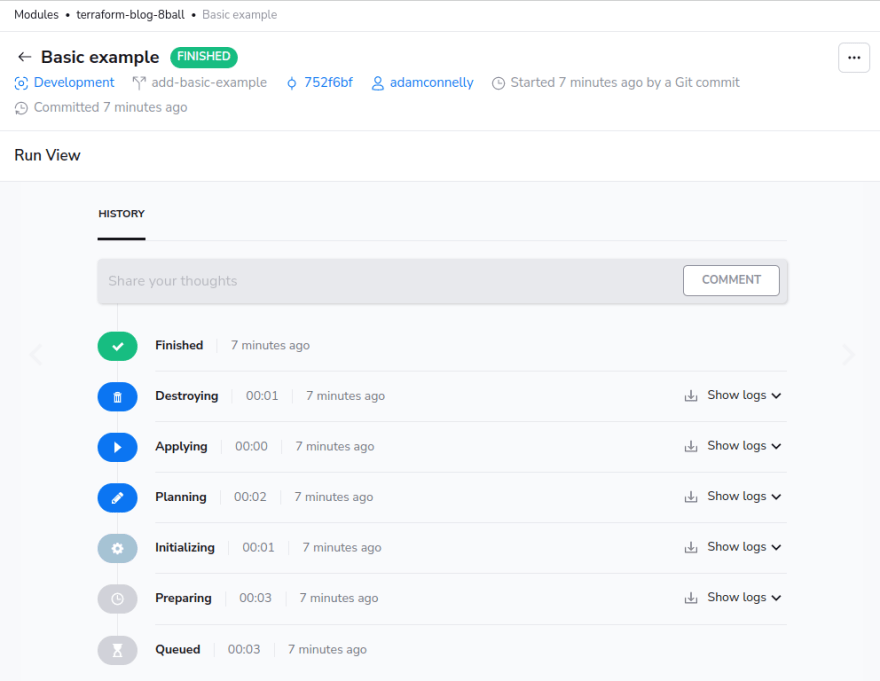
If you click on a test case you can view the Spacelift run, showing the full plan, apply and destroy lifecycle:
Note: test cases will only be triggered if the version number of your module is increased. Please remember to do this, otherwise, your changes will be ignored!
Extending test cases via hooks
Although the module registry gives you the ability to run one or more test cases, it doesn’t provide a particular test framework out of the box. However, you can extend your test cases using Workflow Customization (a.k.a. hooks) to run any additional checks you need.
Let’s pretend that we want to extend the magic 8-ball module to allow a list of custom outcomes to be supplied. The first step would be to add a new variable to our module to support this:
variable "custom_outcomes" {
 type        = list(string)
 default     = null
 description = "A set of custom outcomes that should be used by the 8-ball"
}
At this point we can define our new test case by extending our config.yml file to look like this:
version: 1
module_version: 0.0.3

tests:
 - name: Basic example
   project_root: examples/basic-example

 - name: Custom outcomes
   project_root: examples/custom-outcomes
   environment:
     TF_VAR_custom_outcomes: '["definitely","likely","surely"]'
   after_apply:
     # Get the value of our Terraform output
     - ACTUAL_OUTCOME=$(terraform output -raw outcome)
     # Check it's in our set of custom outcomes
     - echo "definitely likely surely" | grep "$ACTUAL_OUTCOME"
As you can see, a new test case has been defined named Custom outcomes. It defines an environment variable TF_VAR_custom_outcomes to allow us to define the set of outcomes via the config.yml file, and defines some after_apply hooks that run the additional checks.
In this simple example, all we want to do is get the value of a Terraform output (terraform output -raw outcome), and then check whether it exists in our list of expected outcomes (the echo and grep commands). The reason that this works is that an exit code of 0 from our custom hook will allow the test case to pass, whereas a non-zero exit code causes a failure.
Now that our config.yml file has been updated, it’s time to create the Terraform definition for the test case. It should look something like the following:
# Define an input variable that can be supplied via the test case definition
variable "custom_outcomes" {
 type        = list(string)
 description = "A set of custom outcomes that should be used by the 8-ball"
}

# Invoke our module, and pass through the custom_outcomes variable
module "custom_outcomes_example" {
 source          = "../../"
 custom_outcomes = var.custom_outcomes
}

# Define an output to pass the `outcome` output from our module out of our test case's root
# module so that we can assert on it via the `after_apply` hook
output "outcome" {
 value = module.custom_outcomes_example.outcome
}
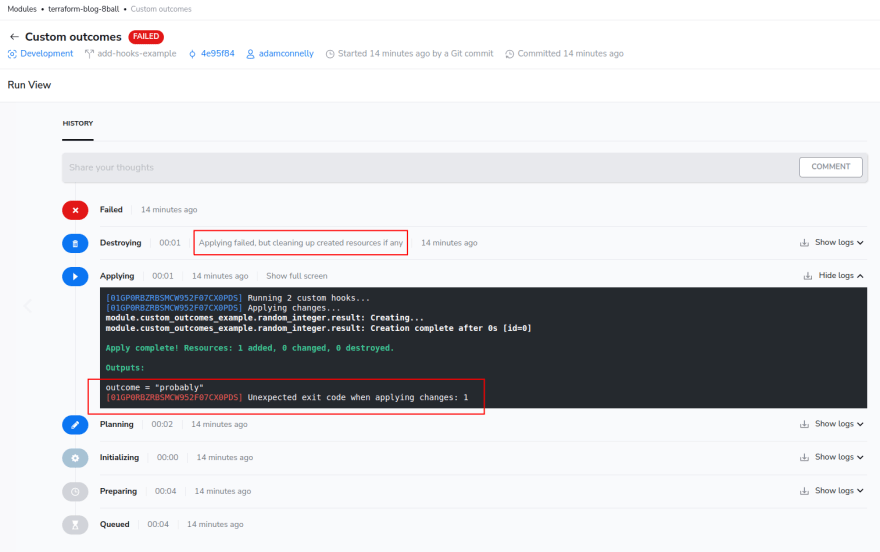
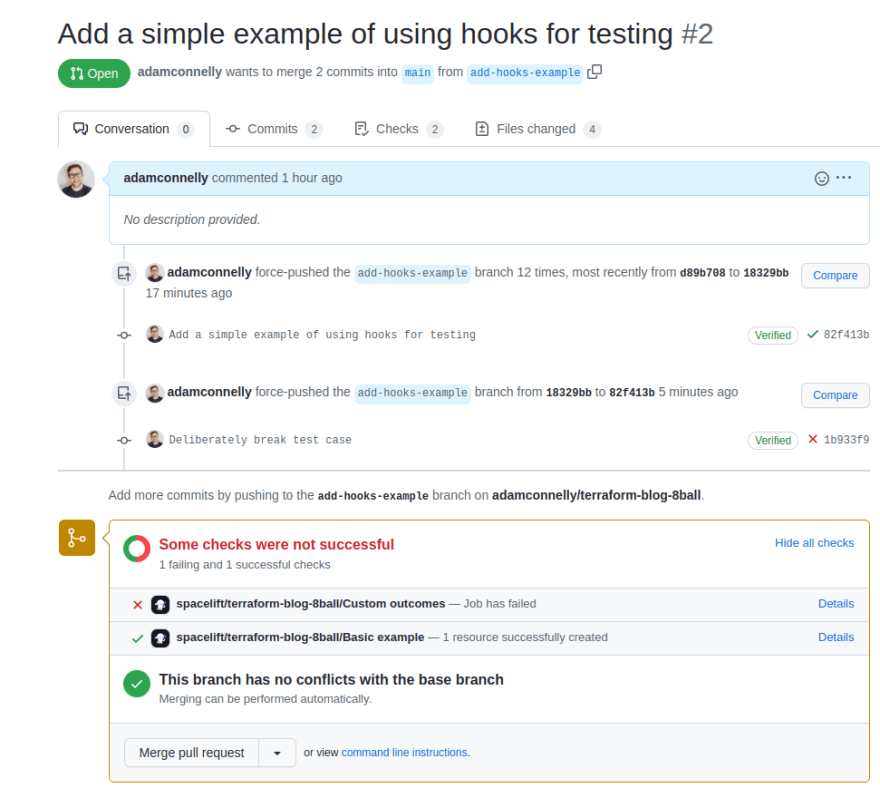
If we try to run this test case now, it should result in a failure since we haven’t actually implemented the changes. You can see that in the following screenshot:
We could then add an implementation like the following to our module to get the test case to pass:
# Allow a set of custom outcomes to be specified
variable "custom_outcomes" {
 type        = list(string)
 default     = null
 description = "A set of custom outcomes that should be used by the 8-ball"
}

locals {
 default_outcomes = ["probably", "maybe", "unlikely", "outcome not looking good", "ask me again"]

 # Use the custom outcomes if they are provided, otherwise use the default outcomes
 outcomes = var.custom_outcomes != null ? var.custom_outcomes : local.default_outcomes
}

resource "random_integer" "result" {
 min = 0
 max = length(local.outcomes) - 1
}

# Output the result
output "outcome" {
 value = local.outcomes[random_integer.result.result]
}
Environment and Cloud Credentials
Spacelift modules support environment variables, context attachments and Cloud credential integrations, just like a stack.
The difference between module and stack environments is that with stacks, the environment is made available to each run, whereas with a module, the environment is made available to each test case that runs.
Cloud Credentials
Since each module test-case goes through a full plan-apply-destroy lifecycle, it’s important to understand that Terraform resources will be created by test case executions even though they will be destroyed as part of the test run. If your module creates resources in a cloud provider, we would recommend that you use a completely separate account dedicated for testing to avoid accidentally impacting other environments.
On a related note, if you have multiple test-cases defined for your module, be aware that they could execute simultaneously, leading to conflicts with resource names. For example, if you created a module that contained the following S3 bucket definition, it could fail if two module tests attempted to create the resource at the same time:
resource "aws_s3_bucket" "conflicting_bucket" {
 bucket = "test-bucket"
}
Instead, it would make more sense to use a bucket_prefix, or to allow the bucket name to be parameterized via a Terraform variable:
resource "aws_s3_bucket" "conflicting_bucket" {
 bucket_prefix = "test-bucket"

 # or:
 # bucket = var.bucket_name
}
Overriding test case environment
The environment for test cases can be overridden on a case-by-case basis via the config.yml file. The config file allows a set of default environment variables to be specified and then allows that environment to be overridden by each test:
version: 1
module_version: 0.0.1

test_defaults:
 environment:
   TF_VAR_bucket: "test-bucket"

tests:
 - name: Test case 1
   project_root: examples/test-case-1

 - name: Test case 2
   project_root: examples/test-case-2
   environment:
     TF_VAR_bucket_name: "test-bucket-2"

 - name: Test case 3
   project_root: examples/test-case-3
   environment:
     TF_VAR_bucket_name: "test-bucket-3"
Please note, Terraform variables don’t automatically propagate through to the underlying module used by each test case. This means that for the example above to work, each test case would need to contain Terraform code similar to the following:
# Declare a variable that will be populated by our test case config
variable "bucket_name" {
 type = string
}

module "test" {
 source = "../../"

 # Reference that variable, and pass it through to our module
 bucket_name = var.bucket_name
}
Integration with VCS Systems
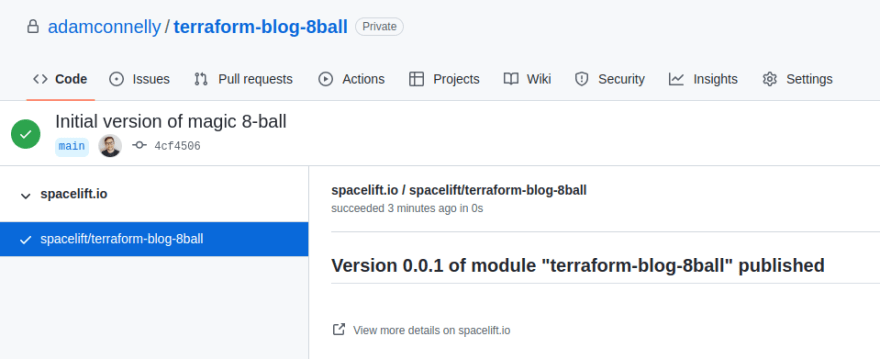
The module registry integrates with your VCS system to provide feedback while working on changes to modules in PRs, and also to connect published versions back to their commits. After publishing a new version, you should see a status against your commit that looks something like this:

Clicking on details shows more information about the version that was published:
If your module has test cases associated with it, and you push a PR, the result of the checks will be displayed:
Storing Multiple Modules in a Single Repo
Spacelift also supports using a single Git repo to store multiple modules. For example, you might have a structure like this:
- /
 + - vpc/
   + - .spacelift/
     |
     + - config.yml
   + - main.tf
 + - eks/
 + - sqs/
 + - s3/
In this example, we’re defining four modules: vpc; eks; sqs; and s3. The contents of the eks, sqs and s3 modules have been omitted for simplicity, but each would also contain a config.yml file along with any required Terraform definitions.
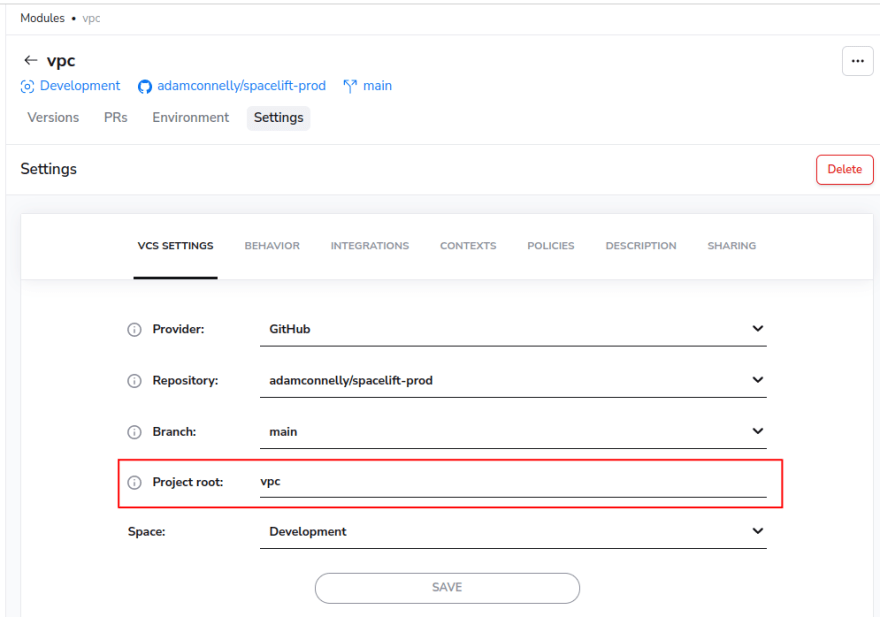
To support this, simply set the project root of each module. Here’s what the vpc module’s settings might look like:
Versioning
Manually via the config.yml file
The simplest way to version your modules is to manually update the module_version property in your config.yml file:
version: 1

# Update module_version before publishing a new version
module_version: 0.0.1
A typical workflow might look like this:
- Make any required changes to your module.
- Edit config.yml and increase module_version as required.
- Create a pull request and make sure any tests pass.
- Once your PR has been approved, merge it to publish the new version.
Automatically via tags
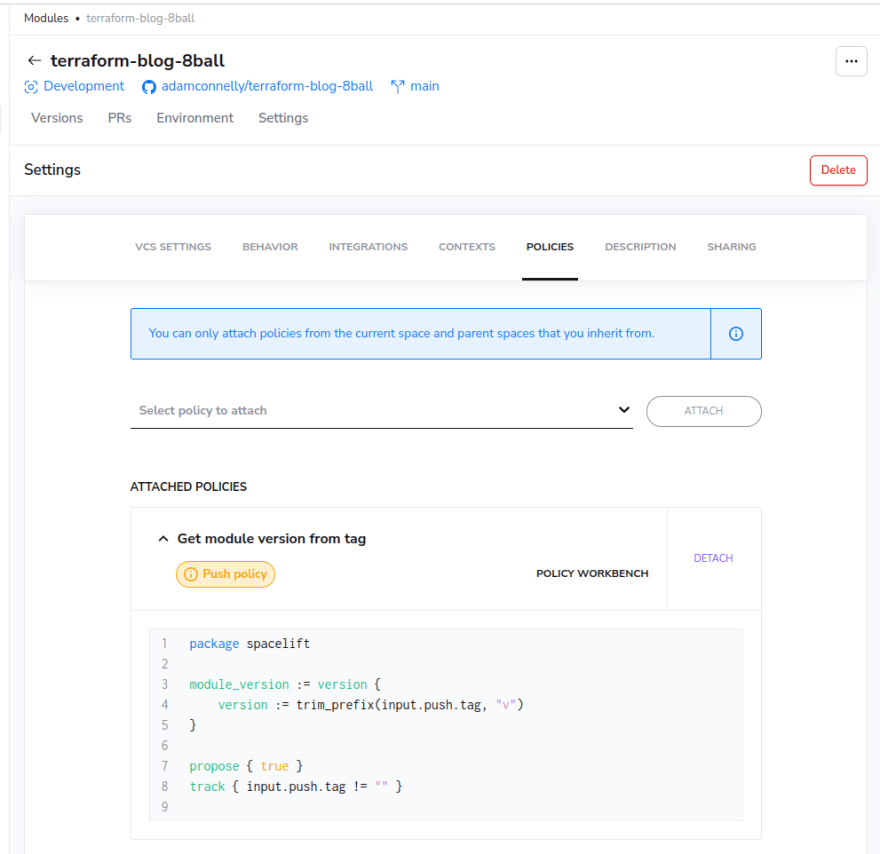
If you don’t want to have to manually edit your config.yml file each time you make a change, another option is to use a tag based approach. To do this, create a new push policy with the following contents:
package spacelift

module_version := version {
   version := trim_prefix(input.push.tag, "v")
}

propose { true }
track { input.push.tag != "" }
This policy tells Spacelift to trigger version publishing whenever a new tag in the format vx.y.z is pushed to your repo and also tells Spacelift to use the tag as the version number. Because Terraform module versions don’t support the v prefix, the policy removes that from the start of the tag.
To enable the policy, attach it to your module:
Now that your policy is in place, pushes to your main branch will not trigger new versions to be published. Instead a new version will be published when a new tag is pushed to your repository.
Automatically Triggering Consumers
Spacelift keeps track of the stacks that consume particular modules. This means that you can automatically trigger any consumers when a new version of the module is published. To do this, you need to do two things:
- Make sure that any Terraform version constraints allow new versions to be used.
- Attach a trigger policy to your module telling it to trigger any consumers.
Version constraints
When referencing a Terraform module, you can specify an optional version constraint. This defines the set of versions that your stack is able to use. For example, if you published version 2.0.0 of a module, but had the following module reference, the new version would not be picked up automatically:
module "version_example" {
 source  = "spacelift.io/adamconnelly/8ball/blog"
 version "~> 1.0.0"
}
Trigger policy
Trigger policies for modules accept the list of consumers of the current latest version of the module as an input to the policy. This allows you to write a simple trigger policy like the following to automatically re-trigger any consumers:
package spacelift

trigger[stack.id] {
 stack := input.stacks[_]
}
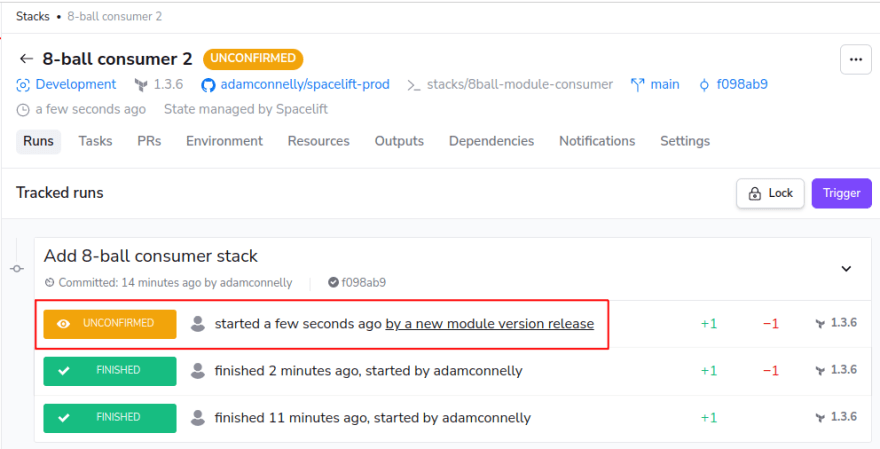
Once you have attached this trigger policy to your module and released a new version of the module, you should see runs triggered on any stacks that are currently using the latest version of the module. It should look something like this:
NOTE: Please be aware that the list of stacks provided to the trigger policy only includes those that are using the _latest _ version of the module at the time that the new version is triggered. This means that if the latest version of a module was 0.0.5, but a stack is currently only using version 0.0.4 of your module, it will not automatically be included in the list of consumers. To fix this, you will need to manually trigger your stack once to make sure it’s using the latest version.
For more information, see our trigger policy documentation.
Sharing Modules with Other Accounts
Spacelift modules can optionally be used by other Spacelift accounts than the one the module is defined in. This can be useful, for example, if you have multiple Spacelift accounts or if you have clients who also use Spacelift who use your custom Terraform modules.
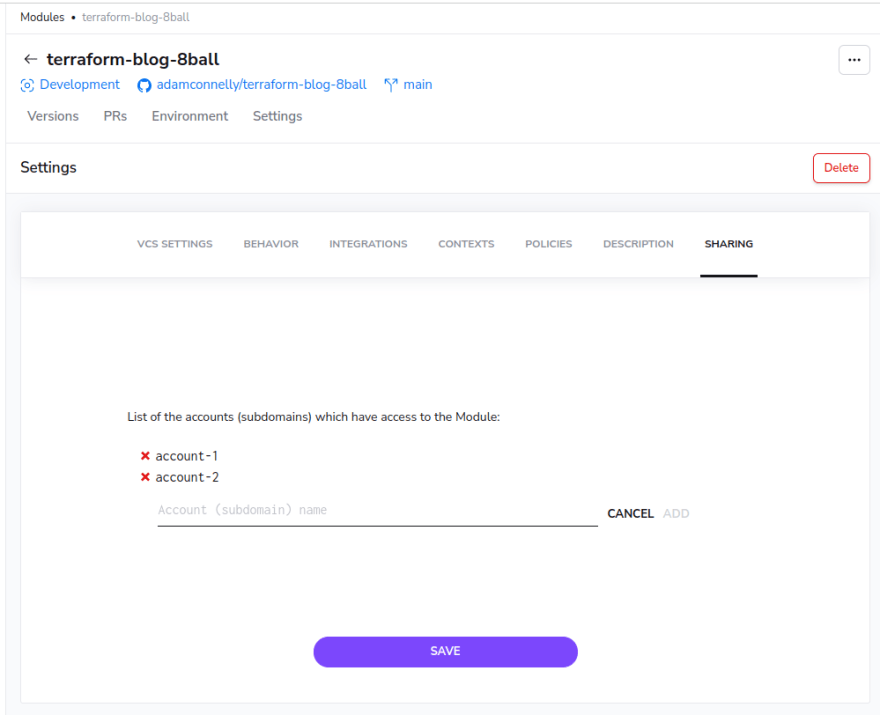
The list of accounts that can access a module can be configured via the sharing section of the module settings:
For more information, see our documentation. Also, please note that module sharing is only available to customers on the Enterprise tier.
Using Modules Outside of Spacelift
Using modules locally
If you want to use Spacelift modules while running Terraform locally, you need to tell Terraform how to authenticate with the Spacelift registry. The easiest way to do this is via the terraform login command. To do this, run the following command and then follow the instructions to login to your Spacelift account via your web browser:
terraform login spacelift.io
Once authentication has completed successfully, you should see a message similar to the following in your console:

Now that you are authenticated, you can add a reference to a Spacelift module and run terraform commands locally as normal.
Using modules in an automated environment
If you need to use a module in an automated environment outside of Spacelift, the best bet is to use an API key. Please see our documentation for more information on generating and using API keys.
Wrapping Up
For more information about the Spacelift module registry, please see the documentation available at docs.spacelift.io.
💡 You might also like:





Top comments (0)