Introduction
In today's fast-paced digital world, finding exactly what you need online should be quick and painless. Imagine entering a vast library where every book, article, and note is meticulously organized and just a whisper away. That's the kind of seamless experience advanced search brings to web applications. In this tutorial, we're diving into the magic of enhancing your e-commerce platform with top-notch search capabilities. We'll explore how to combine Strapi, Next.js, and Algolia Search to add and implement advanced search functionalities.
Prerequisites
Before we begin, make sure you have the following installed on your machine:
The code for this tutorial is available on my GitHub repository. The Strapi backend is on the main branch, while the frontend is on the frontend branch. Feel free to clone it to follow along.
Setting up Strapi Project
Once you've met the above requirements, let's get started by creating a new Strapi application with the command below:
npx create-strapi-app@latest my-project
The above command will prompt you to choose your installation type. For the demonstrations in this tutorial, we'll use the Quickstart (recommended) type and hit the enter key to continue. Then Strapi will start the project scaffolding process.
Once the project is successfully created, run the command below to move into the project folder and spin up the development server:
cd my-project && npm run develop
The above command will start the server and open it on your browser.
Setting up Next.js Project
Now that we have successfully setup our Strapi backend, let's proceed to set the Next.js frontend by running the command below:
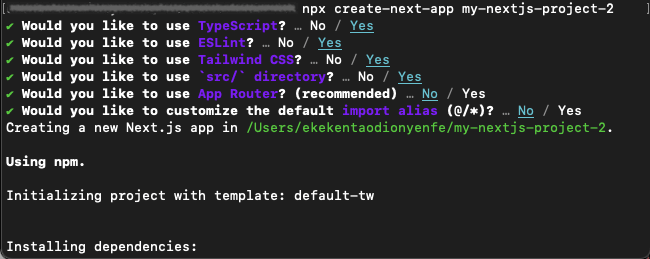
npx create-next-app my-nextjs-project
The command will take you through some prompts. For the demonstrations in this tutorial, your selections should be the same as in the screenshot below:
Then wait for the scaffolding process to complete, change the directory into the project folder, and run the development server with the command:
cd my-nextjs-project && npm run dev
Integrating Algolia with Strapi
Next, let's integrate Algolia with our Strapi backend to enable the search functionality.
Setting up an Algolia account and obtaining API keys
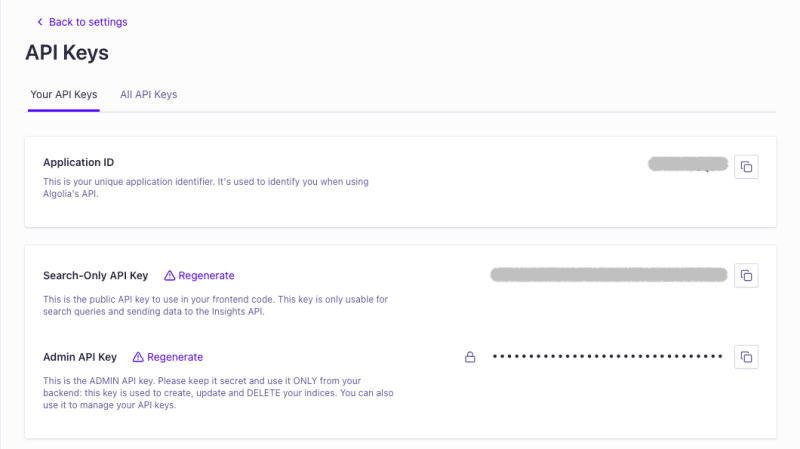
First, click the link on the link to set up an Algolia account. You can sign up with Google, GitHub, or Email.

Then navigate to Settings > API Keys, copy the Application ID and Admin API Key to your Strapi .env file:
// ...
ALGOLIA_PROVIDER_APPLICATION_ID=G9Z6UEUE
ALGOLIA_PROVIDER_ADMIN_API_KEY=043d7•••••••••••••••••••••••8332
Next, install the @mattie-bundle/strapi-plugin-search and @mattie-bundle/strapi-provider-search-algolia packages.
npm install @mattie-bundle/strapi-plugin-search @mattie-bundle/strapi-provider-search-algolia
The @mattie-bundle/strapi-plugin-search package installs the Strapi plugin to enable search functionality, while the @mattie-bundle/strapi-provider-search-algolia package installs the provider specifically using Algolia as the search engine. It integrates Strapi with Algolia's search capabilities, allowing users to leverage Algolia's powerful search features.
Create Collection Type
Now back to our Strapi admin, let's create some products and save and publish to index this entry into your Algolia index. Navigate to Content-Type Builder > + Create new collection type and create a Product collection.
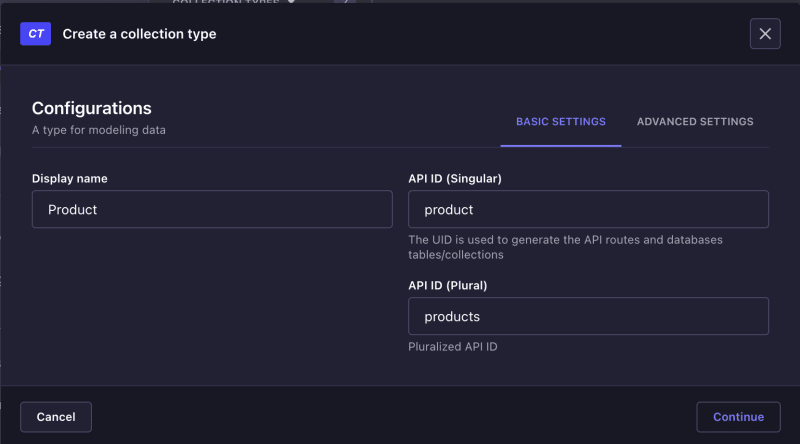
The Product collection should have the name (Text), image(single media), price(float number), and description (Text) fields.
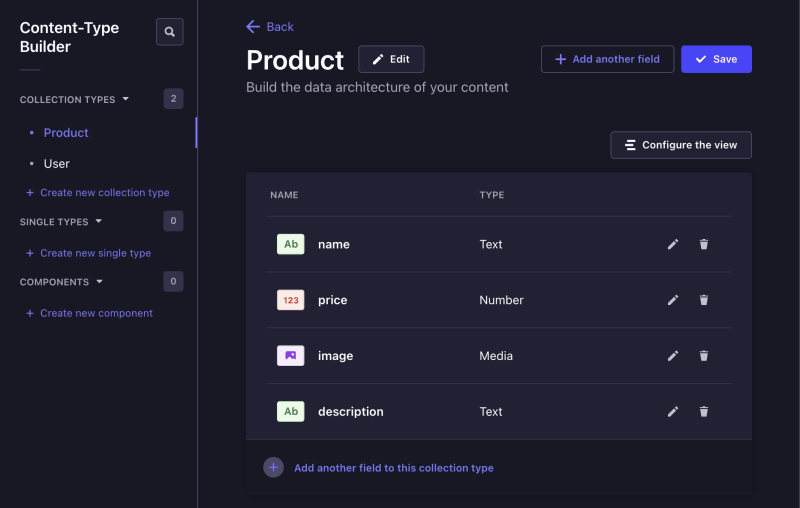
Next, Navigate to Content Manager > COLLECTION TYPES > Products, click on + Create new Entry button, and enter your product details. When you add a new entry or make changes to your Product collection, it will be automatically indexed in Algolia.
Configuring Algolia in the Strapi project to index content.
Now let's update our Strapi plugin to configure Algolia. Update the my-project/config/plugin.js file with the code snippet below:
module.exports = ({ env }) => ({
  search: {
    enabled: true,
    config: {
      provider: "algolia",
      providerOptions: {
        apiKey: env('ALGOLIA_API_KEY'),
        applicationId: env('ALGOLIA_APPLICATION_ID')
      },
      contentTypes: [{ name: "api::product.product", index: "strapi-store" }],
    },
  },
});
The code snippet configures the search functionality for our project, enabling it to use Algolia as the search provider. It sets up Algolia by specifying an API key and application ID. The configuration also details which content types are searchable, in this case, products (which we will create shortly), and assigns them to an Algolia index named "strapi-store".
Building the Search Interface in Next.js
Now that we've created our collection and added some entries, let's build the Search interface in our Next.js front to show the products and perform search operations.
Installing Algolia search client in the Next.js project.
First, install the Algolia search client with the command below:
npm install algoliasearch react-instantsearch-dom
The algoliasearch package is a JavaScript client library for the Algolia search engine, providing methods to interact with the Algolia search API such as indexing, searching, and managing data. On the other hand, the react-instantsearch-dom package is a React component library for constructing search interfaces powered by Algolia. It provides pre-built components that can be seamlessly integrated into React applications to create dynamic search experiences with features like faceting, filtering, and pagination.
Creating search components to display results.
Then create a components folder inside the my-nextjs-project/src directory. In the components folder, create a new file named Search.tsx and import and initialize the Algolia client with the code snippet below:
import algoliasearch from "algoliasearch/lite";

const searchClient = algoliasearch(
  process.env.NEXT_PUBLIC_ALGOLIA_APPLICATION_ID || '',
  process.env.NEXT_PUBLIC_ALGOLIA_API_KEY || ''
);
Go back to your Algolia Account Settings > API Keys, copy the Application ID and Search-Only API Key (Using the admin key could lead to a security issues) to your Next.js. Create a .env.local file (if it does not exists already) in the root directory of your project and add the Algolia credentials:
NEXT_PUBLIC_ALGOLIA_APPLICATION_ID=''
NEXT_PUBLIC_ALGOLIA_API_KEY=''
Syncing Strapi Content with Algolia:
Now, to keep the content in our Strapi collection in Sync with Algolia, ensuring we have a user-friendly search experience, we'll be getting the data directly from our Algolia index. We'll do that in the components/Search.tsx file with the code snippet below:
import { InstantSearch } from "react-instantsearch-dom";
import { connectSearchBox } from "react-instantsearch-dom";
import { connectHits } from "react-instantsearch-dom";
import algoliasearch from "algoliasearch/lite";
const searchClient = algoliasearch(
process.env.NEXT_PUBLIC_ALGOLIA_APPLICATION_ID,
process.env.NEXT_PUBLIC_ALGOLIA_API_KEY
);
const CustomSearchBox = ({ currentRefinement, refine }: any) => (
<input
type="text"
placeholder="Search products..."
value={currentRefinement}
onChange={(e) => refine(e.target.value)}
className="w-full p-4 text-gray-700 bg-white border border-gray-300 rounded-md focus:outline-none focus:ring-2 focus:ring-indigo-500"
/>
);
const SearchInput = connectSearchBox(CustomSearchBox);
const Search = () => {
const ProductCard = ({ product }: any) => (
<div className="border rounded-lg overflow-hidden shadow-lg hover:shadow-xl transition-shadow duration-300 ease-in-out">
<img
src={`http://localhost:1337` + product.image.url}
alt={product.name}
className="w-full h-64 object-cover"
/>
<div className="p-5">
<h2 className="text-2xl font-semibold mb-2">{product.name}</h2>
<p className="text-gray-700 mb-4">{product.description}</p>
<div className="font-bold text-xl">Price: ${product.price}</div>
</div>
</div>
);
const CustomHits = connectHits(({ hits }) => (
<div className="grid grid-cols-1 sm:grid-cols-2 lg:grid-cols-3 gap-6">
{hits.map((hit) => (
<ProductCard key={hit.objectID} product={hit} />
))}
</div>
));
return (
<div className="max-w-4xl mx-auto px-4 py-8">
<InstantSearch
searchClient={searchClient}
indexName="development_strapi-store"
>
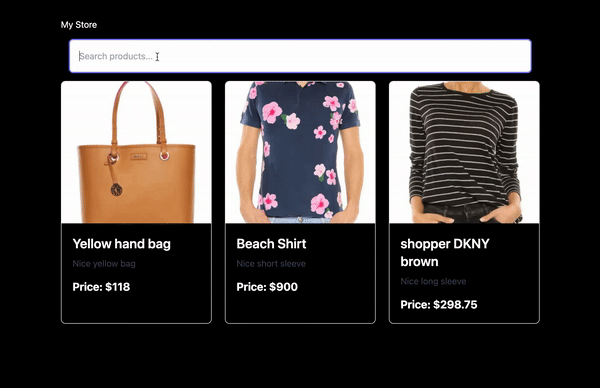
<h4 className="">My Store</h4>
<div className="p-4">
<SearchInput />
</div>
<CustomHits />
</InstantSearch>
</div>
);
};
export default Search;
In the above code snippet, we imported InstantSearch, connectSearchBox, and connectHits. We used InstantSearch to configure the Algolia search client and specify our index name.
When you specify an index name in the Strapi Algolia plugin configuration, the environment in which the app is currently running is automatically appended to the name. That is why the index name is now
development_strapi-store.
Then we use connectSearchBox to create a custom search input since the default input field is not styled, and we use connectHits to create CustomHits*, which allows us to configure how the products are rendered.
Next, update the code in your my-nextjs-project/src/index.tsx file to import the Search component:
import Search from "@/components/Search";

export default function Home() {
  return (
    <Search/>
  );
}
Implementing search features like faceting, filtering, and sorting
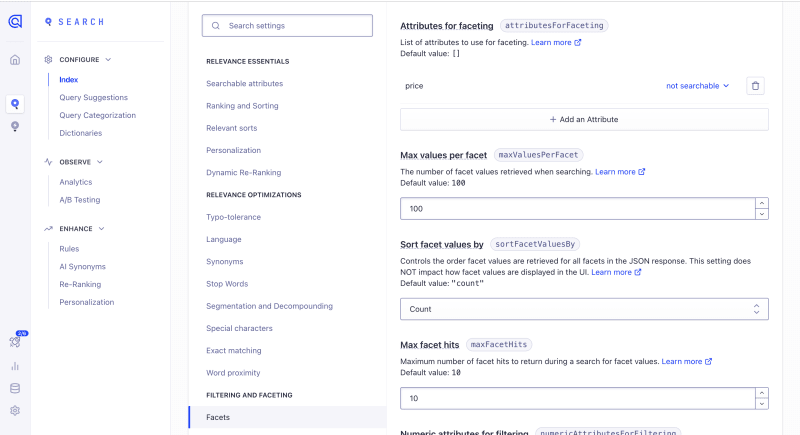
We've successfully added an advanced search to our Next.js e-commerce store. Now let's extend the search features by adding facets, filtering, and sorting. To do that, navigate to your Algolia account, go to the Search tab, and select the development_strapi-store index. Then click on the Configuration tab and locate Facet. Enter the price as the attribute name you want to use for faceting and click Add.
Then update the Search** component inside the InstantSearch component in your components/Search.tsx file to add the Facet feature with the code below:
//...
 <Panel header="Price Range">
    <RefinementList attribute="price" />
 </Panel>

Now users can filter the products by price. Next, let's add the feature for sorting so users can sort the products by ascending or descending order. In your Algolia account index configuration, locate Replicas tab, create + Create Replica index for development_strapi-store_price_asc and development_strapi-store_price_desc then click on Review and Save Settings.

Configure Sorting for Each Replica
For each replica index you've created, go to its Configuration, scroll to the Ranking and sorting section, and adjust the ranking formula to include the attribute you want to sort by. For development_strapi-store_price_asc price ascends and the price descends for development_strapi-store_price_desc, and Review and Save Settings.
Then update the Search component to use the names of these replica indices in the SortBy component as the items values.
//...
import { SortBy} from "react-instantsearch-dom";

//...
<Panel header="Sort by">
  <SortBy
    defaultRefinement="development_strapi-store"
    items={[
      { value: 'development_strapi-store', label: 'Featured' },
      { value: 'development_strapi-store_price_as', label: 'Price asc.' },
      { value: 'development_strapi-store_price_desc', label: 'Price desc.' },
    ]}
  />
</Panel>

Now you can sort the products by price in ascending and descending order.
Conclusion
That's it for this tutorial. You've learned how to add advanced search to a Strapi and Next.js project with Algolia. We began by setting up a Strapi and Next.js project, creating a collection type in the Strapi admin, building out the application UI, configuring the Algolia plugin, and syncing Strapi content with Algolia. Additionally, we enhanced the application by adding search features like faceting, filtering, and sorting. Now that you've learned how to incorporate advanced search into your Strapi and Next.js project using Algolia, how do you plan to use these technologies in your next project?
Resources
The code for this tutorial: GitHub repository.


Top comments (0)