After a long gap, I am continuing my blog on AWS. In my previous two blogs, I have written about Intro to AWS and Intro to EC2 .
Once you have the Linux based EC2 created, you can access the machine via the following ways :
- SSH on Linux based system
- SSH using putty on Windows
- Ec2 Instance connect
Using Linux based system:
The command we can use to login to a Linux machine is SSH :
ssh Ec2-user@<public-Ip_of_Ec2_Instance>
but when we try this to connect using ec2-user as our user and giving the public IP, you should encounter an error saying permission denied. We will need to provide the .pem file that we download during our instance creation as an additional security measure. This is done to avoid any unwanted person accessing our Ec2 server.
So we need to specify the path for the .pem file with an - i option. But before that, we will need to make sure that the .pem file that we have has correct permission. It should have a 400 permission which means the file is a read-only file. We can do that by using chmod command :
chmod 400 <path_to_.pem_file>
After giving the correct permission, we can use the ssh command as below:
ssh -i <path_to_.pem_file> <Ec2-user@<public-Ip_of_Ec2_Instance>
SSH using putty on Windows
We can download putty for Windows and once downloaded, we need to use the putty keygen to generate the keys with which we can connect to our Ec2. From the start menu in Windows, search and open Puttygen. Once its open, you can click on File and click on 'Load Private key' . Browse to the path of your .pem file ( you may need to select "All files" in the browse window to be able to select .pem file ) and click on open. Putty should now give you a success message saying you must save the private key. Click ok and next click on "Save private key" to save the private key. Putty may give an alert asking if you are sure to save private key without passphrase to protect it. Click on Yes and browse path and provide an appropriate file name to save the file.
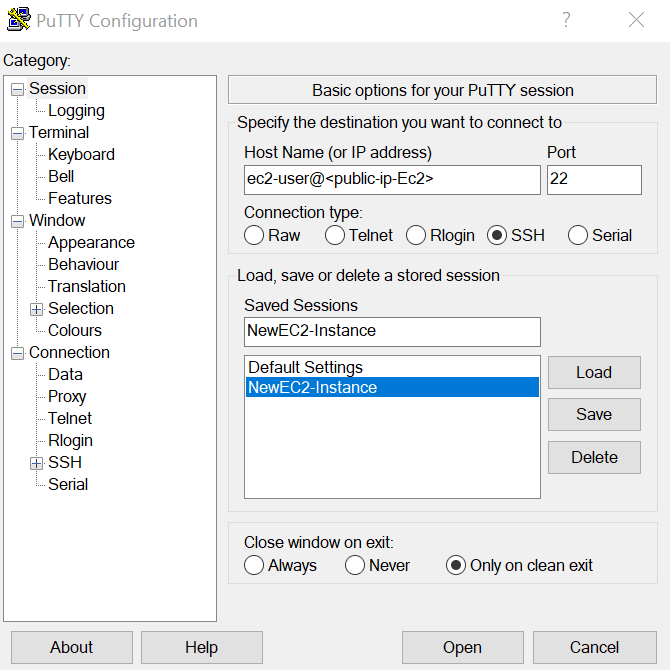
Now that our key is ready, we can open putty and import our pem file in it. Once you open putty, in the Host Name section, enter the IP along with user which SSH would need, like:
ec2-user@<Public_Ip_of_EC2-Instance>
Now add an appropriate name under Saved Session and click on Save to save the session details. Now to import the private key file, search for SSH ( under Connect) on the left and expand SSH. Click on 'Auth' next (no need to expand Auth menu) and click on Browse under 'Private key for authentication'. Now browse to the path where you have saved ppk file and click on open. Click on open on the Putty window to open the connection. You should be able to connect successfully to the Ec2-Instance.
Using EC2 Instance Connect
AWS provides another easy way to connect to your EC2 Instance via browser. Once you login into your AWS console, navigate to EC2 Dashboard, select your instance and click on 'Connect' at the top of the page. In the next page, click 'Connect' to connect to the Ec2 Instance. That's it. Do note that if you are having trouble connecting to your instance this way, you may need to install ec2-instance-connect package using yum (by using ssh via terminal or putty) :
sudo yum install ec2-instance-connect


Top comments (0)