This quote about git had me inspired:
The combination of core simplicity and powerful applications often makes thing[s] really hard to grasp, because of the mental jump required to derive the variety of applications from the essential simplicity of the fundamental abstraction (monads, anyone?)
It comes from a tutorial on writing your own git in Python, and I decided to port it to TypeScript.
In this and coming posts, we will go through the tutorial and complete it in 8 steps. The code, which is strongly typed to the greatest possible extent can be found here. The tutorial leaves the task of upgrading the resulting app "to a full-featured git library and CLI" to the reader, so we will try to take it a step further, if not all the way.
Shall we dance?
0 - Intended Audience
Intermediate JS/TS developers familiar with NodeJS and with at least some basic understanding of File Systems. TypeScript enthusiasts learning the language.
1 - Getting Started
The idea is to make a Node.js app in TypeScript that mimics wyag. For this, we will need a CLI interface in TypeScript.
I followed this tutorial on creating a CLI with Node and am summarising the process below:
Init
Do an npm init in your folder and then add the following dependencies to your package.json:
- clear - clearing the screen,
- figlet - ASCII art for Schwaaag,
- chalk - terminal styling
- commander - for args
- path - for working with file and directory paths
and the following devDependencies:
- @types/node - Type definitions for Node.js
- nodemon - If you don't know what this is, now is the time to stop reading this tutorial and go do something else
- ts-node - execution environment and REPL (if you have to google REPL, seriously, please go do something else)
- typescript - ❤️
Scripts
The Scripts section of your package.json should look like this:
"scripts": {
  "start": "nodemon --watch 'src/**/*.ts' --exec 'ts-node' src/index.ts",
  "create": "npm run build && npm run test",
  "build": "tsc -p .",
  "test": "sudo npm i -g && pizza",
  "refresh": "rm -rf ./node_modules ./package-lock.json && npm install"
},
TSconfig
You will also need a tsconfig.json file in the same folder as your package.json with the following contents:
{
  "compilerOptions": {
    "target": "es5",
    "module": "commonjs",
    "lib": ["es6", "es2015", "dom"],
    "declaration": true,
    "outDir": "lib",
    "rootDir": "src",
    "strict": true,
    "types": ["node"],
    "esModuleInterop": true,
    "resolveJsonModule": true
  }
}
Creating the CLI
Create a src folder in the directory and a file named index.ts within it. Then, start editing:
We start with a normal shebang
#!/usr/bin/env node
Clear the screen:
clear()
Import the dependencies:
const chalk = require('chalk');
const clear = require('clear');
const figlet = require('figlet');
const path = require('path');
const program = require('commander');
Display a banner:
console.log(
  chalk.green(
    figlet.textSync('sustain', { font: 'slant', horizontalLayout: 'full' })
  ));
Add the commands/arguments to the CLI app that we will process:
program
  .version('0.0.1')
  .description('A distributed version control system')
  .option('-i, --init', 'Init a repo')
  .option('-a, --add', 'Add file')
  .option('-c, --cat', 'Cat file')
  .option('-t, --checkout', 'Checkout')
  .option('-m, -commit', 'Commit')
  .option('-h, -hash', 'Hash Object')
  .option('-l, -log', 'Log')
  .option('-t, -ls-tree', 'Hash Object')
  .option('-h, -hash', 'Hash Object')
  .option('-g, -merge', 'Merge')
  .option('-r, -rebase', 'Rebase')
  .option('-v, -rev', 'Rev parse')
  .option('-r, -rm', 'Remove')
  .option('-s, -show', 'Show ref')
  .option('-t, -tag', 'Tag')
  .parse(process.argv);
Next, we want to have some placeholder actions for the arguments sent by the user, we will come back here and write functions for each one of these:
if (program.init) console.log(' - Initialize a repo');
if (program.add) console.log('  - Add file');
if (program.cat) console.log('  - Cat file');
if (program.checkout) console.log('  - Checkout');
if (program.commit) console.log('  - Commit');
if (program.hash) console.log('  - Hash object');
if (program.log) console.log('  - Log');
if (program.lstree) console.log(' - Show dir tree');
if (program.merge) console.log('  - Merge');
if (program.rebase) console.log('  - Rebase');
if (program.rparse) console.log('  - Rev parse');
if (program.rm) console.log(' - Remove');
if (program.show) console.log('  - Show ref');
if (program.tag) console.log('  - Tag');
Finally, add the following to implement the obligatory -h and --help argument for when the user needs help.
if (!process.argv.slice(2).length) {
  program.outputHelp();
}
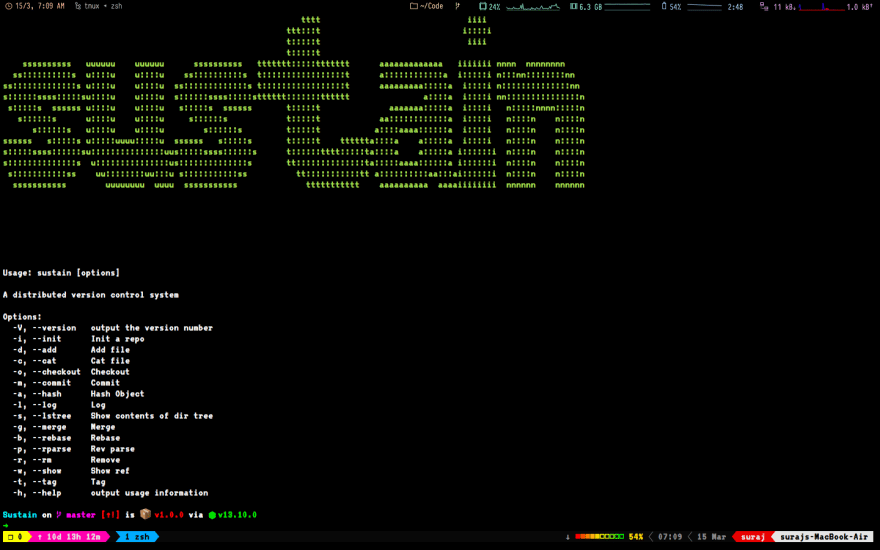
Now do npm run build and call the program, you should see something like this:

In the next part we will add the SusRepository Class to the program, which is our basic building block. We will also add some utility functions to the code. Then we will implement the init command and write a RepoFind function which will recursively look for a git directory for our init functionality.
Original article written for my blog can be read here.


Top comments (6)
Comments like ”if you dont know what X is, go do something else” are unnecessary and rude. People come from all different kind of backgrounds and ridiculing someone for lack of knowledge does not really fit in with the Dev.to vibe.
If I were you I’d edit the article.
If I were you I'd find my lost sense of humour
You do you, but no need to be rude about it. 🤷🏻♂️
That guy is from Kolkata, please don't discriminate him about his sense of humour.
We are open community and can tolerate any of humour sides.
Looking forward!
nodemonis a good tool.I used to use it to restart my project quickly without the "stop and start".