Sticking to container security best practices is critical for successfully delivering verified software, as well as preventing severe security breaches and its consequences.
According to the 2020 CNFC Survey, 92 percent of companies are using containers in production, a 300 percent increase since 2016. Thus, Kubernetes, Openshift, and other container technologies are present everywhere.
But aren’t containers meant to be safe and isolated? Well, kind of.
For example, an exploitable vulnerability inside a container, combined with exposed metadata and a wrong credentials configuration, can compromise your whole cloud infrastructure. As described in our Cloud lateral movement post, a hacker can use this chain of exploits and wrong configurations to run crypto mining applications in your cloud account.
Containers were designed as a distribution mechanism for self-contained applications, allowing them to execute processes in an isolated environment. For isolation purposes, they employ a lightweight mechanism using kernel namespaces, removing the requirement of several additional layers in VMs, like a full operating system, CPU and hardware virtualization, etc.
The lack of these additional abstraction layers, as well as tightly coupling with the kernel, operating system, and container runtime, make it easier to use exploits to jump from inside the container to the outside and vice versa.
Container security best practices don’t just include the delivered applications and the container image itself, but also the full component stack used for building, distributing, and specially executing the container.
This includes:
- The host or VM
- The container runtime
- Cluster technology
- Cloud provider configuration
- And more.
Security can be applied at each of the different phases: development, distribution, execution, detection and response to threats.
Let’s dive into the interesting details, breaking down the general ideas into 18 concrete container security best practices that you can apply in your DevOps workflows.
A complex stack
Containers’ success is often fueled by two really useful features:
- They are a really convenient way to distribute and execute software, as a self-contained executable image which includes all libraries and dependencies, while being much lighter than classical VM images.
- They offer a good level of security and isolation by using kernel namespaces to execute processes in their own “jail”, including mounts, PID, network, IPC, etc., and also resource limiting CPU usage and memory via kernel cgroups. Memory protection, permission enforcement, etc. are still provided via the standard kernel security mechanisms.
The container security model might be enough in most cases, but for example, AWS adds additional security for their serverless solution. It does so by running containers inside Firecracker, a micro virtual machine that adds another level of virtualization to prevent cross-customer breaches.
Does this mean containers are not safe?
You can see it as a double-edged sword.
An application running inside a container is no different than an application running directly in a machine, sharing a file-system and processes with many other applications. In a sense, they are just applications that could contain exploitable vulnerabilities.
Running inside a container won’t prevent this, but will make it much harder to jump from the application exploit to the host system, or access data from other applications.
On the other hand, containers depend on another set of kernel features, a container runtime, and usually a cluster or orchestrator that might be exploited too.
So, we need to take the whole stack into account, and we can apply container security best practices at the different phases of the container lifecycle.
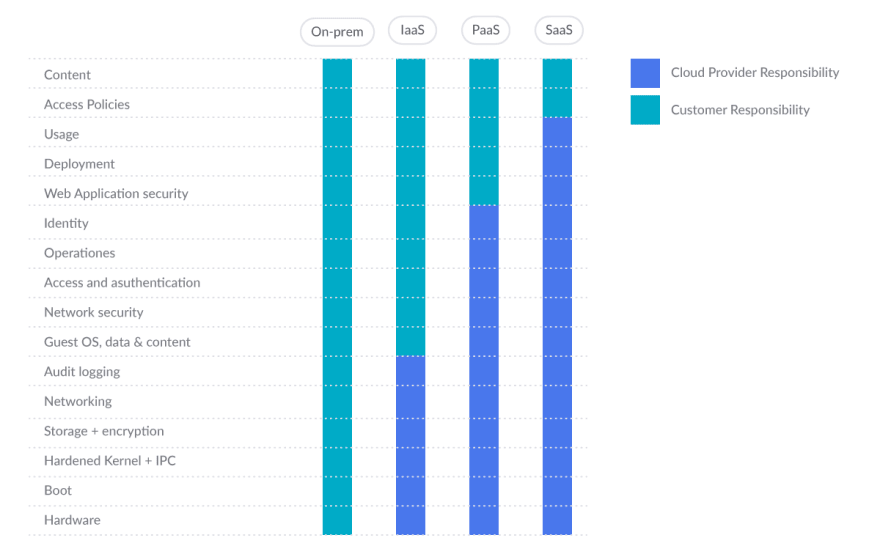
There will be cases like the serverless compute engine ECS Fargate, Google Cloud Run, etc., where some of these pieces are out of our control, so we work on a shared responsibility model.
- The provider is responsible for keeping the base pieces working and secured
- And you can focus on the upper layers.
Prevention: 8 steps for shift left security
Before your application inside a container is executed, there are several places where you can start applying different techniques to prevent threats from happening.
Prevention and applying security as early as possible is key and will save you a lot of trouble, time, and money with minimal effort if you apply some good practices during the development and distribution of the container images.
1. Integrate Code Scanning at the CI/CD Process
Security scanning is the process of analyzing your software, configuration or infrastructure, and detecting potential issues or known vulnerabilities. Scanning can be done at different stages:
- Code
- Dependencies
- Infrastructure as code
- Container Images
- Hosts
- Cloud configuration
- … and more
Let’s focus on the first stage: code. Before you ship the application or even build your application, you can scan your code to detect bugs or potentially exploitable code (a new vulnerability).
For application code, there are different SAST (Static Application Security Testing) tools like sonarqube, which provide vulnerability scanners for different languages, gosec for analyzing go code and detecting issues based on rules, linters, etc.
You can run them at the developer machine, but integrating code scanning tools at the CI/CD process can make sure that a minimum level of code quality is assured. For example, you can block pull requests by default if some checks are failing.
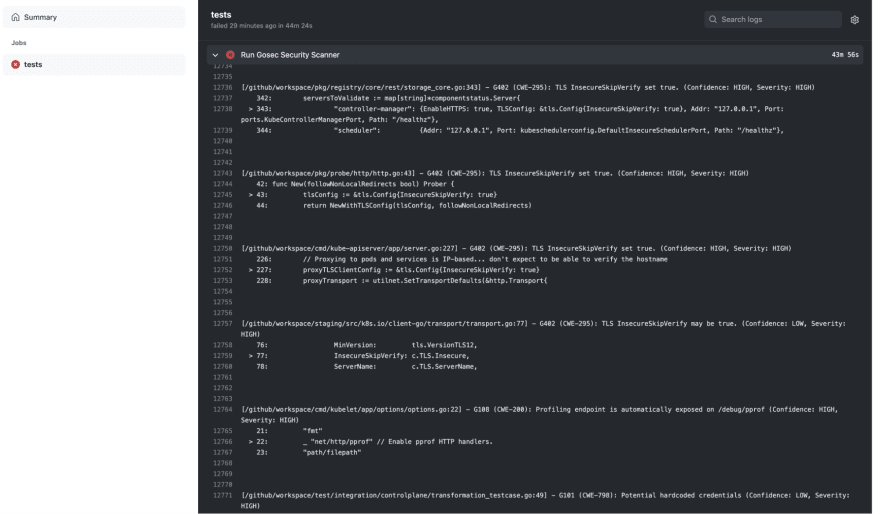
A Github Action running gosec:
name: "Security Scan"
on:
  push:
jobs:
  tests:
    runs-on: ubuntu-latest
    env:
      GO111MODULE: on
    steps:
      - name: Checkout Source
        uses: actions/checkout@v2
      - name: Run Gosec Security Scanner
        uses: securego/gosec@master
        with:
          args: ./...
And the corresponding output:
2. Reduce external vulnerabilities via dependency scanning
Only very minimal and toy applications are free of third-party libraries or frameworks. But reusing code from external dependencies means you will be including bugs and vulnerabilities from these dependencies as part of your application. Dependency scanning should be included as a best practice in any application build process.
Package management tools, like npm, maven, go, etc., can match vulnerability databases with your application dependencies and provide useful warning.
For example, enabling the dependency-check plugin in Maven requires just adding a plugin to the pom.xml:
<project>
    ...
    <build>
        ...
        <plugins>
            ...
            <plugin>
              <groupId>org.owasp</groupId>
              <artifactId>dependency-check-maven</artifactId>
              <version>6.2.2</version>
              <executions>
                  <execution>
                      <goals>
                          <goal>check</goal>
                      </goals>
                  </execution>
              </executions>
            </plugin>
            ...
        </plugins>
        ...
    </build>
    ...
</project>
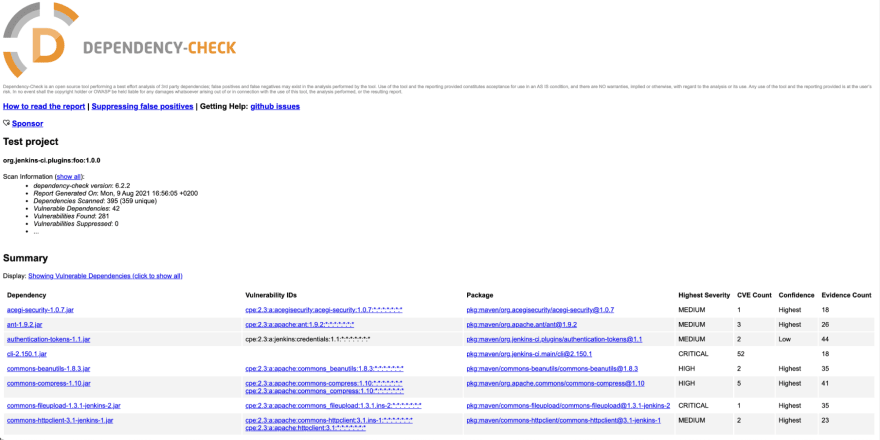
And every time maven is executed, it will generate a vulnerability report:
Avoid introducing vulnerabilities through dependencies by updating them to newer versions with fixes.
In some cases, this might not be possible because the fix is not available, or bumping the version would require a lot of refactoring due to breaking changes. Analyze the vulnerabilities revealed by dependency scanning to evaluate the impact and exploitability, and introduce additional measures like checks in your code or protection mechanisms to prevent the vulnerability from being exploited.
Note that although it is possible to also scan dependencies later, once the application is built, dependency scanning will be less accurate as some metadata information is not available, and it might be impossible for statically linked applications like Go or Rust.
3. Use image scanning to analyze container images
Once your application is built and packaged, it is common to copy it inside a container with a minimal set of libraries, dependent frameworks (like Python, Node, etc.), and configuration files. You can read our Top 20 Dockerfile best practices to learn about the best practices focused in container building and runtime.
Use an image scanner to analyze your container images. The image scanning tool will discover vulnerabilities in the operating system packages (rpm, dpkg, apk, etc.) provided by the container image base distribution. It will also reveal vulnerabilities in package dependencies for Java, Node, Python, and others, even if you didn’t apply dependency scanning in the previous stages.
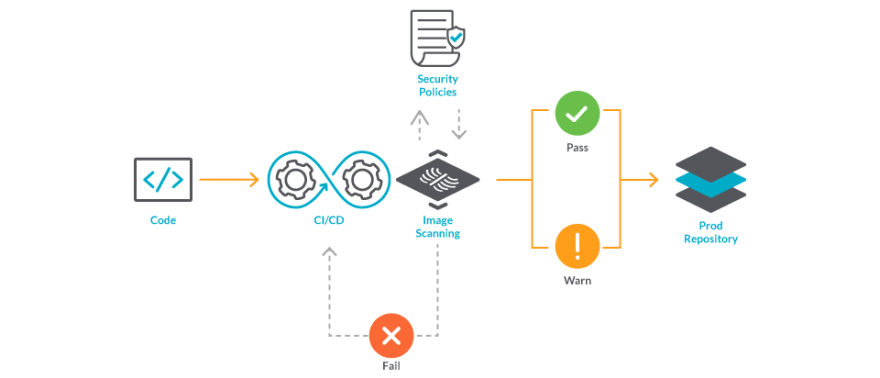
Image Scanning is easy to automate and enforce. It can be included as part of your CI/CD pipelines, triggered when new images are pushed to a registry, or verified in a cluster admission controller to make sure that non-compliant images are now allowed to run. Another option is installing Sysdig Node Image Analyzer to scan images as soon as they start running in the hosts where it is running.
An example is Github Action integration with the Sysdig Secure Inline Scan Action:
name: "Security Scan"
on:
  push:
jobs:
  build-and-scan:
    runs-on: ubuntu-latest
    steps:
    - name: Build the Docker image
      run: docker build . --file Dockerfile --tag my-image:latest
    - name: Scan image
      id: scan
      uses: sysdiglabs/scan-action@v3
      with:
        image-tag: my-image:latest
        sysdig-secure-token: ${{ secrets.SYSDIG\_SECURE\_TOKEN }}
        input-type: docker-daemon
        run-as-user: root
The previous example builds a Docker image and then scans it locally, from the Docker daemon.
Scan results are provided directly as part of the action output, and pull-request can be blocked from merging depending on the check status:
4. Enforce image content trust
Container image integrity can be enforced by adding digital signatures via Docker Notary or similar, which then can be verified in the Admission Controller or the container runtime.
Let’s see a quick example:
$ docker trust key generate example1
Generating key for example1...
Enter passphrase for new example1 key with ID 7d7b320:
Repeat passphrase for new example1 key with ID 7d7b320:
Successfully generated and loaded private key. Corresponding public key available: /Users/airadier/example1.pub
Now, we have a signing key called “example1”. The public part is located in:
$HOME/example1.pub
and the private counterpart will be located in:
$HOME/.docker/trust/private/<key ID>.key
Other developers can also generate their keys and share the public part.
Now, we enable a signed repository by adding the keys of the allowed signers to the repository (airadier/alpine in the example):
$ docker trust signer add --key example1.pub example1 airadier/alpine
Adding signer "example1" to airadier/alpine...
Initializing signed repository for airadier/alpine...
...
Enter passphrase for new repository key with ID 16db658:
Repeat passphrase for new repository key with ID 16db658:
Successfully initialized "airadier/alpine"
Successfully added signer: example1 to airadier/alpine
And we can sign an image in the repository with:
$ docker trust sign airadier/alpine:latest
Signing and pushing trust data for local image airadier/alpine:latest, may overwrite remote trust data
The push refers to repository \[docker.io/airadier/alpine\]
bc276c40b172: Layer already exists
latest: digest: sha256:be9bdc0ef8e96dbc428dc189b31e2e3b05523d96d12ed627c37aa2936653258c size: 528
Signing and pushing trust metadata
Enter passphrase for example1 key with ID 7d7b320:
Successfully signed docker.io/airadier/alpine:latest
If the DOCKER_CONTENT_TRUST environment variable is set to 1, then pushed images will be automatically signed:
$ export DOCKER\_CONTENT\_TRUST=1
$ docker push airadier/alpine:3.11
The push refers to repository \[docker.io/airadier/alpine\]
3e207b409db3: Layer already exists
3.11: digest: sha256:39eda93d15866957feaee28f8fc5adb545276a64147445c64992ef69804dbf01 size: 528
Signing and pushing trust metadata
Enter passphrase for example1 key with ID 7d7b320:
Successfully signed docker.io/airadier/alpine:3.11
We can check the signers of an image with:
$ docker trust inspect --pretty airadier/alpine:latest
Signatures for airadier/alpine:latest
SIGNED TAG   DIGEST                                                             SIGNERS
latest       be9bdc0ef8e96dbc428dc189b31e2e3b05523d9...   example1
List of signers and their keys for airadier/alpine:latest
SIGNER     KEYS
example1   7d7b320791b7
Administrative keys for airadier/alpine:latest
  Repository Key:       16db658159255bf0196...
  Root Key:             2308d2a487a1f2d499f184ba...
When the environment variable DOCKER_CONTENT_TRUST is set to 1, the Docker CLI will refuse to pull images without trust information:
$ export DOCKER\_CONTENT\_TRUST=1
$ docker pull airadier/alpine-ro:latest
Error: remote trust data does not exist for docker.io/airadier/alpine-ro: notary.docker.io does not have trust data for docker.io/airadier/alpine-ro
You can enforce content trust in a Kubernetes cluster by using an Admission controller like Connaisseur.
5. Common security misconfigurations and remediations
Wrongly configured hosts, container runtimes, clusters, or cloud resources can leave a door open to an attack, or create an easy way to escalate privileges and perform lateral movement.
Benchmarks, best practices, and hardening guides provide you with information about how to spot those misconfigurations, why they are a problem, and how to remediate them. Among different sources of information, the Center for Internet Security (CIS) is paramount. It’s a non-profit organization that publishes free benchmarks for many different environments, where any person and company can contribute with their knowledge. It has become a de facto standard for security benchmarking.
The best way to make sure you can check this kind of setting for container security is to automate it as much as possible. Several tools exist for this, mainly based on static configuration analysis, allowing you to check configuration parameters at different levels and provide guidance in fixing them.
Sysdig Secure includes a Compliance and Benchmarks feature which can help you schedule, execute, and analyze all of your infrastructure (Linux hosts, Docker, Kubernetes, EKS, GKE, Openshift clusters, etc.) based on CIS Benchmarks, as well as compliance standards, like PCI DSS, SOC 2, NIST 800-53, NIST 800-190, HIPAA, ISO 27001, GDPR and others, all in a single centralized dashboard.
Other tools you can use are linux-bench, docker-bench, kube-bench, kube-hunter, kube-striker, Cloud Custodian, OVAL, and OS Query.
Example host benchmark control
A physical machine where you just installed Linux, a virtual machine provisioned on a cloud provider, or on-prem may contain several insecure out-of-the-box configurations that you are not aware of. If you plan to use it for a prolonged period, with a production workload or exposure to the internet, you have to take special care of them. This is also true for Kubernetes or OpenShift nodes. After all, they are virtual machines; don’t assume that if you are using a cluster provisioned by your cloud provider that they come perfectly secured.
CIS has a benchmark for Distribution Independant Linux, and one specifically for Debian, CentOs, Red Hat, and many other distributions.
Examples of misconfigurations you can detect:
Example linux distribution
The following figure is provided by CIS Benchmark for Distribution Independant Linux, the configuration is to ensure rsh server is not enabled.
Example container runtime benchmark control
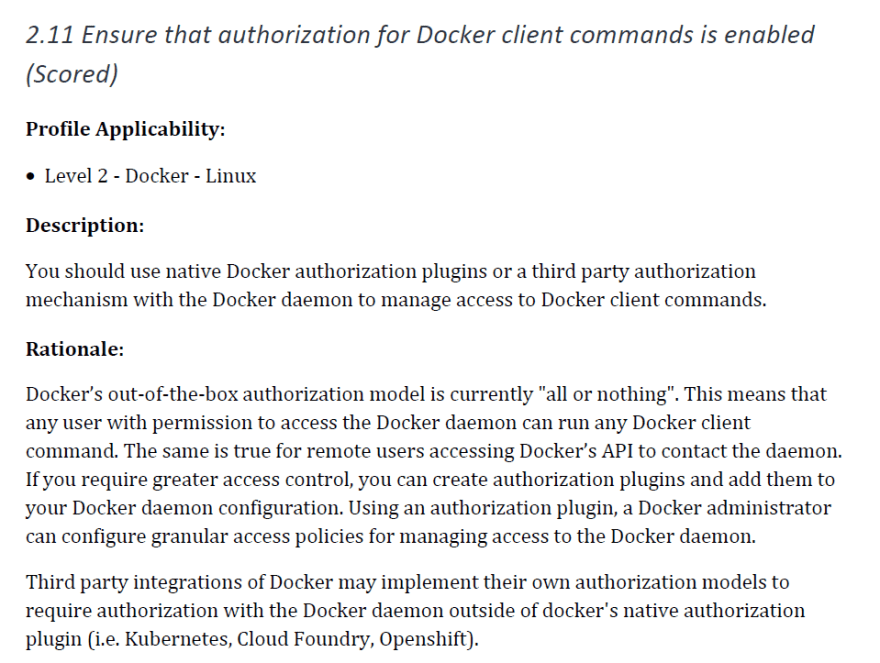
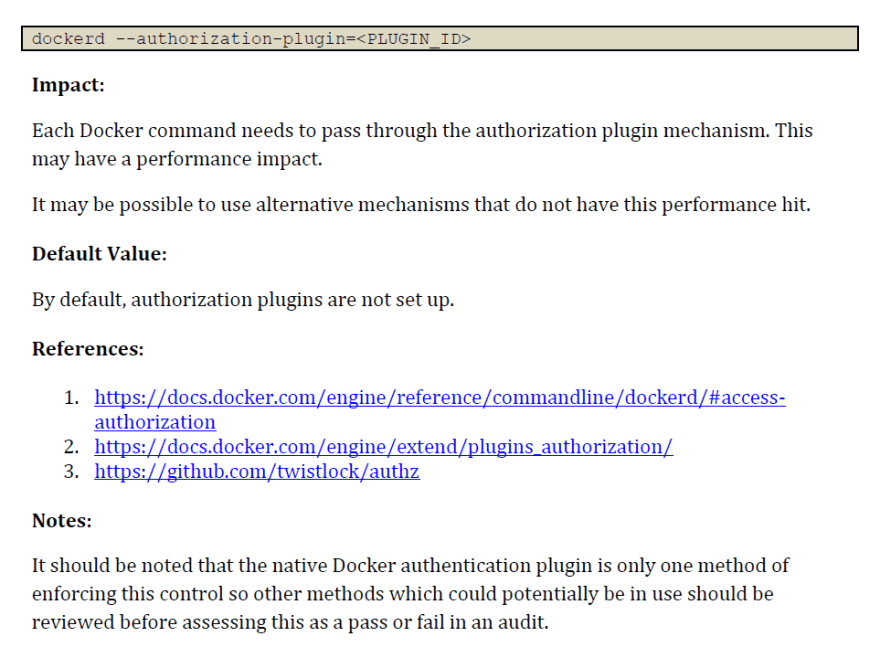
If you install a container runtime like Docker by yourself in a server you own, it’s essential you use a benchmark to make sure any default insecure configuration is remediated. The next figure shows the configuration to ensure that authorization for Docker client commands is enabled.
Example orchestrator benchmark control
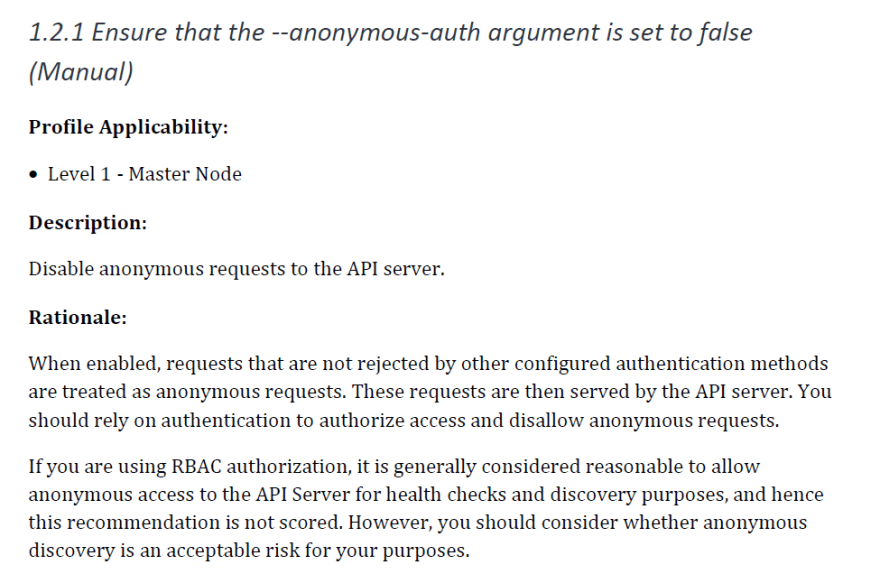
Kubernetes, by default, leaves many authentication mechanisms to be managed by third-party integrations. A benchmark will ensure all possible insecurities are dealt with. The image below show us the configuration to ensure that the –anonymous-auth argument is set to false.
Example cloud benchmark control
Benchmarks on cloud provider accounts, also called Cloud Security Posture Management (CSPM), are essential, as they will check the security on every single asset on the account. All settings that could lead to an attack, resources that should be private but are made public (e.g., S3 buckets), or storage that lacks encryption are defined in this kind of benchmark. This is a benchmark that is essential to automate, as the assets in the cloud account change all the time, and you have to constantly watch that everything is as secure as possible. The following image is an example of configuration check that ensures credentials unused for 90 days or greater are disabled.
6. Incorporate IaC scanning
Cloud resource management is a complex task, and tools like Terraform or CloudFormation can help leverage this burden. Infrastructure is declared as code – aka “Infrastructure as Code” – stored and versioned in a repository, and automation takes care of applying the changes in the definition to keep the existing infrastructure up to date with the declaration.
If you are using infrastructure as code, incorporate IaC scanning tools like Apolicy, Checkov, tfsec, or cfn_nag to validate the configuration of your infrastructure before it is created or updated. Similar to other linting tools, apply IaC scanning tools locally and in your pipeline, and consider blocking changes that introduce security issues.
An example of a checkov execution:
$ pip install checkov
$ checkov --quiet -d .
       \_               \_
   \_\_\_| |\_\_   \_\_\_  \_\_\_| | \_\_\_\_\_\_\_   \_\_
  / \_\_| '\_ \\ / \_ \\/ \_\_| |/ / \_ \\ \\ / /
 | (\_\_| | | |  \_\_/ (\_\_|   < (\_) \\ V /
  \\\_\_\_|\_| |\_|\\\_\_\_|\\\_\_\_|\_|\\\_\\\_\_\_/ \\\_/
By bridgecrew.io | version: 2.0.346
terraform scan results:
Passed checks: 314, Failed checks: 57, Skipped checks: 0
Check: CKV\_AWS\_108: "Ensure IAM policies does not allow data exfiltration"
        FAILED for resource: aws\_iam\_policy\_document.cloudtrail\_ingestor
        File: /modules/ingestor/main.tf:17-31
        Guide: https://docs.bridgecrew.io/docs/ensure-iam-policies-do-not-allow-data-exfiltration
                17 | data "aws\_iam\_policy\_document" "ingestor" {
                18 |   statement {
                19 |     effect = "Allow"
                20 |     actions = \[
                21 |       "s3:Get\*",
                22 |       "s3:List\*",
                23 |       "s3:Put\*",
                24 |       "s3:Head\*",
                25 |       "sqs:DeleteMessage",
                26 |       "sqs:DeleteMessageBatch",
                27 |       "sqs:ReceiveMessage",
                28 |     \]
                29 |     resources = \["\*"\]
                30 |   }
                31 | }
...
7. Secure your host with host scanning
Securing your host is just as important as securing the containers. The host where the containers are running is usually composed of an operating system with a Linux kernel, a set of libraries, a container runtime, and other common services and helpers running in the background. Any of these components can be vulnerable or misconfigured, and could be used as the entry point to access the running containers or cause a denial of service attack.
For example, issues in the container runtime itself can cause an impact in your running containers, like this DoS attack that prevents creating new containers in a host.
We already talked about hardening host configuration in the “Unsafe configuration” section. But how do we detect vulnerable components? A host scanning tool can detect known vulnerabilities in the kernel, standard libraries like glibc, services, and even the container runtime living in the host (quite similar to what image scanning does for a container image).
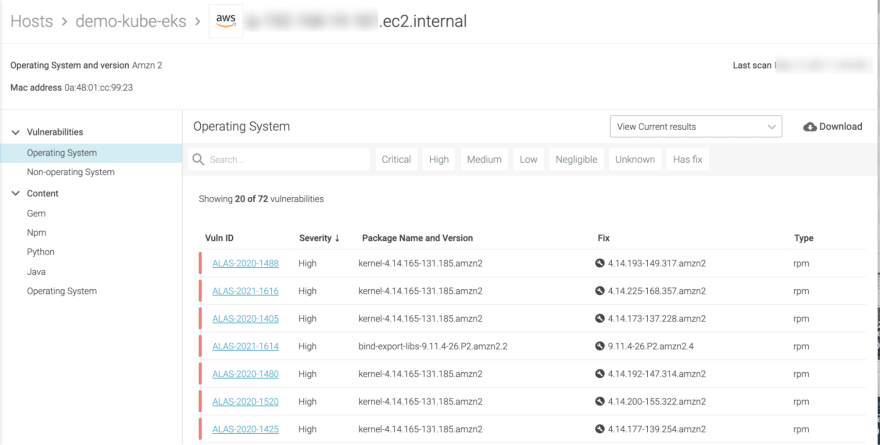
Sysdig Host Analyzer will transparently scan your hosts and report found vulnerabilities, The following figure shows how easy it is to detect risks at a glance on the dashboard.
Use this information to update the operating system, kernel, packages, etc. Get rid of the most critical and exploitable vulnerabilities, or at least be aware of them, and apply other protection mechanisms like firewalls, restricting user access to the host, stopping unused services, etc.
8. Prevent unsafe containers from running
As a last line of defense, Kubernetes Admission Controllers can block unsafe containers from running in the cluster.
Sysdig Admission Controller allows you to deny the creation of pods running images that don’t pass your security policies, based on the scanning results.
Gatekeeper provides a powerful language that can be used to define flexible rules to accept or reject containers based on the pod specification (e.g., enforce annotations, detect privileged pods, or using host paths) and the status of the cluster (e.g.m, require all ingress hosts to be unique within the cluster).
As an example, the following Gatekeeper ConstrainsTemplate (some data is ellipsed) defines a template for detecting required annotations:
apiVersion: templates.gatekeeper.sh/v1beta1
kind: ConstraintTemplate
metadata:
  name: k8srequiredannotations
  annotations:
    description: Requires all resources to contain a specified annotation(s) with a value
      matching a provided regular expression.
spec:
 ...
  targets:
    - target: admission.k8s.gatekeeper.sh
      rego: |
        package k8srequiredannotations
        violation\[{"msg": msg, "details": {"missing\_annotations": missing}}\] {
            provided := {annotation | input.review.object.metadata.annotations\[annotation\]}
            required := {annotation | annotation := input.parameters.annotations\[\_\].key}
            missing := required - provided
            count(missing) > 0
            msg := sprintf("you must provide annotation(s): %v", \[missing\])
        }
        violation\[{"msg": msg}\] {
          value := input.review.object.metadata.annotations\[key\]
          expected := input.parameters.annotations\[\_\]
          expected.key == key
          expected.allowedRegex != ""
          not re\_match(expected.allowedRegex, value)
          msg := sprintf("Annotation <%v: %v> does not satisfy allowed regex: %v", \[key, value, expected.allowedRegex\])
        }
Using that template, we can enforce that all services have some annotations with:
apiVersion: constraints.gatekeeper.sh/v1beta1
kind: K8sRequiredAnnotations
metadata:
  name: all-must-have-certain-set-of-annotations
spec:
  match:
    kinds:
      - apiGroups: \[""\]
        kinds: \["Service"\]
  parameters:
    message: "All services must have a \`a8r.io/owner\` and \`a8r.io/runbook\` annotations."
    annotations:
      - key: a8r.io/owner
        # Matches email address or github user
        allowedRegex: ^(\[A-Za-z0-9.\_%+-\]+@\[A-Za-z0-9.-\]+\\.\[A-Za-z\]{2,6}|\[a-z\]{1,39})$
      - key: a8r.io/runbook
        # Matches urls including or not http/https
        allowedRegex: ^(http:\\/\\/www\\.|https:\\/\\/www\\.|http:\\/\\/|https:\\/\\/)?\[a-z0-9\]+(\[\\-\\.\]{1}\[a-z0-9\]+)\*\\.\[a-z\]{2,5}(:\[0-9\]{1,5})?(\\/.\*)?$
Many more examples are available in the OPA Gatekeeper library project!
We already mentioned Connaisseur Admission Controller as a way to enforce content trust and reject images that are not signed by trusted sources.
Protection – Running your containers safely
Adhering to build time and configuration container security best practices right before runtime still won’t make your container 100 percent safe. New container vulnerabilities are discovered daily, so your actual container, quite safe today, can become a potential victim of new disclosed exploits tomorrow.
In this section, we will introduce container security best practices for including container vulnerability management and protection measures in your workload.
9. Protect your resources
Your containers and host might contain vulnerabilities, and new ones are discovered continually. However, the danger is not in the host or container vulnerability itself, but rather the attack vector and exploitability.
For example, you can protect from a network exploitable vulnerability by impeding connections to the running container or the vulnerable service. And if the attack vector requires local access to the host (being logged in the host), you can restrict the access to that host.
So, limit the number of users that have access to your hosts, cloud accounts, and resources, and block unnecessary network traffic by using different mechanisms:
- VPCs, Security groups, network rules, firewall rules, etc. in cloud providers to restrict communication between VMs, VPCs, and the Internet.
- Firewalls at hosts levels to expose only the minimal set of required services.
- Kubernetes Network Policies for clusters, and additional tools, like Service Mesh or API Gateways, can add an additional security layer for filtering network requests.
10. Verify image signatures
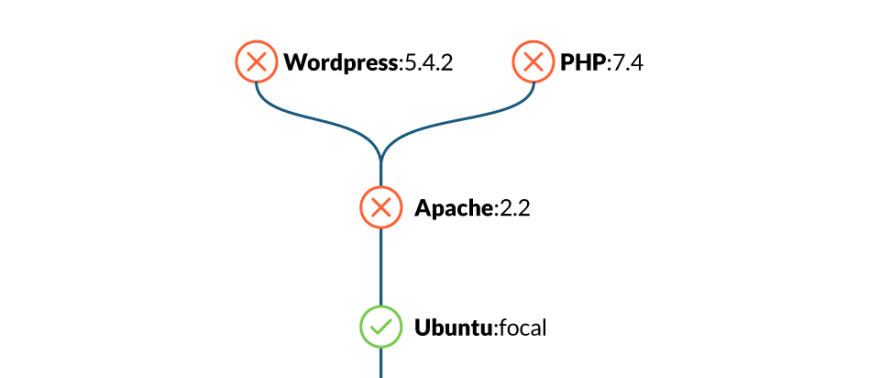
As described in “Image content trust”, image signatures are a protection mechanism to guarantee that the image has not been tampered. Verifying image signatures can also prevent some attacks with tag mutability, assuring that the tag corresponds to a specific digest that has been signed by the publisher. The figure below shows an example of this attack.
11. Restrict container privileges at runtime
The scope or “blast radius” of an exploited vulnerability inside a container largely depends on the privileges of the container, and the level of isolation from the host and other resources. Runtime configuration can mitigate the impact of existing and future vulnerabilities in the following ways:
- Effective user: Don’t run the container as root. Even better, use randomized UIDs (like Openshift) that don’t map to real users in the host, or use the user namespace feature in Docker and in Kubernetes when ready (not available at time of publish).
- Restrict container privileges: Docker and Kubernetes offer ways to drop capabilities and don’t allow privileged containers. Seccomp and AppArmor can add more restrictions to the range of actions a container can perform.
- Add resource limits: Avoid container consuming all the memory or CPUs and starve other applications.
- Be careful with shared storage or volumes: Specifically, things like hostPath, and sharing the filesystem from the host.
- Other options like hostNetwork, hostPID or hostIPC: Kubernetes will make the container share a namespace with the host, reducing isolation.
- Define Pod Security Policies (PSPs) and Security Context Constraints (SCCs for Openshift): Set guardrails in your cluster and prevent misconfigured containers. PSPs and SCCs are Admission Controllers that will reject pods in case their security context does not comply with the defined policies.
12. Manage container vulnerabilities wisely
Manage and assess your vulnerabilities wisely. Not all vulnerabilities have fixes available, or may now be able to be applied easily.
However, not all of them might be easily exploitable, or they may require local or even physical access to the hosts to be exploited.
You need to have a good strategy, including:
- Prioritize what needs to be fixed: You should focus on host and container vulnerabilities with higher score or severity, which often means that they are remotely exploitable and that a public exploit is available. If they are old and well known, the chances are high that they are being actively exploited in an automated way.
- Evaluate the severity of vulnerabilities in your environment: The score or severity provided by the vendor or your linux distribution is a good starting point. But a vulnerability can have a high score if it is remotely exploitable, and then exist in an unused package in an internal host which is not exposed to the internet. And it can be in a production environment, or a developers’ playground and experimental cluster. Evaluate the impact in context, and plan accordingly.
- Plan applying fixes as countermeasures to protect your containers and hosts: Create and track tickets, making vulnerability management part of your standard development workflows.
- Create exceptions for vulnerabilities when you conclude that you are not impacted: This will reduce the noise. Consider snoozing instead of permanently adding an exception, so you can reevaluate later.
Your strategy should translate in policies that a container vulnerability scanner can use to trigger alerts for detected vulnerabilities according to some criteria, and to apply prevention and protection at different levels, like:
- Ticketing: Notify developers of detected vulnerabilities so they can apply the fixes.
- Image registry: Prevent vulnerable images from being pulled at all.
- Host / kernel / container: Block running containers, add additional protection measures or respond by killing, quarantine or shut down hosts or containers for critical issues.
It is also important to perform continuous vulnerability scanning and reevaluation to make sure that you get alerts when new vulnerabilities that apply to running containers are discovered. Sysdig Secure can help here, as it will reevaluate your scanning policies every time the vulnerability feeds are updated.
Detection – Alerts for abnormal behavior
So far, we put the focus on prevention and protection, getting your containers up and running in the best possible shape, and anticipating potential and known attacks. Applying prevention techniques when building, distributing, and running your container with the correct privileges and protections, as well as ensuring the underlying stack, will limit the range of action that an attacker can take. But that doesn’t mean you can just forget about running containers and trust the applied security measures. Once the security measures are running, they can be attacked. We need to detect abnormal and unexpected behavior in our applications in order to take corrective action and prevent security incidents from happening again.
Many different attack vectors exist. For example MITRE ATT&CK provides an extensive list of tactics and techniques “based on real world observations”, which can be used both to apply prevention measures and to analyze the activity to detect abnormal behaviors, which can mean an attack or intrusion is being performed. The MITRE ATT&CK Matrix for Containers covers techniques specifically targeted against container technologies.
13. Set up real-time event and log auditing
Threats to container security can be detected by auditing different sources of logs and events, and analyzing abnormal activity. Sources of events include:
- Host and Kubernetes logs
- Cloud logs (CloudTrail in AWS, Activity Audit in GCP, etc.)
- System calls in containers
Falco is capable of monitoring the executed system calls and generating alerts for suspicious activity. It includes a community-contributed library of rules, and you can create your own by using a simple syntax. Kubernetes audit log is also supported.
You can see nice examples of Falco in action in our Detecting MITRE ATT&CK articles:
Sysdig Secure extends the capabilities of Falco and can also ingest events from different cloud providers.
As an example, the following rule would trigger an alert whenever a new ECS Task is executed in the account:
rule: ECS Task Run or Started
condition: aws.eventSource="ecs.amazonaws.com" and (aws.eventName="RunTask" or aws.eventName="StartTask") and not aws.errorCode exists
output: A new task has been started in ECS (requesting user=%aws.user, requesting IP=%aws.sourceIP, AWS region=%aws.region, cluster=%jevt.value\[/requestParameters/cluster\], task definition=%aws.ecs.taskDefinition)
source: aws\_cloudtrail
description: Detect a new task is started in ECS.
Sysdig also includes an ever growing set of rules tagged with the corresponding compliance standards and controls, and provides a centralized dashboard for exploring all security events in your infrastructure:
14. Monitor your resources
Excessive resource usage (CPU, memory, network), quick decrease in available disk space, over-average error rate, or increased latency might be signals that something strange is happening in your system.
Collect metrics, like with Prometheus. Configure alerts to quickly get notified when the values exceed the expected thresholds. Use meaningful dashboards to explore the evolution of metrics, and correlate with changes in other metrics and events happening in your system.
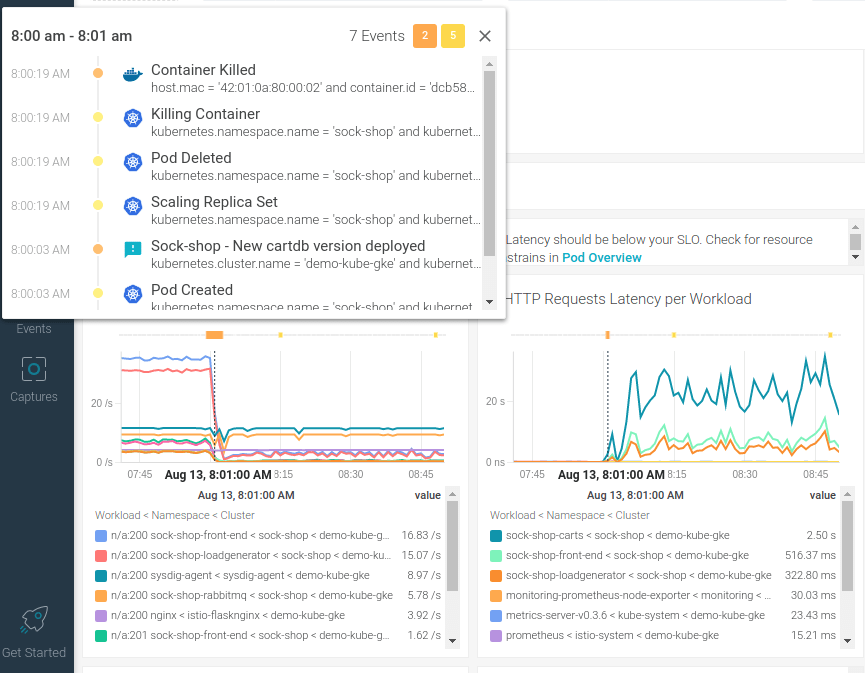
In this example, we notice a sudden increase in request latency and the request rate falling. This could mean something is happening in your containers (e.g., a cryptominer consuming all the available CPU), or an exploit causing response slowness and potentially a DoS. Checking the related cluster events around that time frame, we see a pod has been replaced, so it is also possible that a malicious or simply incorrectly configured version was deployed.
Incident response and forensics
Once you detect a security incident is happening in your system, take action to stop the threat and limit any additional harm. Instead of just killing the container or shutting down a host, consider isolating it, pausing it, or taking a snapshot. A good forensics analysis will provide many clues and reveal what, when, and how it happened. It is critical to identify:
- If the security incident was a real attack or just a component malfunction.
- What exactly happened, where did it occur, and are any other potentially impacted components?
- How can you prevent the security incident from happening again?
15. Isolate and investigate
When a security incident is detected, you should quickly stop it first to limit any further damage.
- Stop and snapshot: When possible, isolate the host or container. Container runtimes’ offer was to “pause” the container (i.e., “docker pause” command) or take a snapshot and then stop it. For hosts, you might take a snapshot at the filesystem level, then shut it down. For EC2 or VM instances, you can also take a snapshot of the instance. Then, proceed to isolation. You can copy the snapshot to a safe sandbox environment, without networking, and resume the host or container.
- Explore and forensics: Once isolated, you can ideally explore the live container or host, and investigate running processes. If the host or container is not alive, then you can just focus on the snapshot of the filesystem. Explore the logs and modified files. There are tools like, Sysdig Secure captures, that greatly enhance forensics capabilities by recording all the system calls around an event and allowing you to explore even after the container or host is dead.
- Kill the compromised container and/or host as a last resource: Simply destroying the suspicious activity will prevent any additional harm in the short term. But missing details about what happened will make it impossible to prevent it from happening again, and you can end up in a never ending whack-a-mole situation, repeatedly waiting for the next attack to happen just to kill it again.
Check out a great example of forensics investigation in THREAT ALERT: Crypto miner attack involving RinBot’s server, a popular Discord bot.
16. Fix misconfigurations
Investigation should reveal what made the attack possible. Once you have discovered the attack source, take security measures to prevent it from happening again. The cause of a host, container, or application being compromised can be a bad configuration, like excessive permissions, exposed ports or services, or an exploited vulnerability.
In the case of the former, fix the misconfigurations to keep it from happening again. In the latter case, it might be possible to prevent a vulnerability from being exploited (or at least limit its scope) by making changes in configurations, like firewalls, using a more restrictive user, and protecting files or directories with additional permissions or ACLs, etc.
If the issue applies to other assets in your environment, apply the fix in all of them. It’s especially important to do so in those that might be exposed, like applications that are reachable from the internet if the exploit can be executed over a remote network connection.
17. Patch vulnerabilities
When possible, fix the vulnerability itself:
- For operating system packages (dpkg, rpm, etc.): First check if the distribution vendor is offering an updated version of the package containing a fix. Just update the package or the container base image.
- Older distribution versions: The vendor will stop providing updated versions and security fixes. Keep your hosts and images using supported versions before it is too late.
- For language packages, like NodeJS, Go, Java, etc.: Check for updated versions of the dependencies. Search for minor updates or patch versions that simply fix security issues if you can’t spend additional time planning and testing for breaking changes that can happen on bigger version updates. But plan ahead: old versions won’t be maintained forever.
- In case the distribution does not offer a patched version or there is no fix for unmaintained packages: It is still possible that a fix exists and can be manually applied or backported. This will require some additional work but it can be necessary for packages that are critical for your system and when there is no official fixed version yet. Check the vulnerability links in databases like NVD, vendor feeds and sources, public information in bug reports, etc. If a fix is available, you should be able to locate it.
If there is no fix available that you can apply on the impacted package, it might still be possible to prevent exploiting the vulnerability with configuration or protection measures (e.g., firewalls, isolation, etc.). Also, it might be complex and require a deep knowledge of the vulnerability, but you can add additional checks in your own code. For example, a vulnerability caused by an overflow in a JSON processing library that is used by a web API server could be prevented by adding some checks at the HTTP request level, blocking requests that contain strings that could potentially lead to the overflow.
18. Close the loop
Unfortunately, host and container security is not a one way trip where you just apply a set of security containers good practices once and can forget forever. Software and infrastructure are evolving everyday, and so complexity increases and new errors are introduced. This leads to vulnerabilities and configuration issues. New attacks and exploits are discovered continuously.
Start by including prevention and security best practices. Then, apply protection measures to your resources, mostly hosts and workloads, but also cloud services. Continue monitoring and detecting anomalous behavior to take action, respond, investigate and report the discovered incidents. Forensics evidence will close the loop: fix discovered vulnerabilities and improve protection to start over again, rebuilding your images, updating packages, reconfiguring your resources, and create incident reports to the future security incidents.
In the middle, you need to assess risk and manage vulnerabilities. The number of inputs to manage in a complex and big environment can be overwhelming, so classify and prioritize to focus on the highest risks first.
Conclusion
We’ve reviewed how container security best practices can be easily applied to your DevOps workflows. In particular, remember to:
- Shift left security, the first step is prevention.
- Protect all your assets.
- Know everything that happens in your organization, monitoring and detecting issues as fast as possible.
- Plan for incident response, because attacks are inevitable.
Remember that container security best practices don’t just include the delivered applications and container images themselves. You also need to include the full component stack used for building, distributing, and specifically executing the container.
54 percent of containers live for five minutes or less, which makes investigating anomalous behavior and breaches extremely challenging.
One of the key points of cloud-native security is addressing container security risks as soon as possible. Doing it later in the development life cycle slows down the pace of cloud adoption, while raising security and compliance risks.











Top comments (0)