
Your nodejs server app is ready. Its time to get it into the cloud. But the cloud can be overwhelming with many options and many tricks. We will breakdown a straight forward approach to reliably host your application on AWS and also manage its environment variables. Apart from hosting your application on day 1, you will also automatically scale your application and load balance incoming requests. Finally you will need a way to easily ship updates and push new code on the fly.
We will breakdown the full journey into 3 parts. Not because the journey is long, but because we want to understand the journey.
Part 1: Dockerize and deploy a sample nodejs application using AWS ECR (Elastic container registry) and AWS EC2 (Elastic compute cloud) and manage environment using AWS Parameter store.
Part 2: Autoscale and Load balance the dockerized nodejs application using AWS Auto scaling group, AWS Application load balancer and EC2.
Part 3: Continuous deployment of your dockerized nodejs application using AWS Code Pipeline and AWS Code Build and Github
This is Part 1, Dockerize and deploy a nodejs app on AWS
Lets pull up our sleeves and start 🚀
A sample nodejs app to work with
We will first create a sample app to work with and then dockerize it. Throughout the tutorial we will call our app my-app. So create a directory called my-app and setup our application.
MAKE SURE you have nodejs and npm available
mkdir my-app
cd my-app
npm init -y
You should now have a bare bone nodejs server. Lets, install express and dotenv for a simple app.
npm i express dotenv
create an index.js file and add this code. It creates a server using express. Note that server uses Port 8000
const express = require("express");
require("dotenv").config();

const PORT = 8000;
const APP_NAME = process.env.APP_NAME;

const app = express();

app.get("/", (_, res) => {
  res.send(`Hello from ${APP_NAME}!`);
});

app.listen(PORT, () => {
  console.log(`Hello from ${APP_NAME}!`);
});
The code reads APP_NAME from a .env file. This is mainly to demonstrate how environments can be managed in aws. create a .env file and add the following env variables, Use any values you would like
APP_NAME=myapp
In package.json, add the start command under scripts
"scripts": {
  "start": "node index.js"
}
Now run npm install and then npm start to run the server. You should see Hello from myapp! when the server starts.
You can find the Sample application in Github
Dockerize the application
We will dockerize our nodejs application in this section. First make sure Docker is installed in your system. Check the Official Documentation to install.
Note: Make sure to install buildx and support multi architecture builds.
The first step to dockerize your app is to write a Dockerfile. For our nodejs app, create a file named Dockerfile and add the following code.
# Use the official Node.js 20.13.1 image
FROM node:20.13.1-alpine

# Set the working directory
WORKDIR /app

# Copy the project
COPY . ./

# Install dependencies
RUN npm install

# Expose the port (replace with your application's port)
EXPOSE 8000

# Command to start the application
CMD ["npm", "start"]
Also create a .dockerignore file to ignore specific files from getting copied to docker image.
node_modules
.env
Note: we will not pass the .env file when building docker image. In AWS, env vars will be made available in a more secure and scalable way using AWS parameter store.
Now run the following code to build an image of your application. You can use any name other than my-app
docker build -t my-app:latest .
Now your docker image is ready. To check docker images you can run docker images. You should see my-app in the list.
To run the docker image in a container locally, use the following command. Make sure you are in the Folder with .env file. Use the appropriate port mapping
docker run --env-file .env -p 8000:8000 my-app:latest
This should run your dockerized application now. Visit https://localhost:8000 to check.
Deploy Application on EC2
Now we start working on AWS, Make sure to sign in to the AWS console on your preferred zone. We will also need to sign in to AWS CLI on our local machine. You can follow along the AWS CLI **installation instructions HERE
Next, **Login to be authenticated with AWS CLI following instructions HERE
Create an ECR repository for our app
Now that our docker image is ready and we have tested that it works, we will now host the image in AWS ECR. AWS ECR or Elastic container service is a service where you can host docker images.
Login to AWS console from the Browser and search for ECR. From the ECR console, click on "Create Repository". Fill in the name as "my-app", or your desired name.
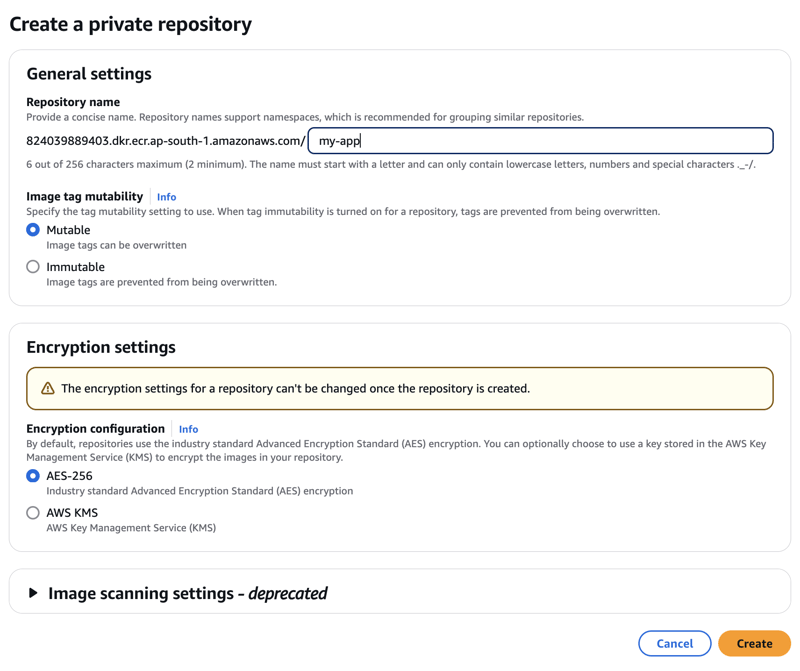
On the ECR console, you should see the "Repository URI" with the following structure. We will need this "Repository URI" later.
<aws_account_id>.dkr.ecr.<aws_region>.amazonaws.com/my-app
(or, the repository name you use)
*Note: * The variables aws_account_id, aws_region will be used repeatedly in this tutorials.
Push image to ECR
To push our image to ECR we will use the AWS CLI. First login to ECR using CLI on your local machine. Make sure to replace <aws_account_id>, <aws_region>
aws ecr get-login-password --region <aws_region> | docker login --username AWS --password-stdin <aws_account_id>.dkr.ecr.<aws_region>.amazonaws.com
You should see Login Succeeded in the console.
Now we will push the my-app docker image to ECR.
docker buildx build --platform linux/amd64,linux/arm64 -t <aws_account_id>.<aws_region>.amazonaws.com/my-app:latest --push .
This will push our image to ECR. If you visit ECR and click on my-app repository. You should see the latest tagged image.
Notes: We are building the image for multiple platforms as our production instance can have any platform. You may skip multiple architecture build if you know the architecture of your production servers.
Make sure buildx is installed with docker locally.
Running application in EC2
There are a number of steps to run our application properly on an EC2. The steps are
- Configure env using parameter store
- Configure ec2 role so our ec2 has proper permissions
- Run application in ec2
configuring aws parameter store for env variables
To securely use environment variables with AWS services, we will use AWS parameter store (a feature of AWS Systems Manager or SSM).
parameter store is a service where you can store secrets or variables and then read from different services.
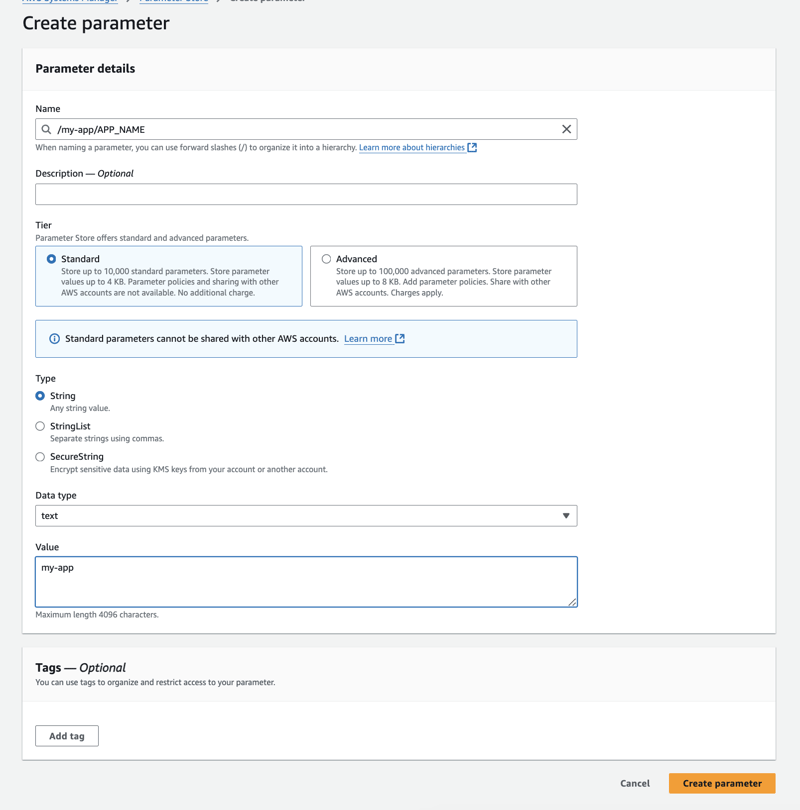
Search for "Parameter store" in AWS and go into it. Click "Create parameter".
Use /my-app/APP_NAME as the name and use my-app as value. You can even use encrypted values if your secrets are sensitive.
Now click "Create parameter" and we are done
Create AWS EC2 role for configuring permissions
In this section we will create an AWS EC2 role which will be used with the AWS instance.
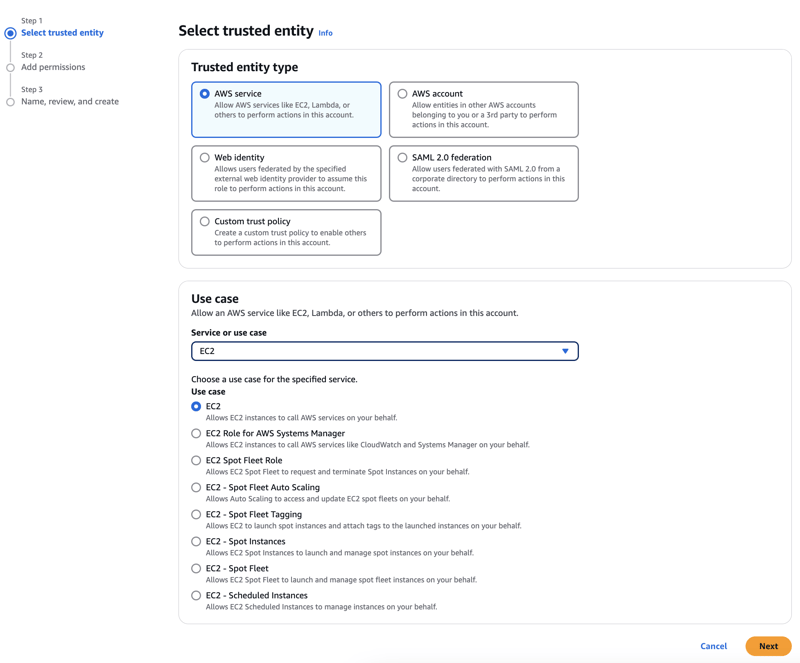
Search for "IAM" in the AWS panel and go in. Select "Roles" from the left panel under "Access management". Click on "Create role".
Step 1. Under "Select trusted entity", select "AWS service", under "Use case", select "EC2". Click next.
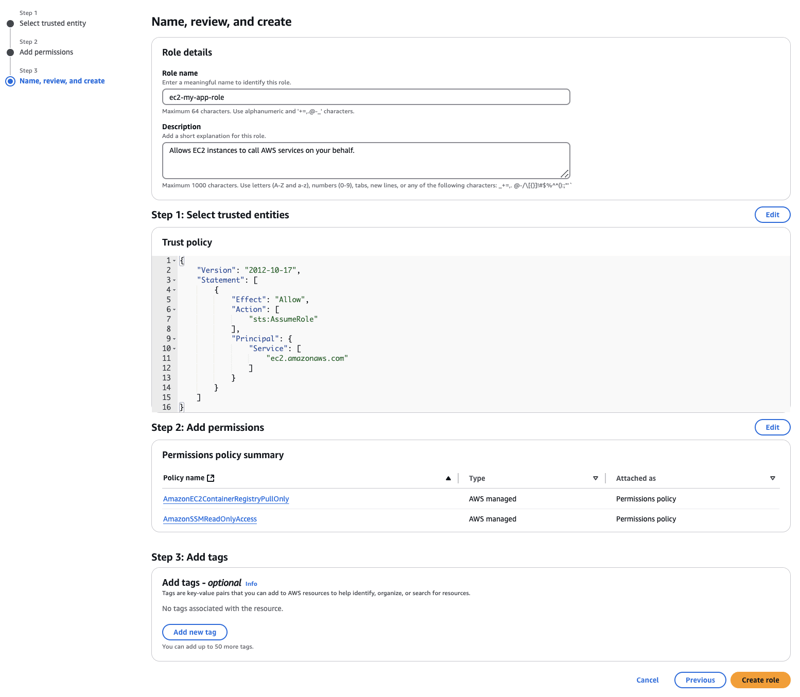
Step 2. Next we "Add permissions". Add the following permission sets by searching
AmazonSSMReadOnlyAccessAmazonEC2ContainerRegistryPullOnly
Now, click next
step 3. Provide name and check access and create the role.
Provide a name for the role like ec2-my-app-role, check permissions and create the role.
Run application on EC2
Now it is time to create our EC2 and run our application. Go to "EC2" panel in AWS and click Launch instance
Choose the follow config when creating the ec2.
- name: my-app-ec2 (or any name you like)
- Machine image: Ubuntu (choose the latest version)
- Instance type: t3a.micro (or any instance you prefer)
- Key pair: Make sure to attach a key pair (create a new key if needed)
- Security group: Select existing or create a security group. Make sure to allow SSH, HTTP and HTTPS traffic.
- Add storage: 12GB is good enough
- Open Advanced details, from "IAM instance profile", select the role we created in previous section
ec2-my-app-role
That's it, now hit "Launch instance"
Now, we want to connect to the EC2 and configure and run our application.
Go to the EC2 panel and you should see the instance loading up. When instance is in running state, click on it and then on next page,
Click on "Connect". We will connect to our EC2 instance using SSH to configure and run it.
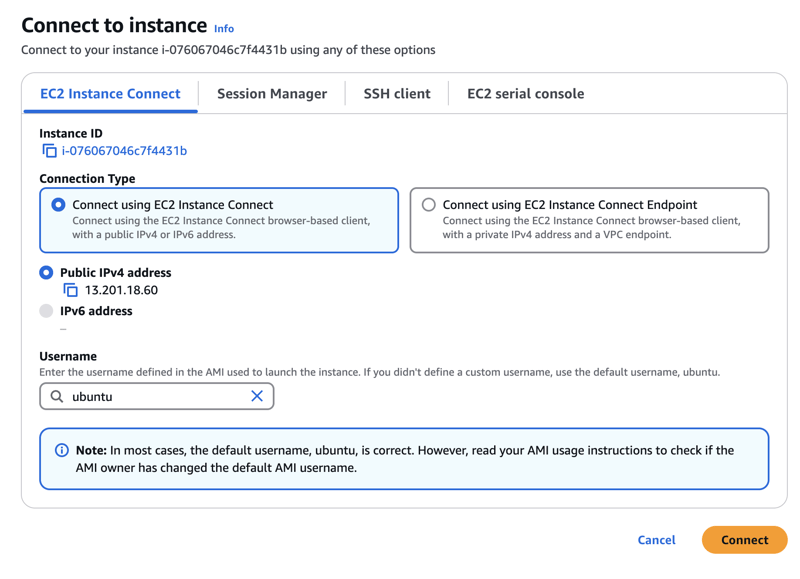
You should see a terminal to configure your EC2 now.
Configuring the EC2
- Install necessary dependencies
First install some necessary updates and dependencies for the next steps.
# Update package list and upgrade all packages
sudo apt-get update -y
sudo apt-get upgrade -y

# Necessary packages
sudo apt-get install -y apt-transport-https ca-certificates curl software-properties-common
We will also install nginx and git in the instance
sudo apt-get install -y nginx
sudo systemctl start nginx
sudo systemctl enable nginx

sudo apt-get install -y git
- We install docker in the EC2 instance
curl -fsSL https://download.docker.com/linux/ubuntu/gpg | sudo apt-key add -
sudo add-apt-repository "deb [arch=amd64] https://download.docker.com/linux/ubuntu $(lsb_release -cs) stable" -y

sudo apt-get update -y
sudo apt-get install -y docker-ce docker-ce-cli containerd.io -y

# enable, start docker
sudo systemctl start docker
sudo systemctl enable docker

sudo docker --version

# Docker user group
sudo usermod -aG docker $USER
newgrp docker

# Docker Compose
sudo curl -L "https://github.com/docker/compose/releases/download/v2.22.0/docker-compose-$(uname -s)-$(uname -m)" -o /usr/local/bin/docker-compose
sudo chmod +x /usr/local/bin/docker-compose

# optional - clean all docker unused images, containers
docker system prune -a --force
- Next, we will install AWS CLI into the instance. We will need the AWS CLI to pull docker image from ECR and to configure env variables in next part.
sudo apt-get update -y
sudo apt-get install -y unzip curl

curl "https://awscli.amazonaws.com/awscli-exe-linux-x86_64.zip" -o "awscliv2.zip"
unzip awscliv2.zip
sudo ./aws/install
aws --version
Running the application
Our first task is to pull the ECR image into our EC2 instance.
Make sure to replace <aws_region>, <aws_account_id> and use your docker image name and tags (i.e my-app, latest).
aws ecr get-login-password --region <aws_region> | docker login --username AWS --password-stdin <aws_account_id>.dkr.ecr.<aws_region>.amazonaws.com
docker pull <aws_account_id>.dkr.ecr.<aws_region>.amazonaws.com/my-app:latest
Now if you run docker images, you should see .../my-app image with latest tag.
Next we read env vars from AWS SSM parameter store and create a .env file. What it does is it recursively reads all parameter store parameters that start with /my-app, this is why we used a suffix in the name.
aws ssm get-parameters-by-path \
    --path "/my-app" --recursive --with-decrypt \
    | jq -r '.Parameters[] | (.Name | split("/")[-1]) + "=" + (.Value)' \
    | tee .env
if your run cat .env, you should see contents of .env file just created.
Finally we are ready to run our application. Make sure to replace the variables.
docker run --env-file .env -p 8000:8000 -d <aws_account_id>.dkr.ecr.<aws_region>.amazonaws.com/my-app:latest
You can run curl http://localhost:8000 to check application is running.
Accessing our application
Configure nginx to serve our application in the default Http port accessible from the internet.
The configuration tells nginx to forward requests to port 8000.
echo "server {
listen 80;
server_name _;
client_max_body_size 20M;

location / {
proxy_pass http://localhost:8000;
proxy_http_version 1.1;
proxy_set_header Upgrade \$http_upgrade;
proxy_set_header Connection "upgrade";
proxy_set_header Host \$host;
proxy_cache_bypass \$http_upgrade;
}
}" | sudo tee /etc/nginx/sites-available/default > /dev/null
sudo nginx -t
sudo service nginx restart
Now run curl http://localhost and you see your application output.
To access our application over internet, Go to AWS EC2 console and find you EC2 instance.
You should find a "Public ipv4 address" associated with your instance.
Go to http://{PUBLIC_IP_ADDRESS} and see your application output.
Note: Make sure the security group of the EC2 instance allows HTTP traffic from anywhere in inbound rules.
About Author:
Tanmoy Basak Anjan is CEO and Co-Founder of engaze.ai, a sales tech platform that is changing the way restaurants operate. Visit engaze.ai to know more.

Top comments (0)