Introduction
Moving Amazon Redshift to a new account and region might seem difficult, but it doesn’t have to be. You might need to follow regulations or reorganize your teams. In this guide, we will show you step by step how to move your Redshift data to a different account and region. After reading this guide, you will know how to do Redshift migrations easily, with minimal downtime and secure data. Let’s start and make your Redshift move simple!
Prerequisites
For the migration process, choose a maintenance window with minimal write activity, ensuring alignment with the organization’s RTO and RPO requirements.
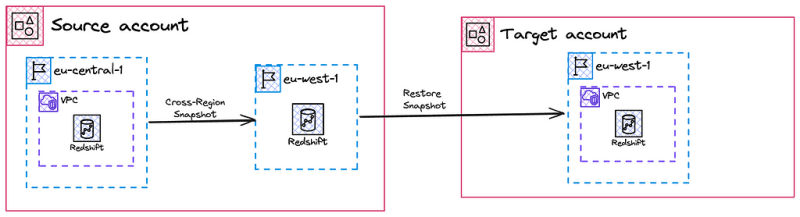
Step 1: Configure cross-region snapshot
To move the cluster to a different region in a different account, you first need to configure the cross-region snapshot for the cluster in the source account where the cluster resides.
- Go to your cluster and click Actions.
- Select Configure cross-region snapshot.
- In the Destination AWS Region drop-down menu, choose the region where you want to move the cluster in the target account.
- Click Save.

Step 2: Create a manual snapshot
To share a cluster snapshot with another AWS account, you need a manual snapshot.
- Go to your cluster and click Actions.
- Choose Create Snapshot.
- Give the snapshot a name and click Create Snapshot.
Since we configured the cross-region snapshot in the previous step, creating a snapshot now will also copy it to the destination region.

Step 3: Grant Access to KMS Key in the Target Account
When you share an encrypted snapshot, you also need to share the KMS key that was used to encrypt it. To do this, add the following policy to the KMS key. In this policy example, replace 123456789123 with the identifier of the TargetAccount.
{
    "Id": "key-policy-1",
    "Version": "2012-10-17",
    "Statement": [
        {
            "Sid": "Allow use of the key in TargetAccount",
            "Effect": "Allow",
            "Principal": {
                "AWS": [
                    "arn:aws:iam::123456789123:root"
                ]
            },
            "Action": [
                "kms:Decrypt"
            ],
            "Resource": "*"
        }
    ]
}
Step 4: Share snapshot
Navigate to Snapshots, find the manual snapshot you created, and click on it. Under Snapshot access, click on edit. Enter the TargetAccount ID and click Add account. Once you’re done, click Save. Now, the snapshot will be accessible in the TargetAccount and the destination region..

Step 5: Restoring a Cluster from Snapshot in the Target Account
Navigate to the TargetAccount and the destination region in Redshift. Under snapshots, you will find the shared snapshot. Click on Restore snapshot and configure options like Nodes, Networking, and more as needed.
Conclusion
In this guide, we’ve covered the essential steps to migrate Amazon Redshift to a new account and region smoothly. By following these steps carefully, you can ensure minimal downtime and maintain data integrity throughout the migration process. I hope this guide has provided clarity and confidence for your Redshift migration journey!


Top comments (0)