As an administrator, you can lock a subscription, resource group, or individual resource to prevent other users in the organisation from accidentally deleting or modifying resources. A lock overrides any permissions the user might have.
In this walkthrough, we will add a lock to a resource group and test deleting the resource group. A resource group is a container to manage and aggregate resources in a single unit. You group related resources such as virtual machines, storage accounts and virtual networks.
- Adding a Lock to the resource group and test deletion
- Sign in to the the Azure portal
- In the Azure portal, type in resource group in the search bar and select Resource groups under Services
 This would list out the names of the resource groups created and available
 - Select any of the resource groups available for this task
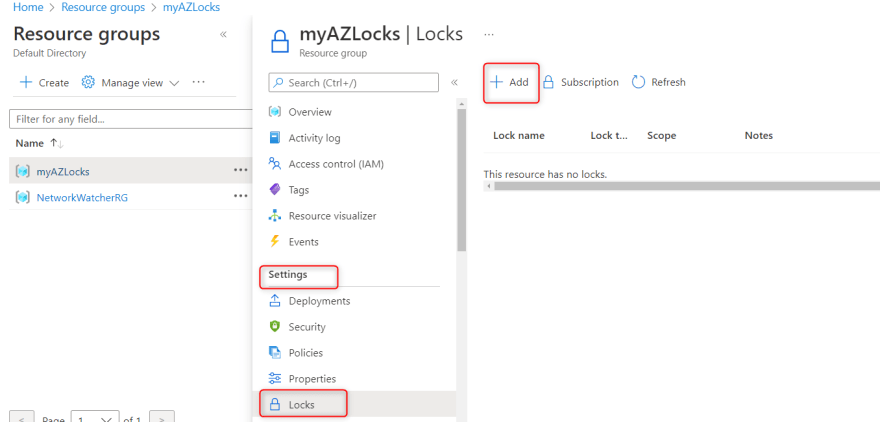
- In the Settings section, click Locks and then select + Add

- Configure the new lock with the following and select OK when you are done

 You would notice the lock has two types, **the Read-only and Delete.
Read only means authorised users can read a resource, but they can not delete or update the resource, while the Delete means authorised users can read and modify a resource, but they can not delete the resource.
 - Select Overview and click Delete resource group. Type the name of the resource group and click OK

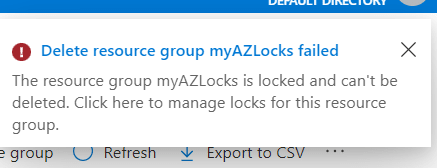
- You will receive an error message stating the resource group is locked and can not be deleted

- Test deleting a member of the resource group
We will test if the resource lock protects a storage account in the resource group. Read more about storage account here.
- From the search box, type storage accounts and select Storage accounts under Services

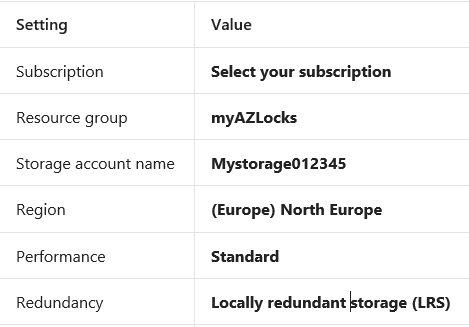
- On the Storage accounts page, click +Create and fill in the following information. The storage account name must be a globally unique name.


- Select Review + Create to review your storage account settings and allow the configuration to be validated.
- Once validated, click Create and wait for the notification that the storage account was successfully created.
- Access your new storage by selecting Go to resource. From the Overview pane, click Delete

- You will receive an error message stating the resource or its parent has a delete lock.
 Note: We did not create a lock specifically for the storage account but we did create a lock at the resource group level which contains the storage account. As such, the parent level lock prevents us from deleting the resource and the storage accounts inherits the lock from the parent.
- Remove the resource lock
- Return to the resource group 'myAZLocks' and in the Settings section, select Locks
- Select Delete of 'Azlock'

- Return to the storage account page and confirm you can now delete the resource
Congratulations! We just added a lock to a resource group and tested deletion, tested deleting a resource in the resource group and removed the resource lock.


Top comments (0)