"Air Hockey" photo by LadyDucayne is licensed under CC BY 2.0.
Airtable is an awesome product. It’s like a cross between a spreadsheet and a database, but with a lot more flexibility for creating dynamic views of your data. In this post you’ll learn to read Airtable data from a Twilio serverless application. The advantages of doing so are as follows:
- Rapid prototyping. If you need to persistently store data, it’s easier to create an Airtable base than to set up a proper database.
- Maintenance flexibility. Folks who don’t know how to code can easily maintain and extend the data.
- Easy authentication. Sure, you could use Google Sheets as a lightweight database, but authenticating with Google Sheets API can be tricky.
Today we’ll be building an app that returns facts about animals, but you can customize this code to fit your use case.
Prerequisites
- A Twilio account -- sign up for a free one here and receive an extra $10 when you upgrade your account
- A free Airtable account
- A Twilio phone number with SMS capabilities
Airtable 101
In order to use Airtable, you need to be familiar with a few key concepts. If you’re already an Airtable whiz, feel free to skip to the “Reading From Airtable with a serverless function” section.
- Bases. According to Airtable documentation, “A base is a database that contains all of the information you need for a specific project.”
- Bases are made up of one or more tables, which are essentially like different sheets or tabs of a spreadsheet.
- Records are units of data, analogous to a row on a spreadsheet.
- Information in records is stored in fields, which are kind of like a column on a spreadsheet.
- Workspaces are folders where you can organize your bases so that other folks can collaborate with you.
To create a new base you can:
- Choose one of Airtable’s many official templates
- Choose a template created by the Airtable community
- Start from scratch
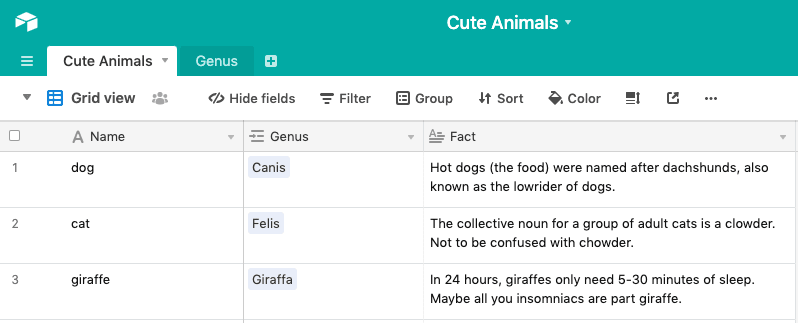
I’ve created a small base called “Cute Animals” that we’ll be working with today. You can view it [here])(https://airtable.com/shr5u6b5xR9mBcLYZ) and create your own copy with the “Copy base” button on the right-hand side.
This base contains a “Cute Animals” table that has 3 fields:
- Name, a single line text field
- Genus, a link to another record (in the Genus table)
- Fact, a long text field
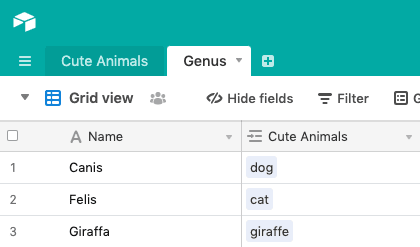
It also contains a “Genus” table that has 2 fields:
- Name, a single line text field
- Cute Animals, a link to another record (in the “Cute Animals” table)
While you’re in Airtable, let’s get some credentials. Generate an Airtable API key and save it somewhere -- you’ll need it in a minute.
Be careful not to commit your Airtable API key to any code that's going up on GitHub, or share it with anybody. If you do they can gain full access to your Airtable account.
Each base has a unique ID number. Make a note of your Airtable base ID which can be found in the (nifty!) auto-generated API documentation for that specific base.
Reading Airtable data from a serverless function
We'll use a Twilio Function to receive an incoming SMS message and fetch data from our Airtable base. Open the Functions configuration dashboard. Add your Airtable API key and base IDs as environment variables, AIRTABLE_API_KEY And AIRTABLE_BASE_ID respectively.
While you’re at it, add the Airtable Node.js SDK to the Dependencies section of the Functions configuration dashboard. Here we’re using version ^0.8.1 (that is, 0.8.1 or the latest minor patch Hit “Save” to save all your configuration changes.
Let’s write a Function that, given an animal name, returns the animal fact. This will show you how to filter airtable records by field for a simple text search. Using the blank template, create a new Function called getAnimalFact. Give it a path, /get-animal-fact. Copy the following code into it:
const airtable = require("airtable");
const twilio = require("twilio");

exports.handler = function (context, event, callback) {
 const base = new airtable({
   apiKey: context.AIRTABLE_API_KEY,
 }).base(context.AIRTABLE_BASE_ID);
 const twiml = new Twilio.twiml.MessagingResponse();
 const animalName = event.Body.toLowerCase();

 return base("Cute Animals")
   .select()
   .all()
   .then((records) => {
     records.forEach((record) => {
       if (record.get("Name") === animalName) {
         twiml.message(record.get("Fact"));
         callback(null, twiml);
       }
     });
     twiml.message(
       `Sorry, we couldn't find any facts about the ${animalName}.`
     );
     callback(null, twiml);
   })
   .catch((error) => {
     callback(error);
   });
};
What is even happening here? Let’s break it down.
- First, we instantiate the Airtable base.
The
selectmethod allows you to select your view, which returns the records in the order listed in that view. Called with no args, records are returned in random order. - The
allmethod is asynchronous and returns every record in the view. Which is okay if you have a small number of records, but for larger bases you may want to paginate using theeachPagefunction. See the Airtable auto-generated API docs for an example. - Then we iterate through the records until we find a matching one, grab data from the field we want, and wrap it in some good old-fashioned TwiML so the Twilio API can send it as a text message.
- This code returns the Fact field of the first matching record.
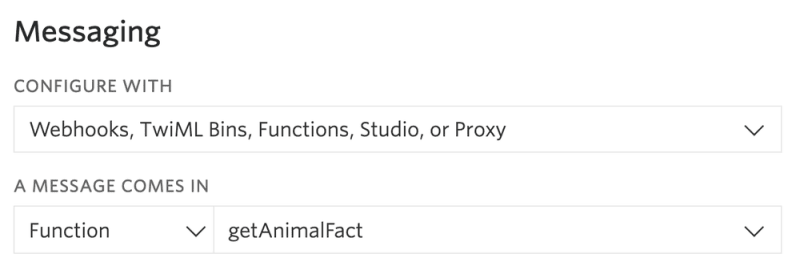
After adding this code, save your Function and wait for it to deploy itself. On the phone numbers dashboard, configure your Twilio number to call this Function when a new message comes in.
Test it out by texting “Cat” to your Twilio number. You should receive the following response:
The collective noun for a group of adult cats is a clowder. Not to be confused with chowder.
Testing error paths is important too. If we try the same with zebra, we get the following output:
Sorry, we couldn't find any facts about the zebra.
Fetching linked record data from Airtable
One real power of Airtable is that you can have many different field types, including:
- URLs
- Dates
- Phone numbers
- Email addresses
- Links to other records
See a full list of Airtable field types at this link.
Links to other records are powerful, and give you lightweight relational database functionality. Let’s add the Genus field, which is a link to another record, to our SMS response.
Fetching the linked data requires an additional API call. In the code below, we’ll use the find method to fetch one record with a specific ID. Replace the code in your Function with the following:
const airtable = require("airtable");
const twilio = require("twilio");

exports.handler = function (context, event, callback) {
 const base = new airtable({
   apiKey: context.AIRTABLE_API_KEY,
 }).base(context.AIRTABLE_BASE_ID);

 const animalName = event.Body.toLowerCase();
 let fact = null;
 return base("Cute Animals")
   .select()
   .all()
   .then((records) => {
     let genusId = null;
     const twiml = new Twilio.twiml.MessagingResponse();
     const record = records.find(
       (record) => record.get("Name") === animalName
     );
     if (record) {
       fact = record.get("Fact");
       genusId = record.get("Genus");
     } else {
       twiml.message(
         `Sorry, we couldn't find any facts about the ${animalName}.`
       );
       callback(null, twiml);
     }
     base("Genus")
       .find(genusId)
       .then((record) => {
         twiml.message(
           `${fact} Also, the genus of a ${animalName} is ${record.get(
             "Name"
           )}.`
         );
         callback(null, twiml);
       });
   })
   .catch((error) => {
     console.log(error);
     callback(error);
   });
};
Save your Function again.
Text dog to the number and witness the following response:
Hot dogs (the food) were named after dachshunds, also known as the lowrider of dogs. Also, the genus of a dog is Canis.
Conclusion
In this post, you’ve learned to:
- Fetch plain text data and linked records using the Airtable Node.js SDK
- Create a Twilio app backed backed by a serverless Function and an Airtable base
If you're interested in learning more, the next post in this series explains how to write to Airtable from a SMS message.
I’ve heard about so many awesome Airtable projects recently, such as this mutual aid tool to help community groups keep people fed during the covid crisis. If you’re building something cool I’d love to hear from you. Hit me up on Twitter or send me an email: tthurium [at] twilio [dot] com.


Top comments (0)