One of the most popular service on the AWS cloud.
Amazon S3 is an acronym for Amazon Simple Storage Service
An object storage service offering industry-leading scalability, data availability, security, and performance.
It is designed to retrieve any amount of data from anywhere.
AWS S3 use cases
Below are some of it popular use cases:
- Data Archival, Infrequent Access & Reduced Redundancy
- Backup and Disaster Recovery
- Analytics
- Static Website Hosting
- Improve File Sharing
- Create Private Local Repository
Without further Adieu, lets set our timer to 5mins.

Step 1
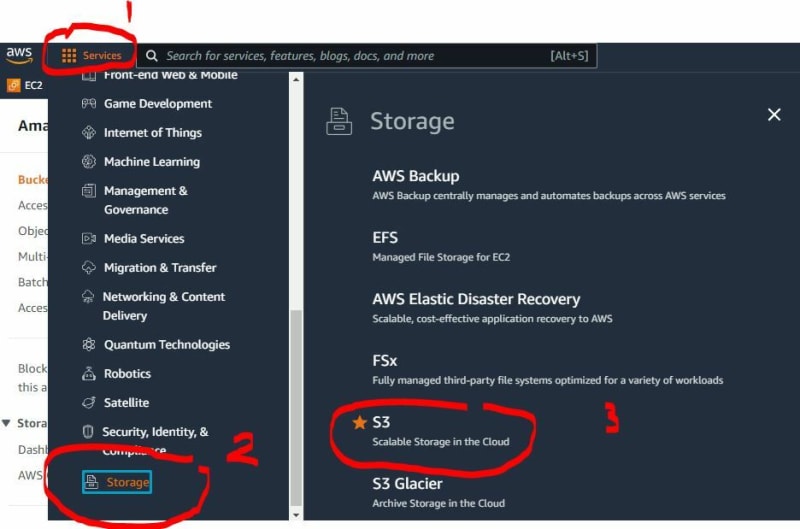
Login to the AWS console, on the top left corner click on Services then click on Storage then S3
Step 2
On the S3 landing page, click Create Bucket
Step 3
For the General Configuration add your bucket name
Bucket name must be unique and must not contain spaces or uppercase letters. Every S3 bucket on the cloud must have a unique name.
Popular naming convention is to use the name of the project, your Account ID, then your environment.
In my case its
test-758734324072-dev
Step 4
Uncheck Block all public access, and make sure to check I acknowledge that the current settings might result in this bucket and the objects within becoming public.
This is because we want our S3 bucket publicly accessible.
Step 5
Leave every other thing as default, then click Create Bucket
As soon as this is done, you would be redirected to bucket dashboard.
Step 6
On the dashboard, click on the newly created bucket in my case
test-758734324072-dev
Step 7
click on Properties, and copy the ARN.
You would need it for the next step.
Step 8
We have to set the bucket policies.
click Permissions then Bucket policy click Edit
Add the below policy
{
"Version":"2012-10-17",
"Statement":[
  {
      "Sid":"Stmt1625306057759",
      "Principal":"*",
      "Action":"s3:*",
      "Effect":"Allow",
      "Resource":"arn:aws:s3:::test-758734324072-dev"
  }
]
}
Change the Resource value to your bucket ARN, in my case its
arn:aws:s3:::test-758734324072-dev
Step 9
Still on the permissions tab scroll down to the last section Cross-origin resource sharing (CORS)
click edit and add the following configuration.
[
 {
     "AllowedHeaders":[
         "*"
     ],
     "AllowedMethods":[
         "POST",
         "GET",
         "PUT",
         "DELETE",
         "HEAD"
     ],
     "AllowedOrigins":[
         "*"
     ],
     "ExposeHeaders":[

     ]
 }
]
Note: for both the Bucket policy and CORS configuration, make sure you don't have any spaces at the beginning of your input, or else, you would encounter errors.
Step 10
Lastly click on the Object Tab, then click on Upload, to upload any file of your choice to the S3 bucket.
Thats it folks, you have successfully created an S3 bucket in less than 5mins.


Top comments (0)