What if I told you that, with the power of ChatGPT and your competitor emails, you can quickly build a competitor analysis tool? If you are not tracking your competitors, well, now is the time, as I will show you how to track all your competitors using ChatGPT automatically.
Our competitors highlight their business activities through multiple channels, including email newsletters. I sign up for all my competitors' newsletters to keep a pulse on their activities. But this manual process often gets lost in the craziness of my already full inbox. Once I have all the competition emails, what do I do with them that can add any value?
Look no further, as this article will help you build the perfect competitor analysis tool using ChatGPT, Google Sheets, and Zapier without having to write any code.
How does the competitor analysis tool work?
The competitor analysis tool utilizes a Gmail account, Google Sheets, ChatGPT, and Zapier. I created an isolated Gmail account to reduce the risk of inadvertently running my personal emails through ChatGPT and using my data to train ChatGPT with my data. Next, Zapier connects Gmail, Google Sheets, and ChatGPT, allowing us to automate ingesting new emails and convert them to Google Sheet rows.
For those who don't know, Zapier is a no-code automation tool that connects services. Our project uses Zapier to read our Gmail inbox for new emails. When a new email arrives, Zapier is triggered to create a new row, process the mail, and convert it into the defined Google sheet columns.
A second process is triggered once the new row in the Google sheet is populated. This time, we trigger ChatGPT to iterate over the email content multiple times. For each iteration of ChatGPT, we ask it to perform a new task. We ask ChatGPT to process and output the following information about the email:
- Create a word cloud of words that are mentioned often in the email.
- Perform a SWOT analysis on the email, providing its strengths, weaknesses, opportunities, and threats.
- Summarize the email into a single sentence.
- Categorize the email into defined categories (Promotion, Entertainment, Advertisement, Notification, Sales, or Informational)
- Indicate the sentiment of the email.
- Subject Analysis
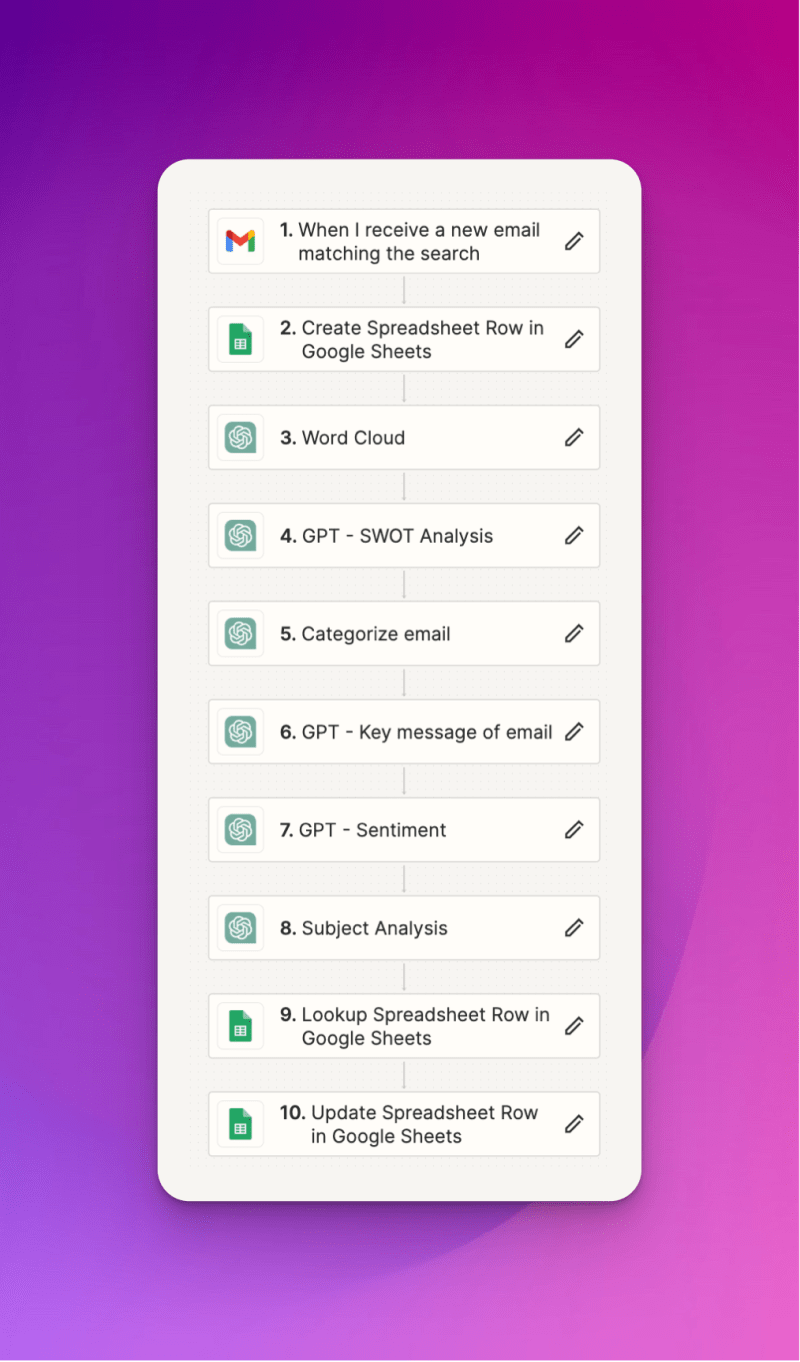
Competitor Analysis Tool Zapuer Workflow
ChatGPT Competitor Analysis Project Requirements
Before we get started, have a look at the requirements below. Once you have the below ready, we can get started.
Requirements:
- Gmail account. You can use your existing Gmail account or create a new one if you don't have one. I made a new account to prevent my data from leaking to ChatGPT.
- ChatGPT account ** ** - Create a ChatGPT account. If you are planning to process a lot of emails, you might want to consider upgrading to ChatGPT + ** **
- Zapier Account —This project recommends a starter Zapier account ($29 per month). However, if you convert the email manually to Google Sheets, you could probably still use the free version. An Open-Source alternative to Zapier is https://n8n.io/, which I've also used but requires a bit more setup.
Build the ChatGPT Competitor Analysis
First, we will set up Zapier with Gmail. Zapier will then monitor Gmail for incoming Emails that match a specific search string. The search string should use the email from which your competitors send emails. I use my email to continue sending new emails to test for demonstration purposes.
- Open Zapier and navigate to create a new Zap
- Click the trigger and select Gmail as the application. Next, confirm the authentication to Gmail.
- Next, select which event in Gmail we want to execute. Select "New Email Matching Search." This way, we can prevent spam or unwanted emails from triggering our workflow. Click Continue
- Click Continue
- Now, we can configure the search string. I will use the 'from:competitor@competitor-email.com' search string in this example. The search string uses Gmail's search string. For a different search example, here's the full list of possibilities. https://support.google.com/mail/bin/answer.py?hl=en&answer=7190
- Click the 'Test Trigger' button to read your inbox for an email matching the search query from Step 5. If the test is unsuccessful, ensure you have an email in the inbox matching the search string and that your search string is correct. Keep testing until you see the results.
- Now that the test has passed, you should see several email records queried from your inbox. Select the email record you want to continue with and click Continue with the selected record.
Store emails in Google Sheet
Next, set up a new Google Sheet to store the selected emails in raw format for later steps.
- Create a new Google Sheet. You can use my Google Sheet here as a template that contains all the columns required to store the emails. - https://docs.google.com/spreadsheets/d/1RIYOwFmMVDecQ32RrearZBwMBxNuKgFsO2twNW-u7ic/edit?usp=sharing
- In Zapier, add a step below the Gmail step.
- Search for Google Sheets and continue. It will use the same Google authentication as your previous Gmail account.
- Event " Create spreadsheet row" and click continue.
- Under Action, select your Google Drive, where the Google Sheet is stored.
- Select the spreadsheet name. If you use the template from Step 1, the spreadsheet name is Competitor GPT.
- Use the default worksheet.
The Google Sheet is ready. Next, we will map the Gmail email fields to the Google Sheet columns.
Map email to Google Sheets
- ID = ID (Alphanumerical number). We use this field as our index for lookups.
- Date = Date ** Date: ** Fri, 22 Mar 2024 11:09:16 +0100
- From = *From Name: * Brian Christner
- To = *To Emails: * The email address you are filtering from the Gmail setup
- Subject = *Subject: * 2x2 AC/DC Tickets
- Body = Body Plain
- Click Continue
- Click Test step
- Zapier outputs the results in the test window. Switch to Google Sheets. The results are also in the Competitor GPT Google Sheet.
- Success, but wait to click publish.
We have connected Gmail to Google Sheets. We can test the process by sending test emails to the Gmail account. After a few seconds, the emails should appear in the Google sheet.
Next is the best part: connecting ChatGPT to the equation. ChatGPT will now be set up in several steps, each with its task that iterates over the Google Sheet. Each step stores the result in the appropriate column in Google Sheets.
Let's dive in.
Setting up ChatGPT tasks
The following section enables six different ChatGPT tasks within Zapier. We prompt ChatGPT to perform the following:
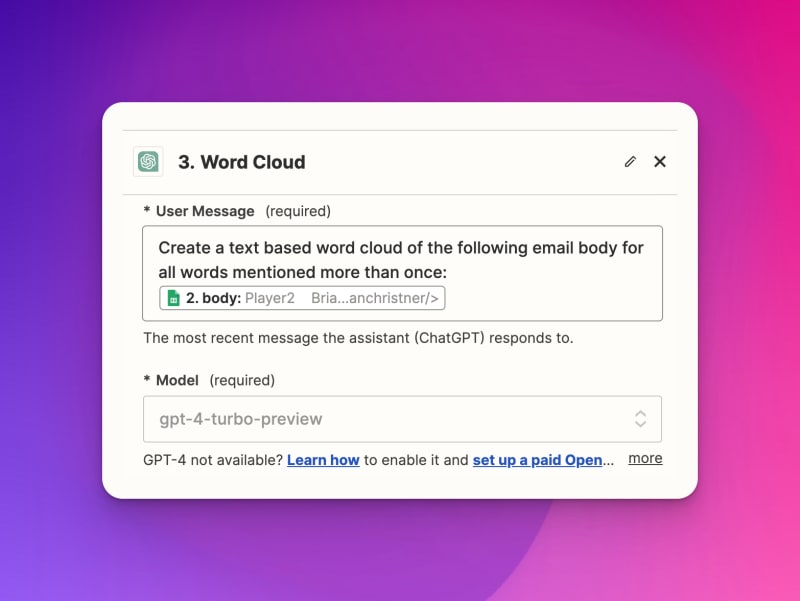
Prompt ChatGPT to create a Word Cloud
As the first task, we will set up a Word Cloud that counts the number of occurrences of a word in the email.
- Add a step below Google Sheets by clicking the
+symbol below the task. - Search for ChatGPT and select ChatGPT
- Click "ChatGPT" at the top of the step to rename it to Word Cloud.
- Event = Conversation
- User Message = "Create a word cloud from the text of this email and provide a count of the number of times a word is mentioned more than once. Just provide the word cloud results and no explanation."
- You noticed the "Insert Data" pop-up below where you entered the User Message. Here, select 2. Google Sheets
- Select the Body column from the Google Sheet, which will feed the data from this field into ChatGPT.
- Model = gpt-4-turbo-preview
- Click Continue
- Click test and verify the output at the bottom of the screen, which should display the word cloud.
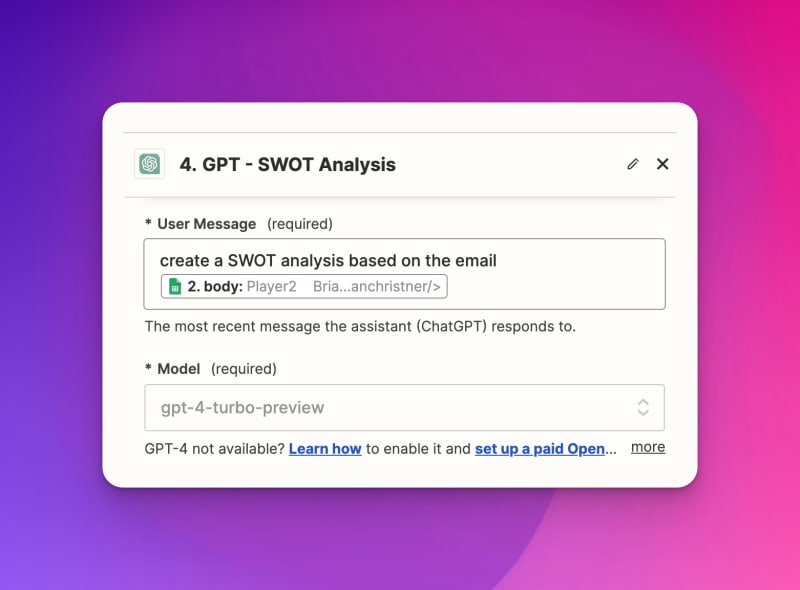
Prompt ChatGPT to perform a SWOT Analysis
Set up the task to perform a SWOT analysis on the body of the email.
- Add a step below Google Sheets by clicking the
+symbol below the task. - Search for ChatGPT and select ChatGPT
- Click "ChatGPT" at the top of the step to rename it "SWOT Analysis."
- Event = Conversation
- User Message = "Create a word cloud from the text of this email and provide a count of the number of times a word is mentioned more than once. Just provide the word cloud results and no explanation."
- You noticed the "Insert Data" pop-up below where you entered the User Message. Here, select 2. Google Sheets
- Select the Body column from the Google Sheet, which will feed the data from this field into ChatGPT.
- Model = gpt-4-turbo-preview
- Click Continue
- Click test and verify the output at the bottom of the screen, which should display the test results.
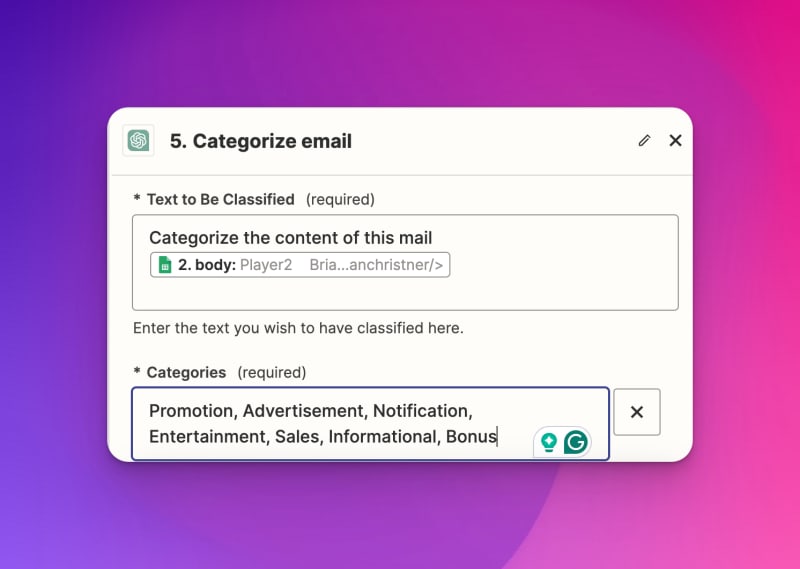
Prompt ChatGPT to Categorize email
Set up the task to determine the category of the email received.
- Add a step below Google Sheets by clicking the
+symbol below the task. - Search for ChatGPT and select ChatGPT
- Click "ChatGPT" at the top of the step to rename it to "Categorize Email."
- Event = Classify text
- User Message = "Categorize the content of this mail Categorize the content of this mail."
- You noticed the "Insert Data" pop-up below where you entered the User Message. Here, select 2. Google Sheets
- Select the Body column from the Google Sheet, which will feed the data from this field into ChatGPT.
- Model = gpt-4-turbo-preview
- The Categories field input: "Promotion, Advertisement, Notification, Entertainment, Sales, Informational, Bonus"
- Click Continue
- Click test and verify the output at the bottom of the screen, which should display the test results.
Prompt ChatGPT to highlight the Key Message of the Email
Set up the task to determine the key message of the email.
- Add a step below Google Sheets by clicking the
+symbol below the task. - Search for ChatGPT and select ChatGPT
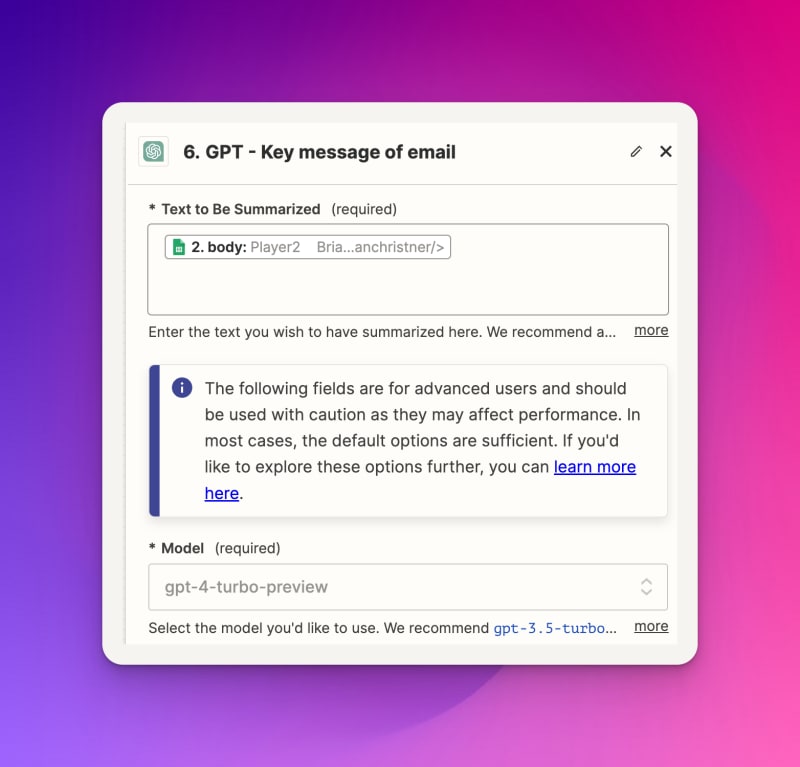
- Click the name "ChatGPT" at the very top of the step to rename it to "Key Message"
- Event = Summarize text
- Text to be summarized = "Insert Data" pop-up below where you entered the User Message. Here, select 2. Google Sheets
- Select the *Body column * from the Google Sheet, which will feed the data from this field into ChatGPT.
- Model = gpt-4-turbo-preview
- Click Continue
- Click test and verify the output at the bottom of the screen, which should display the test results.
Prompt ChatGPT to perform an Email Sentiment analysis
Set up the task to perform an email sentiment analysis analysis on the email's body.
- Add a step below Google Sheets by clicking the
+symbol below the task. - Search for ChatGPT and select ChatGPT
- Click the name "ChatGPT" at the very top of the step to rename it to "Email sentiment."
- Event = Analyze Text Sentiment
- Text to be analyzed = "Insert Data" pop-up below where you entered the User Message. Here, select 2. Google Sheets
- You noticed the "Insert Data" pop-up below where you entered the User Message. Here, select 2. Google Sheets
- Select the Body column from the Google Sheet, which will feed the data from this field into ChatGPT.
- Model = gpt-4-turbo-preview
- Click Continue
- Click test and verify the output at the bottom of the screen, which should display the test results.
Prompt ChatGPT to perform a Subject Analysis
Set up the task to perform an analysis of the email subject.
- Add a step below Google Sheets by clicking the
+symbol below the task. - Search for ChatGPT and select ChatGPT
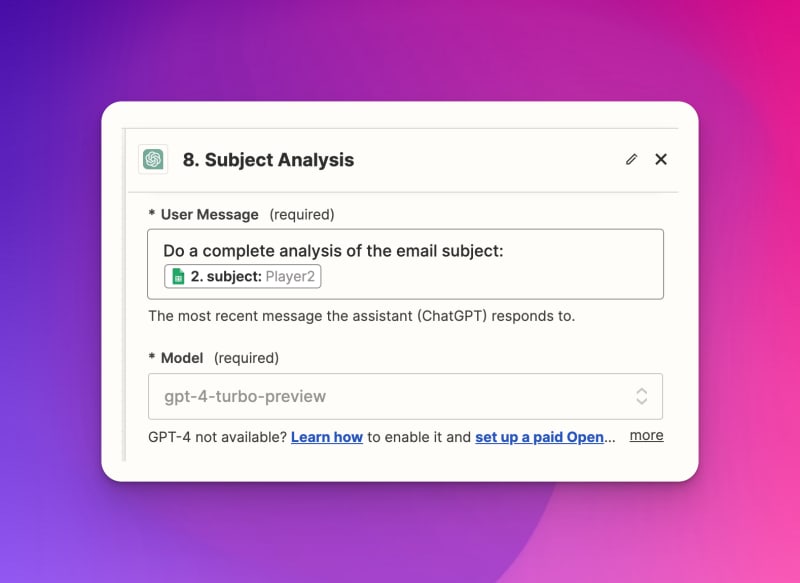
- Click the name "ChatGPT" at the very top of the step to rename it to "Subject Analysis."
- Event = Conversation
- User Message = "Do a complete analysis of the email."
- You noticed the "Insert Data" pop-up below where you entered the User Message. Here, select 2. Google Sheets
- Select the Subject column from the Google Sheet, which will feed the data from this field into ChatGPT.
- Model = gpt-4-turbo-preview
- Click Continue
- Click test and verify the output at the bottom of the screen, which should display the test results.
Insert the ChatGPT results into Google Sheets
The six ChatGPT steps successfully processed the prompts and stored the data within Zapier. Next, we transfer the data stored in Zapier to our Google Sheet.
To input the ChatGPT data, we first need to look up the row in the Google Sheet that contains the email data matching this particular email. This step will look up the email ID and date from the email as keys to determine the correct row in the Google Sheet. The data is inserted into the proper columns once the correct Google Sheet row matches Zapier.
Look up Google Sheet Row
Set up the task to perform a Google Sheet row lookup matching data from the email we inserted earlier.
- Add a step below Google Sheets by clicking the
+symbol below the task. - Search for Google Sheets and select Google Sheets.
- Click "ChatGPT" at the top of the step to rename it "Row Lookup."
- Event = Lookup Spreadsheet Row
- Under Action, select your Google Drive, where the Google Sheet is stored.
- Select the spreadsheet name. If you use the template from earlier, the spreadsheet name is Competitor GPT.
- Use the default worksheet.
- Lookup Column: ID
- Lookup Value: You noticed the "Insert Data" pop-up below where you entered the User Message. Here, select 2. Google Sheets
- Select the ID column from the Google Sheet.
- Supporting Lookup column: Date
- Supporting Lookup value: You noticed the "Insert Data" pop-up below where you entered the User Message. Here, select 2. Google Sheets
- Select the Date column from the Google Sheet.
Update Google Sheet Row
Finally, we can update the Google Sheet with the results from all the previous steps
- Add a step below Google Sheets by clicking the
+symbol below the task. - Search for Google Sheets and select Google Sheets
- Click the name "ChatGPT" at the very top of the step to rename it to "Update Google Sheet."
- Event = Update Spreadsheet Row
- Under Action, select your Google Drive, where the Google Sheet is stored.
- Select the spreadsheet name. If you use the template from earlier, the spreadsheet name is Competitor GPT.
- Use the default worksheet.
- Row: Lookup Spreadsheet Row and select ID
- Word Cloud: Insert Data -> Word Cloud -> Reply
- SWOT Analysis: Insert Data -> SWOT Analysis-> Reply
- GPT Summary: Insert Data -> Summarized Data -> Summarized Text
- Category of email: Insert Data -> Categorize Email -> Category
- Sentiment: Insert Data -> Sentiment -> Sentiment
- Sentiment: Insert Data -> Sentiment -> Sentiment
- Subject Analysis: Insert Data -> Subject Analysis -> Reply
FINALLY, we can click Publish in Zapier upper right-hand corner to enable the Zap
The Competitor Analysis tool is complete
We've successfully built a competitor analysis tool utilizing Gmail, Zapier, Google Sheets, and ChatGPT. The true test is to send emails to your newly created tool and see how it processes them. Once you are satisfied with your tests, start scaling up the number of competitors you track.
I forwarded a Google Tips email to the Competitor Analysis tool as a test so you can see the results. You can find the results from the test here - https://docs.google.com/spreadsheets/d/1RIYOwFmMVDecQ32RrearZBwMBxNuKgFsO2twNW-u7ic/edit?usp=sharing
What's next?
Now that the Competitor Tool basis is in place, you can make iterative improvements. Continue by adjusting each ChatGPT step to better adapt to your use case. I'm continually improving the Zapier flow and ChatGPT steps. As the ChatGPT improves, so will your workflow.
You can also create a separate Zapier flow that iterates over the Google Sheets on a set interval to determine the frequency of the emails or possibly new patterns. Finally, a monthly report about all the emails collected will be made, and the findings will be presented.
One last point: be sure to keep an eye on your ChatGPT costs. If you decide to process many emails, this could incur some costs on ChatGPT.
Frequently Asked Questions
- What tools do I need to build a competitor analysis tool? To automate the process of collecting and analyzing competitors' emails for insights without coding, you'll need Gmail, Google Sheets, ChatGPT, and Zapier.
- Can I perform SWOT analysis with this tool? Yes, the guide shows how to use ChatGPT to analyze competitors' emails for SWOT analysis, sentiment analysis, and more, providing strategic insights.
- Is coding knowledge required to set up this tool? No, the guide provides a no-code solution, making it accessible for anyone to set up and use the tool effectively.
- How does the tool organize the analysis for easy access? The tool utilizes Google Sheets to store and organize the insights gathered from ChatGPT's analysis of competitors' emails, ensuring easy access and review.
- Can I customize the analysis to focus on specific aspects of my competitors? Yes, the setup allows for customization in analyzing competitors' strategies through email content, enabling you to tailor the insights according to specific needs or focus areas.
Follow me
If you liked this article, Follow Me on Twitter to stay updated!





Top comments (0)