In this tutorial we are going to learn how to send a SMS when your Typeform is submitted using the Nexmo Messages API and the Node.js framework Hapi.
This example is going to create a webhook that you can connect to your Typeform that will notify you whenever someone completes the form. We'll use the Nexmo Messages API to send an SMS message with the date and link to view the response.
You can download and run this code for yourself from the nexmo-community/nexmo-typeform-sms respository on GitHub.
Prerequisites
You'll need to create accounts to run this for yourself, so make sure you have the following set up:
- A Nexmo account
- A Typeform account
- Ngrok (so the outside world can access the app on your local machine)
- The Nexmo Command Line Interface
The code for this example is built using Node.js and the hapi framework. It will work on Node.js version 8.9.0 or above.
You can check your version of Node by running node -v on your command line. If the number is 8.9.0 or higher then you're good to go. If it isn't then please use an older version of hapi.
Create the Skeleton Application
In order to receive an incoming webhook from Typeform, you need to have an application set up with at least one POST route. We'll start by building a basic application with a POST route.
In a new folder, initalise a new Node.js application by running
npm init -y
Next, install the dependencies for the project:
npm i hapi nexmo@beta
Create the hapi server
Hapi is a simple to use configuration-centric framework. It enables developers to focus on writing reusable application logic instead of spending time building infrastructure. I like it because it has built-in support for input validation, caching, authentication, and other essential facilities for building web and services applications.
We'll create the main file for the application by adding a new file in your root directory called index.js. This is going to be our webhook server.
In this new file, add the following code:
const Hapi = require('hapi');

// create the hapi server and listen on port 3000
const server = Hapi.server({
  port: 3000,
  host: 'localhost'
});

// create a POST route for http://localhost:3000/
server.route({
  method: 'POST',
  path: '/',
  handler: (request, h) => {

    // return a 200 OK HTTP status code
    return h.response().code(200)
  }
});

// initialize the server using async/await
const init = async () => {
  await server.start();
  console.log(`Server running at: ${server.info.uri}`);
};

// log any error and exit
process.on('unhandledRejection', (err) => {
  console.log(err);
  process.exit(1);
});

// run the server
init();
Create a Messages & Dispatch Application
Set up a new Messages & Dispatch application via the Nexmo Dashboard.
You don't need an inbound or status webhook for the purpose of this blog post, so you can use http://example.com in those fields.
Remember to also click the Generate public/private key pair link. This will download a file called private.key.
Locate the private.key file on your system and move it to the root folder for your application.
Finalise the app set up by clicking the Create Application button and you're done with config.
Make a note of your Application ID, you'll need it in the next step.
Send the SMS Using the Messages API
The final part in this blog post is to take the request that Typeform makes and send a SMS message with the data inside.
The Nexmo Messages API will handle all of this for us. We'll use the Nexmo Node JS Client Library to send the SMS.
If you're following along, you installed the library when we created the skeleton application, now you have to require it in the index.js file and initialize the Nexmo instance with your API key and secret, the Application ID from the previous steps and the path to the private.key you downloaded when you created your Messages & Dispatch Application.
At the top of index.js add the following code, making sure to replace NEXMO_API_KEY, NEXMO_API_SECRET, NEXMO_APPLICATION_ID and NEXMO_APPLICATION_PRIVATE_KEY_PATH with your own credentials:
const Nexmo = require('nexmo')

const nexmo = new Nexmo({
  apiKey: "NEXMO_API_KEY",
  apiSecret: "NEXMO_API_SECRET",
  applicationId: "NEXMO_APPLICATION_ID",
  privateKey: "NEXMO_APPLICATION_PRIVATE_KEY_PATH"
})
We'll also need to update the route handler we created so that it sends an SMS message to you when the Typeform is submitted. Don't forget to replace YOUR_NUMBER with your phone number. Don't use a leading + or 00 when entering the phone number, start with the country code, for example 447700900000.:
server.route({
  method: 'POST',
  path: '/',
  handler: (request, h) => {
    nexmo.channel.send(
      { "type": "sms", "number": "YOUR_NUMBER" },
      { "type": "sms", "number": "NEXMO" },
      {
        "content": {
          "type": "text",
          "text": `New submission in Typeform ${request.payload.form_response.definition.title} on ${new Date(request.payload.form_response.submitted_at).toDateString()}. You can view it at https://admin.typeform.com/form/${request.payload.form_response.form_id}/results#responses`
        }
      },
      (err, data) => { console.log(data.message_uuid); }
    );

    return h.response().code(200)
  }
});
With that in place, run the following command to start up the server:
node index.js
The app will launch on port 3000.
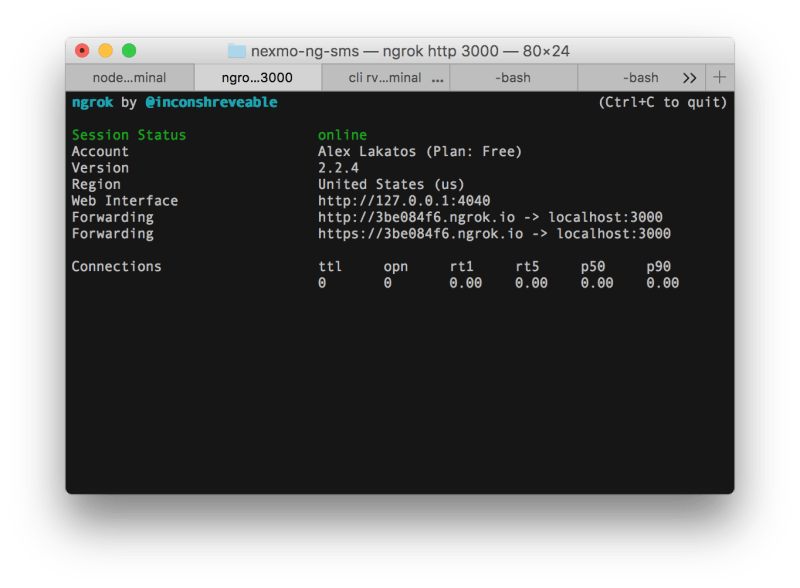
Use Ngrok to open up this port to the world and make note of the URLs it produces for you.
Here is a handy guide to working with Ngrok if you haven't used it before.
TLDR? You can start up Ngrok (if installed) by running this command:
ngrok http 3000
Connect the webhook to Typeform
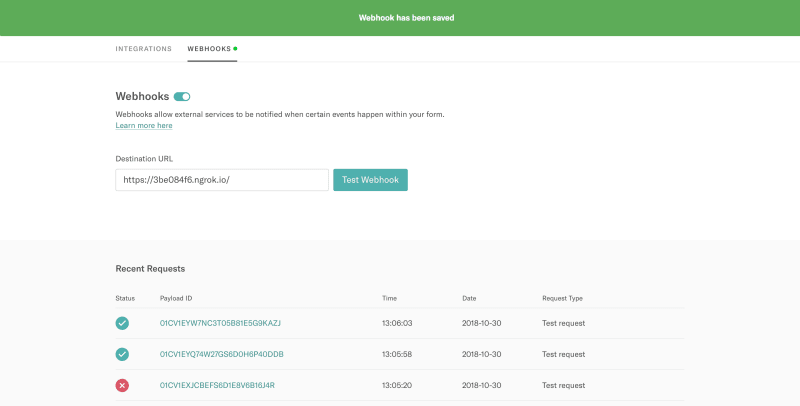
We've finished our webhook, so now it's time to connect it to a Typeform. If you need help doing this, there is a really good article in their help section that shows you how to connect a webhook to your typeform. Use the ngrok URL you just got from the command above instead of pastebin for the destination URL in the typeform guide.
As soon as you click Test Webhook to see it's working, you'll receive an SMS message with the details.
Conclusion
We’ve used a hapi server to setup a webhook that’s connected to a Typeform, which sends a SMS message using the Nexmo Messages API whenever a user completes the form. You could do even more, for example send out each response in the form via SMS or even use Facebook Messenger to complete the Typeform.
If you want to do more with the Nexmo APIs, here is some essential reading to get you moving:
- The documentation for the Messages API and the Dispatch API on the developer portal
- In-depth tutorial for using the Messages API to send and receive Facebook Messages
- If you need us, try the Nexmo Community Slack channel


Top comments (0)