In this tutorial, we will be building a Non-Expo React Native application to upload images and videos to Firebase cloud storage.
Firebase
Firebase is a platform developed by Google used to create mobile and web applications. It was originally an independent company founded in 2011.
In 2014, Google acquired the platform and it is now their flagship offering for app development. Cloud Storage for Firebase is a powerful and cost-effective storage service. The Cloud Storage SDK supports file uploads and downloads for your apps. You can use the cloud storage SDK to store images, audio, video, or other user-generated content.
Prerequisites
The fundamentals of React and React Native will not be covered in this tutorial. If you are not comfortable with the fundamentals, this is a helpful tutorial that you can go through before beginning with this project.
Overview
We'll be going through these steps in this article:
- Development environment.
- Setting up the Firebase project.
- Setting up Firebase storage.
- Installing dependencies.
- Building the UI.
- Adding media picker.
- Uploading media.
- Adding upload progress.
- Adding pause/resume upload.
- Get the download URL.
- Recap.
You can take a look at the final code in this GitHub Repository.
Development environment
IMPORTANT - We will not be using Expo in our project.
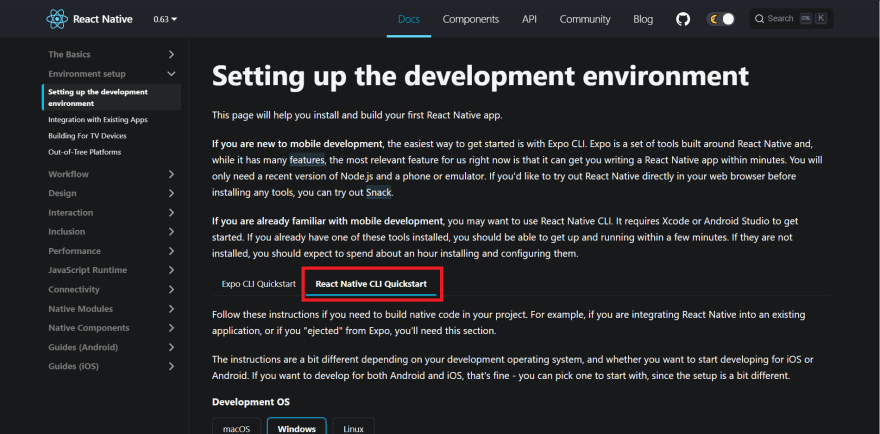
You can follow this documentation to set up the environment and create a new React app.
Make sure you're following the React Native CLI Quickstart, not the Expo CLI Quickstart.
Installing dependencies
You can install these in advance or while going through the article.
"@react-native-firebase/app": "^10.4.0",
"@react-native-firebase/storage": "^10.4.0",
"react": "16.13.1",
"react-native": "0.63.4",
"react-native-image-picker": "^3.1.3",
To install a dependency, run:
npm i --save <package-name>
After installing the packages, for iOS, go into your ios/ directory, and run:
pod install
IMPORTANT FOR ANDROID
As you add more native dependencies to your project, it may bump you over the 64k method limit on the Android build system. Once you reach this limit, you will start to see the following error while attempting to build your Android application.
Execution failed for task ':app:mergeDexDebug'.Use this documentation to enable multidexing.
To learn more about multidex, view the official Android documentation.
Setting up the Firebase project
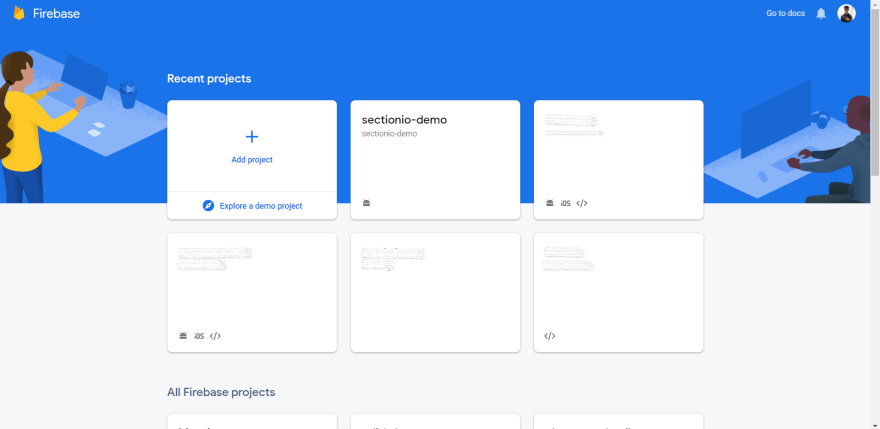
Head to the Firebase console and sign in to your account.
Create a new project.
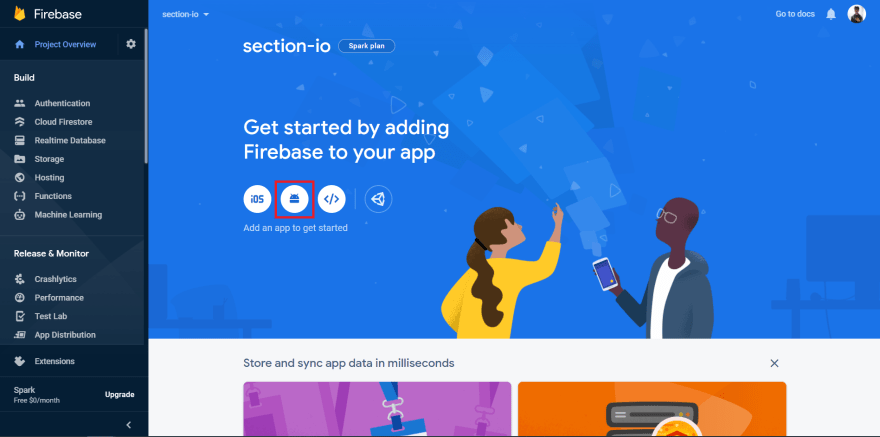
Once you create a new project, you'll see the dashboard.
Now, click on the Android icon to add an Android app to the Firebase project.
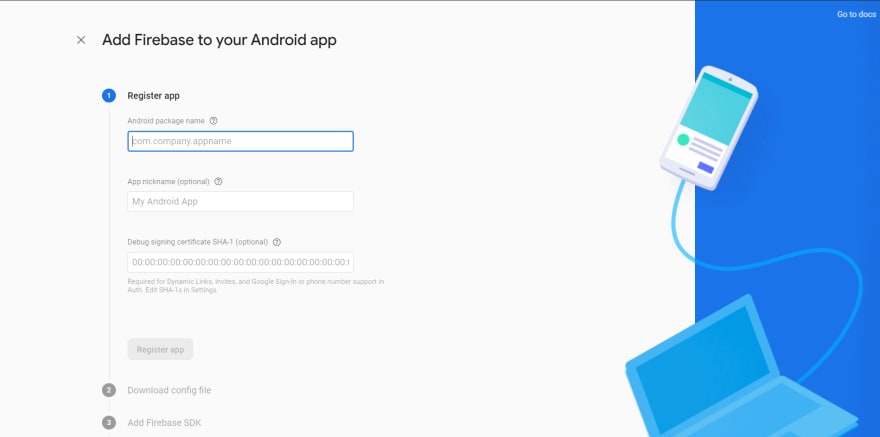
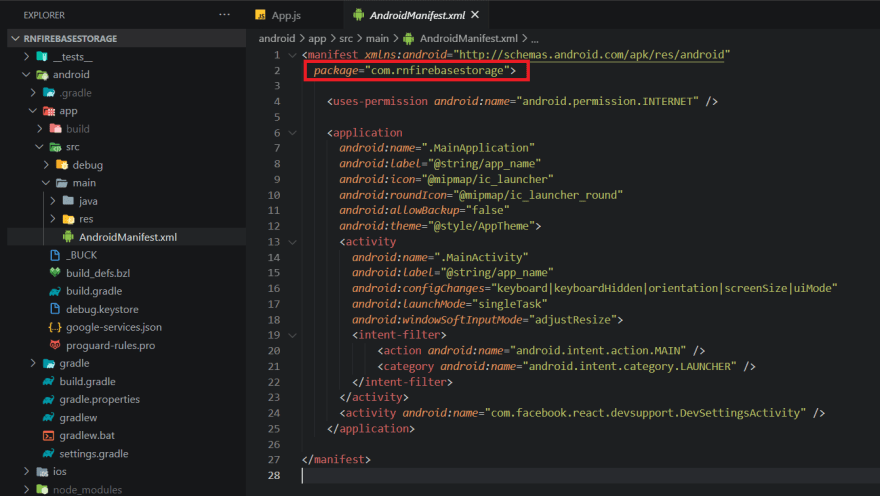
You will need the package name of the application to register the application. You can find the package name in the AndroidManifest.xml that is located in android/app/src/main/.
Once you enter the package name and proceed to the next step, you can download the google-services.json file. You should place this file in the android/app directory.
This file contains configurations that'll enable your application to access firebase services.
After adding the file, proceed to the next step. It will ask you to add some configurations to the build.gradle files.
First, add the google-services plugin as a dependency inside of your android/build.gradle file:
buildscript {
  dependencies {
    // ... other dependencies

    classpath 'com.google.gms:google-services:4.3.3'
  }
}
Then, execute the plugin by adding the following to your android/app/build.gradle file:
apply plugin: 'com.android.application'
apply plugin: 'com.google.gms.google-services'
You need to perform some additional steps to configure Firebase for iOS. Follow this documentation to set it up.
Finally, we should install the @react-native-firebase/app package in our app to complete the set up for Firebase.
npm install @react-native-firebase/app
Setting up Firebase storage
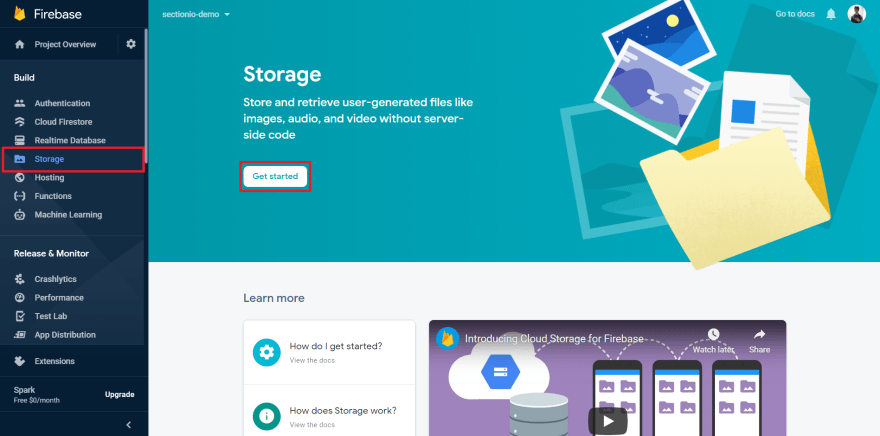
Head over to the Storage section in the dashboard and click on the Get Started button.
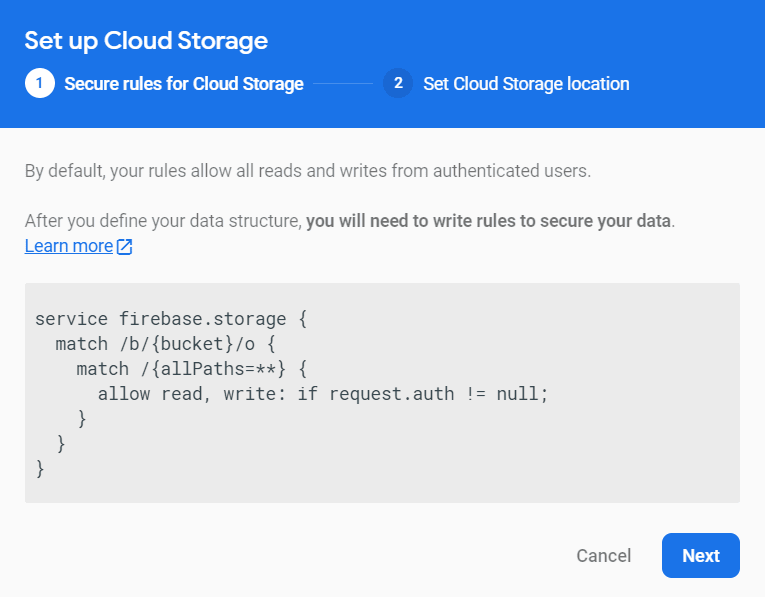
A modal will pop up with information about the storage rules. By default, only authenticated users can read and write from the cloud storage. Since we are not going to cover authentication in this tutorial, we will change the rules and set the cloud storage to open.
Do not set your cloud storage as open in a production application. This will allow anyone to read and write to your cloud storage, compromising all the data in your cloud storage.
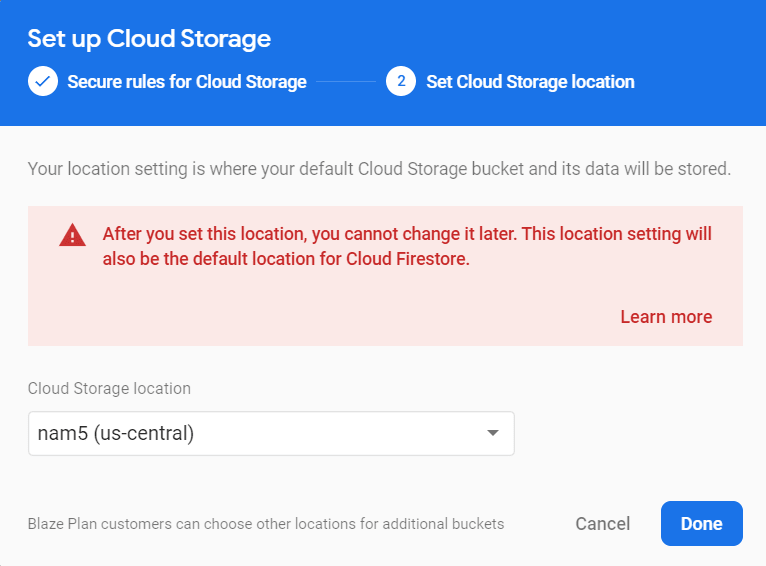
On the next step, it will ask you for the storage bucket location.
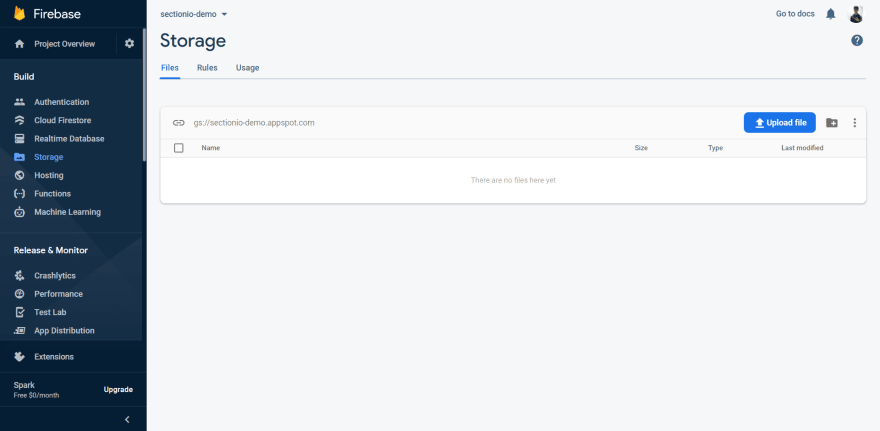
Once this is done, you'll see this screen. You can upload files and delete files manually from this screen.
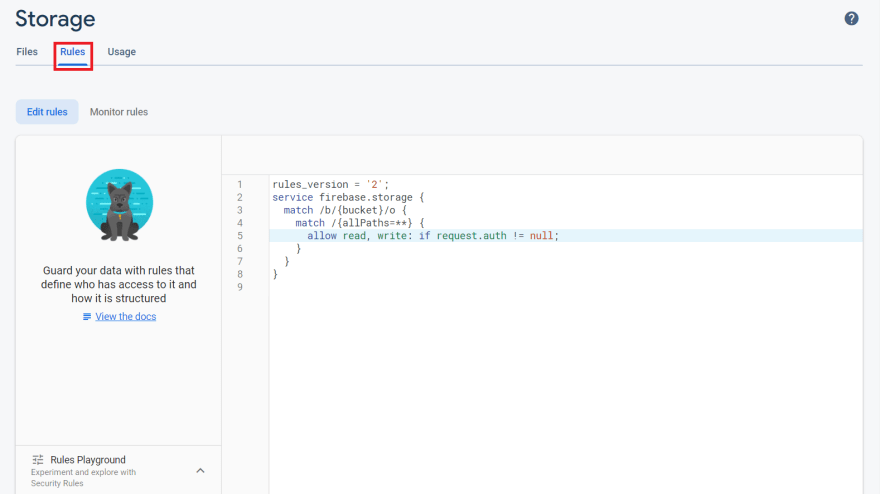
Now, let's edit the cloud storage rules and set the cloud storage bucket as open. Switch to the Rules tab.
Now, replace the existing rules with this.
rules_version = '2';
service firebase.storage {
  match /b/{bucket}/o {
    match /{allPaths=**} {
      allow read, write: if true;
    }
  }
}
If you'd like to learn more about cloud storage rules, refer here.
Building the UI
In the App.js, let's add 4 buttons to the screen.
Take a Photo.
Record Video.
Pick a Photo.
Pick a Video.
import { StyleSheet, Text, View, TouchableOpacity } from 'react-native';

export default function App() {
  return (
    <View style={styles.screen}>
      <Text style={styles.title}>Firebase Storage</Text>
      <View>
        <TouchableOpacity style={styles.button}>
          <Text style={styles.buttonText}>Take Photo</Text>
        </TouchableOpacity>
        <TouchableOpacity style={styles.button}>
          <Text style={styles.buttonText}>Record Video</Text>
        </TouchableOpacity>
        <TouchableOpacity style={styles.button}>
          <Text style={styles.buttonText}>Pick a Photo</Text>
        </TouchableOpacity>
        <TouchableOpacity style={styles.button}>
          <Text style={styles.buttonText}>Pick a Video</Text>
        </TouchableOpacity>
      </View>
    </View>
  );
}
Styles:
const styles = StyleSheet.create({
  screen: {
    flex: 1,
    alignItems: 'center',
  },
  title: {
    fontSize: 35,
    marginVertical: 40,
  },
  button: {
    backgroundColor: '#47477b',
    color: '#fff',
    justifyContent: 'center',
    alignItems: 'center',
    paddingVertical: 15,
    paddingHorizontal: 40,
    borderRadius: 50,
    marginTop: 20,
  },
  buttonText: {
    color: '#fff',
  },
});
Adding media picker
Now, the first 2 buttons should open the camera to take a photo and record a video respectively, and the next 2 buttons should open the gallery to pick an image and video respectively.
Let's install the react-native-image-picker to add these functionalities.
npm install react-native-image-picker
The minimum target SDK for the React Native Image Picker is
21. If your project targets an SDK below 21, bump up the minSDK target inandroid/build.gradle.
After the package is installed, import the launchCamera and launchImageLibrary functions from the package.
import { launchCamera, launchImageLibrary } from 'react-native-image-picker';
Both functions accept 2 arguments. The first argument is options for the camera or the gallery, and the second argument is a callback function. This callback function is called when the user picks a media or cancels the operation.
Check out the API Reference for more details about these functions.
Now let's add 4 functions, one for each button.
const onTakePhoto = () => launchCamera({ mediaType: 'image' }, onMediaSelect);

const onTakeVideo = () => launchCamera({ mediaType: 'video' }, onMediaSelect);

const onSelectImagePress = () =>
  launchImageLibrary({ mediaType: 'image' }, onMediaSelect);

const onSelectVideoPress = () =>
  launchImageLibrary({ mediaType: 'video' }, onMediaSelect);
Let's create a function called onMediaSelect. This is the callback function that we passed to the launchCamera and the launchImageLibrary functions. We will get the details of the media that the user picked in this callback function. We'll use that to upload the media to the cloud storage.
We should start the upload process only when the user did not cancel the media picker. If the user cancelled the operation, the picker will send a didCancel property in the response object.
const onMediaSelect = async (media) => {
  if (!media.didCancel) {
    // Upload Process
  }
};
You can learn more about the response object that we get from the launchCamera and the launchImageLibrary functions here.
Now, pass the 4 functions to the onPress prop of the TouchableOpacity for the respective buttons.
For example:
<TouchableOpacity style={styles.button} onPress={onTakePhoto}>
  <Text style={styles.buttonText}>Take Photo</Text>
</TouchableOpacity>
Uploading media
Let's install the package for Firebase storage.
npm install @react-native-firebase/storage
Once the package is installed, let's import the package.
import storage from '@react-native-firebase/storage';
To upload a file to the cloud storage, we should create a reference object.
A reference is a pointer to a file in your bucket. This file can either exist already, or it may not exist yet.
We need to use the ref method to create a reference.
const reference = storage().ref('<filename>');
You can also specify a file located in a nested directory:
const reference = storage().ref('/directory1/directory2/filename.png');
Now, we should use the putFile method in the reference object to upload the image from the user's device to the cloud storage. The putFile method accepts a path to the file on the user's device.
The callback function that we passed to launchCamera and the launchImageLibrary functions will get the URI of the image in the response object. We need to pass the URI to the putFile method.
const onMediaSelect = async (media) => {
  if (!media.didCancel) {
    const reference = storage().ref(media.fileName);
    const task = reference.putFile(media.uri);
  }
};
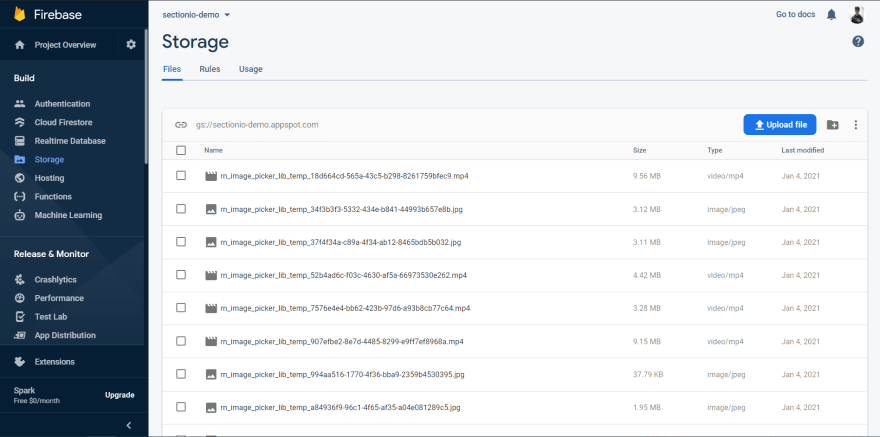
Once the media has been uploaded, you can take a look at it in the Firebase console.
We don't have any visual feedback while the media is uploading. Let's add that in the next step.
Adding upload progress
The state of the Task object that is returned from the putFile method will keep changing while the file is getting uploaded. We can add an event handler to handle this state change.
task.on('state_changed', (taskSnapshot) => {
  // Handle Event Here
});
The callback function that we pass will receive a TaskSnapshot object. It'll contain the number of bytes transferred and the total number of bytes of the file.
We can use this information to display the upload progress.
Let's create 2 states in the application: One to maintain whether the file is getting uploaded and the other for the TaskSnapshot object.
const [uploading, setUploading] = useState(false);
const [uploadTaskSnapshot, setUploadTaskSnapshot] = useState({});
Let's set the uploading state to true when the onMediaSelect is called.
const onMediaSelect = async (media) => {
  if (!media.didCancel) {
    setUploading(true);
    const reference = storage().ref(media.fileName);
Now, we need to set the TaskSnapshot object on the state_changed event handler.
task.on('state_changed', (taskSnapshot) => {
  setUploadTaskSnapshot(taskSnapshot);
});
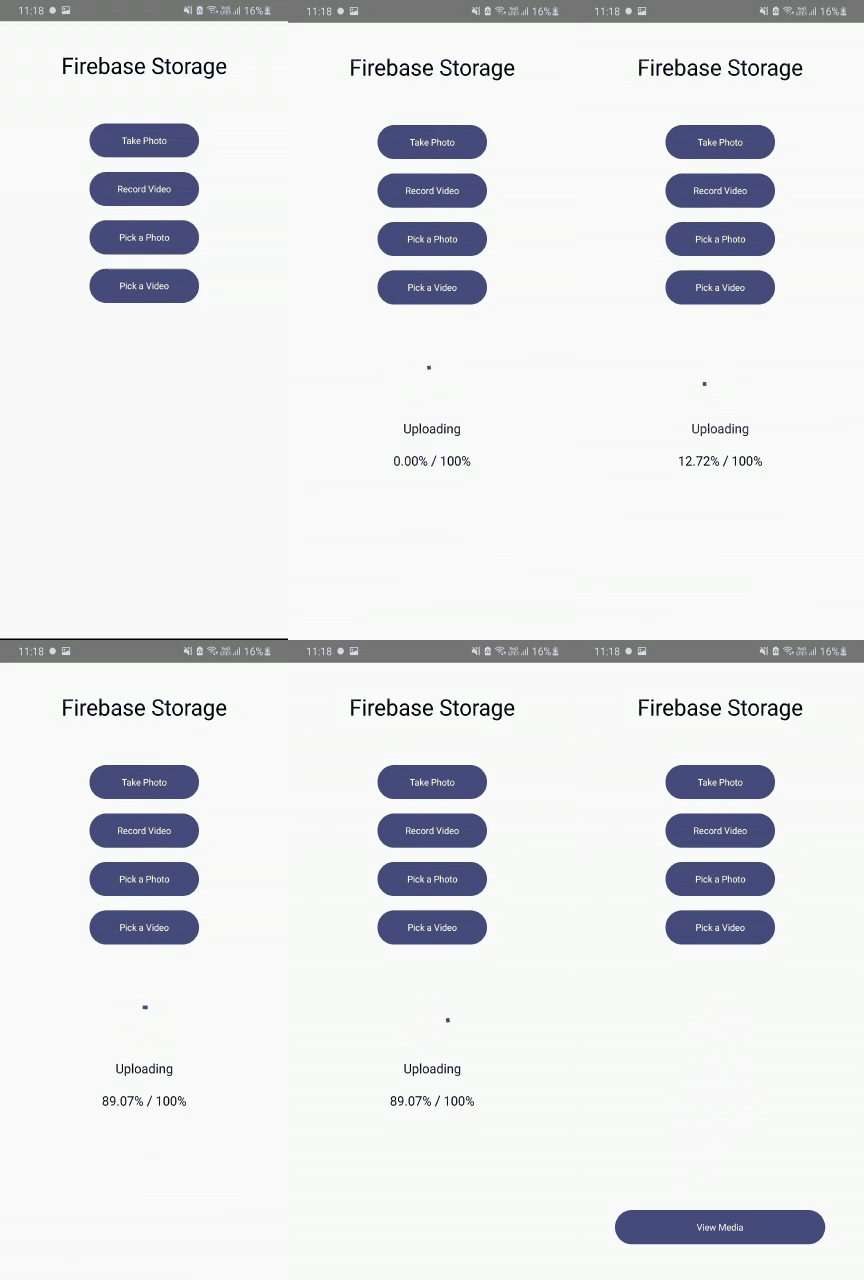
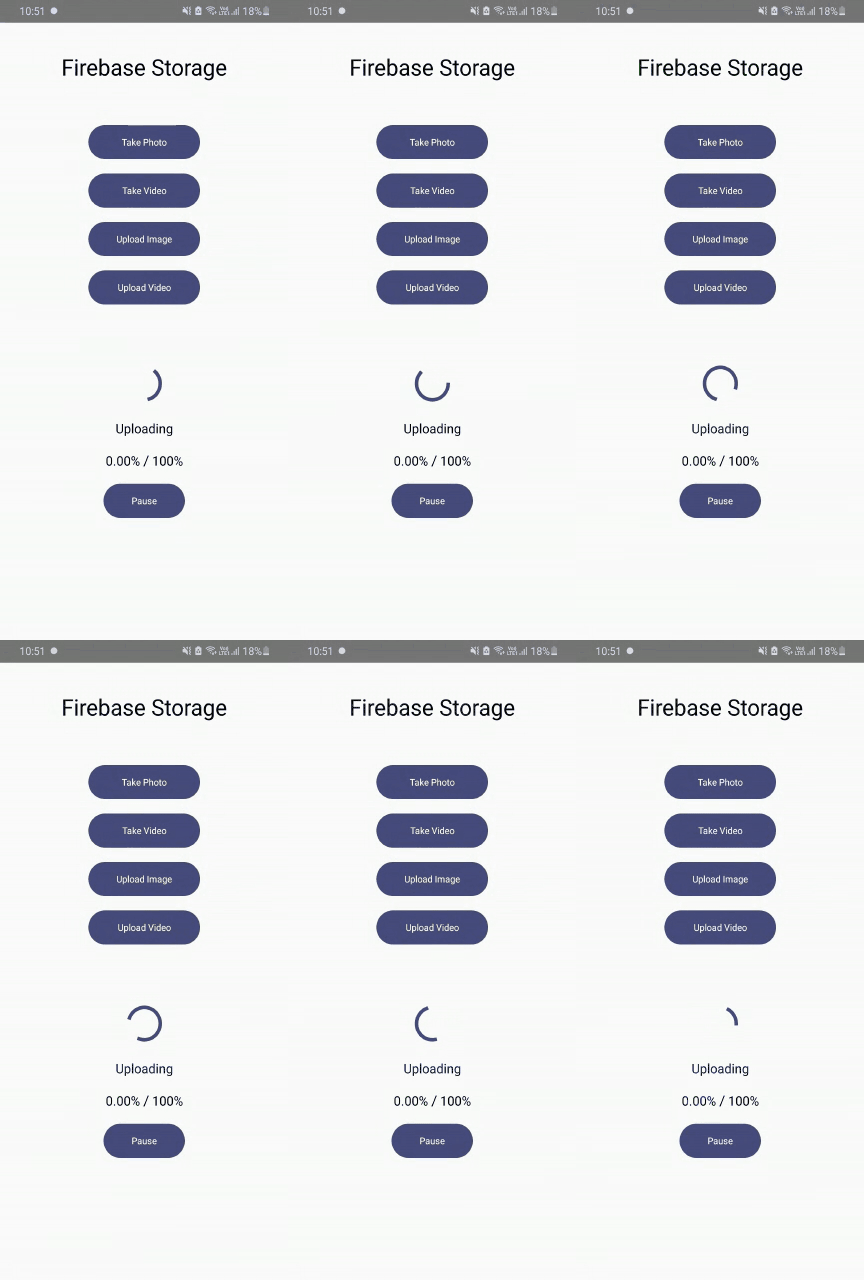
Let's display the progress in the UI using these states along with an activity indicator and a status text. This should be displayed only when a file is being uploaded.
import { ActivityIndicator } from 'react-native';
{uploading && (
  <View style={styles.uploading}>
    <ActivityIndicator size={60} color="#47477b"></ActivityIndicator>
    <Text style={styles.statusText}>Uploading</Text>
    <Text style={styles.statusText}>
      {`${((uploadTaskSnapshot.bytesTransferred / uploadTaskSnapshot.totalBytes) * 100).toFixed(2)}% / 100%`}
    </Text>
  </View>
)}
Styles:
center: {
  flex: 1,
  width: '100%',
  justifyContent: 'center',
  alignItems: 'center',
  paddingHorizontal: 50,
},
uploading: {
  marginTop: 80,
  justifyContent: 'center',
  alignItems: 'center',
},
statusText: {
  marginTop: 20,
  fontSize: 20,
},
Adding pause/resume upload
Let's add a state to maintain whether the upload is paused or not. This will be a boolean state.
const [paused, setPaused] = useState(false);
Let's add a button to Pause/Resume the upload when a file is being uploaded.
{uploading && (
  <View style={styles.uploading}>
    <ActivityIndicator size={60} color="#47477b"></ActivityIndicator>
    <Text style={styles.statusText}>Uploading</Text>
    <Text style={styles.statusText}>
      {`${((uploadTaskSnapshot.bytesTransferred / uploadTaskSnapshot.totalBytes) * 100).toFixed(2)}% / 100%`}
    </Text>
    <TouchableOpacity style={styles.button}>
      <Text style={styles.buttonText}>{paused ? 'Resume' : 'Pause'}</Text>
    </TouchableOpacity>
  </View>
)}
To pause/resume the upload, we need to use the Task object. It has 2 methods: pause and resume. Since the task object is inside the onMediaSelect function, let's set up a state outside and assign the Task object to that state when it's created.
const [uploadTask, setUploadTask] = useState();

const onMediaSelect = async (media) => {
  if (!media.didCancel) {
    setUploading(true);
    const reference = storage().ref(media.fileName);
    const task = reference.putFile(media.uri);
    setUploadTask(task);
Now, we can write a function to toggle between pause and resume.
const togglePause = () => {
  if (paused) uploadTask.resume();
  else uploadTask.pause();
  setPaused((paused) => !paused);
};
Pass this function to the onPress pass of the pause button.
<TouchableOpacity style={styles.button} onPress={togglePause}>
  <Text style={styles.buttonText}>{paused ? 'Resume' : 'Pause'}</Text>
</TouchableOpacity>
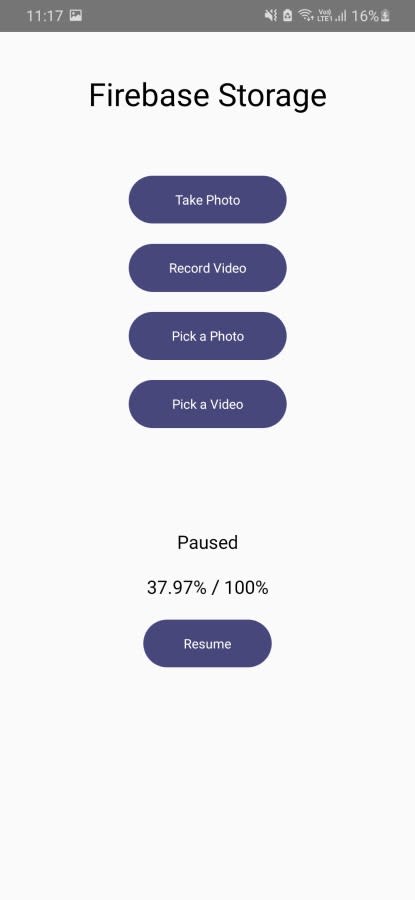
Let's update the status text to paused and hide the activity indicator if the upload is paused.
{!paused && <ActivityIndicator size={60} color="#47477b"></ActivityIndicator>}
<Text style={styles.statusText}>
  {paused ? 'Paused' : 'Uploading'}
</Text>
Get the download URL
The putFile method returns a Task object.
We can add a .then() to it that will get called when the upload is completed. If not, the .catch() will be called.
const onMediaSelect = async (media) => {
  const reference = storage().ref(media.fileName);
  const task = reference.putFile(media.uri);
  task.then(async () => {
    // Get Download URL Here
  });
};
We can get the download URL using the reference to the storage location.
task.then(async () => {
  const downloadURL = await reference.getDownloadURL();
});
Let's create a button that will open the link in your phone's browser.
To do so, let's create a state to store the download URL and access it outside this function.
const [downloadURL, setDownloadURL] = useState();
Let's set the URL once we get it.
task.then(async () => {
  const downloadURL = reference.getDownloadURL();
  setDownloadURL(downloadURL);
});
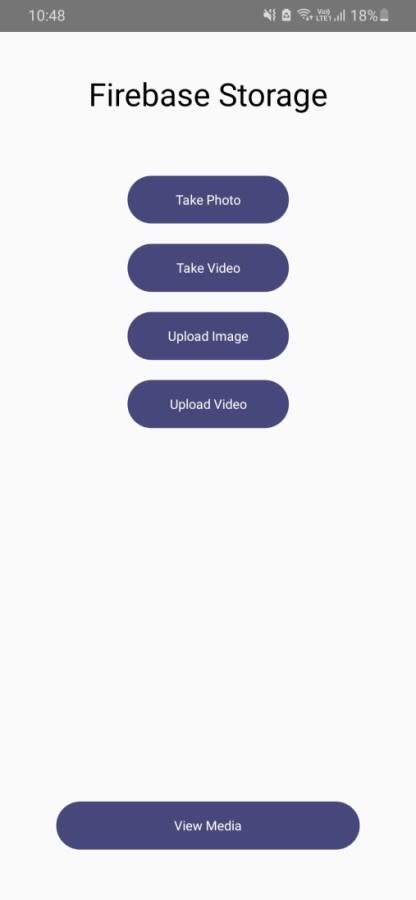
Now, let's create a button in the UI. This button will only be displayed when a download URL is available.
{downloadURL && (
  <TouchableOpacity
    style={[styles.button, style.mediaButton]}>
    <Text style={styles.buttonText}>View Media</Text>
  </TouchableOpacity>
)}
Styles:
mediaButton: {
  position: 'absolute',
  bottom: 0,
  marginBottom: 50,
  width: 300,
},
We need to use the Linking module from react-native to open the link in the phone's browser. Let's import it.
import { Linking } from 'react-native';
To open the link, we should use the openURL method in the Linking module.
<TouchableOpacity
  style={[styles.button, styles.mediaButton]}
  onPress={() => Linking.openURL(downloadURL)}>
  <Text style={styles.buttonText}>View Media</Text>
</TouchableOpacity>
Now, the button should open the media that we uploaded on the phone's browser.
Let's Recap
We set up our development environment and created a React Native app.
We created a Firebase project.
We set up cloud storage for our Firebase project.
We updated the cloud storage rules to be open for everyone. Keep in mind that you should never keep it open in a production environment.
We built a simple UI for the app.
We added the
react-native-image-pickerpackage to pick images/videos using the gallery and capture images/video using the camera.We installed the Firebase cloud storage package.
We created a cloud storage reference using the
reffunction.We uploaded our file to the location which was being pointed by the reference we created.
We added an event handler for the
state_changedevent during upload and used theTaskSnapshotobject to get the upload progress.We added a button to pause/resume the upload.
We got the download URL from the reference and added a button to open it in the phone's browser.
Congratulations, 🥳 You did it.
Thanks for Reading!






Top comments (0)