Article originally published here : https://www.bootrails.com/blog/action-mailer-tutorial/
Motivation
Action Mailer is already included in any new Rails application. However in this tutorial we will take time to see how each piece of code works. In development, test and production mode. Thus, we hope to increase confidence, and remove any bug fear of any newcomer to the stack.
Prerequisites
Here are the tools we will use in this tutorial :
$> ruby -v
ruby 3.1.0p0 // you need at least version 3 here
$> bundle -v
Bundler version 2.2.11
$> npm -v
8.3.0 // you need at least version 7.1 here
$> yarn -v
1.22.10
$> psql --version
psql (PostgreSQL) 13.1 // let's use a production-ready database locally
$> redis-cli ping // redis is a dependency of Sidekiq
PONG
$> foreman -v
0.87.2
Create a minimalistic, empty Rails app
By default, a Rails application already embeds Action Mailer, but for this tutorial, this is something we precisely want to build without help. Rails offers a --minimal option that allows the developer to get the bare minimum files for a Rails app, see this article : https://www.bootrails.com/blog/rails-new-options/
Also by default, Rails offers no route, no view, no controller, so here are the commands to create a --minimal Rails app with at least one welcome page that works :
mkdir railsmails && cd railsmails
echo "source 'https://rubygems.org'" > Gemfile
echo "gem 'rails', '~> 7.0.0'" >> Gemfile
bundle install
bundle exec rails new . --force -d=postgresql --minimal

# Create a default controller
echo "class WelcomeController < ApplicationController" > app/controllers/welcome_controller.rb
echo "end" >> app/controllers/welcome_controller.rb

# Create a default route
echo "Rails.application.routes.draw do" > config/routes.rb
echo '  get "welcome/index"' >> config/routes.rb
echo '  root to: "welcome#index"' >> config/routes.rb
echo 'end' >> config/routes.rb

# Create a default view
mkdir app/views/welcome
echo '<h1>This is h1 title</h1>' > app/views/welcome/index.html.erb


# Create database and schema.rb
bin/rails db:create
bin/rails db:migrate
First step : require ActionMailer in the application
Open application.rb and uncomment line with action_mailer as follow :
# inside config/application.rb
require_relative "boot"

require "rails"
# Pick the frameworks you want:
require "active_model/railtie"
# require "active_job/railtie"
require "active_record/railtie"
# require "active_storage/engine"
require "action_controller/railtie"
require "action_mailer/railtie" # ⇐ Uncomment

# ... everything else remains the same
Create ApplicationMailer, our base Class
# inside app/mailers/application_mailer.rb
class ApplicationMailer < ActionMailer::Base
  default from: "from@example.com"
  layout "mailer"
end
Ok ! Very interesting here.
- We guess that the sender is "from@example" by default, which is 1) not the address we want and 2) we probably don't want it to be public anyway. So a good place would be to put it inside a
.envfile. - A layout is needed, just like plain Rails Views.
- Last but not least, by integrating ourself this base class, we are now aware of pieces of configuration, that our mind would have skipped if the app was built "as usual" (i.e. without the
--minimalflag)
Create classic layout
Create app/views/layouts/mailer.html.erb
<!-- inside app/views/layouts/mailer.html.erb -->
<!DOCTYPE html>
<html>
  <head>
    <meta http-equiv="Content-Type" content="text/html; charset=utf-8" />
    <style>
      /* Email styles need to be inline */
    </style>
  </head>

  <body>
    <%= yield %>
  </body>
</html>
Development mode
In development, you don't want any real e-mail to go out of the application, this might be too dangerous.
To avoid this, add the letter_opener gem to your Gemfile. Any email sent will then just be a file written on your local disk, that will be displayed instantly in the browser, once the email is sent.
# inside Gemfile
gem 'letter_opener', group: :development
Then run
bundle install
Then configure config/environments/development.rb by adding the following few lines :
# inside config/environments/development.rb
# ...
  config.action_mailer.default_url_options = { host: 'localhost', port: 3000 }
  config.action_mailer.delivery_method = :letter_opener
  config.action_mailer.perform_deliveries = true
# ...
Now make possible for the app to send an email :
# inside app/mailers/hello_mailer.rb
class HelloMailer < ApplicationMailer

  default from: 'me@example.com'

  def welcome_email
    @user = params[:user]
    mail(to: @user[:email], subject: 'Welcome to My Awesome Site')
  end

end
Side notes :
-
mailwill actually deliver the email, it comes from the inherited ApplicationMailer. - The e-mail will be sent from 'me@example.com' as stated in the 2nd line
Now create a file welcome_email.html.erb inside app/views/hello_mailer :
<!-- inside app/views/hello_mailer/welcome_email.html.erb -->
<!DOCTYPE html>
<html>
  <head>
    <meta content='text/html; charset=UTF-8' http-equiv='Content-Type' />
  </head>
  <body>
    <h1>Welcome to example.com, <%= @user[:name] %></h1>
    <p>Thanks for joining and have a great day!</p>
  </body>
</html>
Now you can send the email from anywhere in your application. Let's see how.
# inside config/routes.rb
Rails.application.routes.draw do
  get "welcome/index"

  # route where you will send an email
  post "welcome/please_send_email"

  # where visitor are redirected once email has been sent
  get "welcome/email_sent"

  root to: "welcome#index"
end
# inside app/controllers/welcome_controller.rb
class WelcomeController < ApplicationController

  def index
  end

  def please_send_email
    HelloMailer.with(user: {name: 'jane', email: 'jane@example.com'}).welcome_email.deliver_later
  end

  def email_sent
  end

end
Side notes :
- Here we use OpenStruct to mimic a Ruby Object
-
deliver_laterallows us to send email in the background, in development or test mode, email will be send immediately, but we need a 3rd party tool like Sidekiq to take care of background jobs in production, see this article : https://www.bootrails.com/blog/rails-sidekiq-tutorial/
Now build the views
<%# inside app/views/welcome/index.html.erb %>
<h1>This is h1 title</h1>

<%= form_with url: welcome_please_send_email_path do |f| %>
 <%= f.submit 'Send e-mail' %>
<% end %>
<%# inside app/views/welcome/email_sent.html.erb %>
<h1>We tried to send an email</h1>
<p>Please check the logs</p>
Launch your local web server by running :
$> bin/rails s
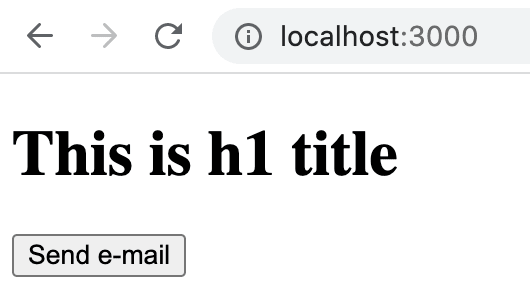
The following screen should be displayed :
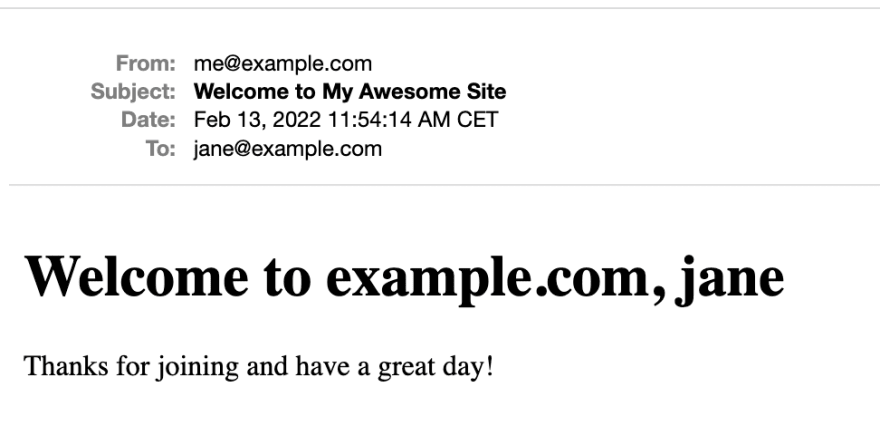
Now click the button, an email should be shown in a new tab :
Check the logs in the console :
Processing by WelcomeController#email_sent as HTML
  Rendering layout layouts/application.html.erb
  Rendering welcome/email_sent.html.erb within layouts/application
[ActiveJob] [ActionMailer::MailDeliveryJob] [bf93f412-257e-4e17-8b0d-67316f95362a]   Rendered layout layouts/mailer.html.erb (Duration: 3.4ms | Allocations: 1274)
  Rendered welcome/email_sent.html.erb within layouts/application (Duration: 2.1ms | Allocations: 407)
  Rendered layout layouts/application.html.erb (Duration: 11.3ms | Allocations: 4630)
Completed 200 OK in 14ms (Views: 13.4ms | ActiveRecord: 0.0ms | Allocations: 5658)


[ActiveJob] [ActionMailer::MailDeliveryJob] [bf93f412-257e-4e17-8b0d-67316f95362a] HelloMailer#welcome_email: processed outbound mail in 289.8ms
[ActiveJob] [ActionMailer::MailDeliveryJob] [bf93f412-257e-4e17-8b0d-67316f95362a] Delivered mail 6208e3564925e_102972468-476@macbook-pro-de-david.home.mail (61.7ms)
[ActiveJob] [ActionMailer::MailDeliveryJob] [bf93f412-257e-4e17-8b0d-67316f95362a] Date: Sun, 13 Feb 2022 11:54:14 +0100
From: me@example.com
To: jane@example.com
Message-ID: <6208e3564925e_102972468-476@macbook-pro-de-david.home.mail>
Subject: Welcome to My Awesome Site
Mime-Version: 1.0
Content-Type: text/html;
 charset=UTF-8
Content-Transfer-Encoding: 7bit
Great ! We're now able to send e-mail in development mode.
Test mode
Now the tricky part. In test mode,
- you don't want real e-mails to be sent,
- you also don't want e-mails to be displayed in the browser like in dev mode,
- you don't want e-mails to stay forever in the job queue
To avoid all this, open config/environments/test.rb :
Add these 3 lines at the bottom of the file
  config.action_mailer.default_url_options = { host: 'localhost', port: 5100 }
  config.action_mailer.delivery_method = :test
  config.active_job.queue_adapter = :test
default_url_options actual values don't really matter in test mode, but be aware that in production, you need to add the actual domain here in the host key.
Now google around to see where to put perform_enqueued_jobs in your test - you could wrap your test around this block, or simply call ActiveJob::Base.queue_adapter.perform_enqueued_jobs = true before your test suite.
Then, in your test, all you have to do to read the body of the last received email is something like this :
ActionMailer::Base.deliveries.try(:last).try(:body).try(:decoded)
Production
In production, in order to send real e-mail to real people, you need a 3rd party tool like Mandrill, MailChimp or PostMark.
The steps are as follow :
So subscribe to any of these 3rd party provider, they generally have a large generous free tier, and anyway sending e-mail will not work at scale with free e-mail provider like Gmail (this is not recommended to try)
Install the corresponding Ruby gem
Follow docs to get the API key, and configure your Rails app as stated in the docs
Here are the step for PostMark : https://postmarkapp.com/send-email/rails
Warning ! The PostMark tutorial wants you to modify config/application.rb, which is not a good idea : the config will apply to dev and test mode. Instead, put the configuration inside config/environments/production.rb
That's it
Sending email with Rails is not complicated, but you have to take care of each 3 environments separately: development, test, and production. 3 environments, 3 different ways to handle emails. With this in mind, and a slow but well-understood first installation, you should not encounter any problem when dealing with emails.
Enjoy !


Top comments (0)