Last year, I built a static website for a friend of mine who has an Italian restaurant, which has been vital for her business since then. The first year the site performed really well businesswise. However, issues have started to appear as my friend needed to change the site's content to showcase the new season products, menu, and schedule. I started implementing the changes by hand, but we suddenly realized that this was not convenient at all, since she needed to change the content on the fly without having to rely on me. After considering many different possibilities, I solved the problem by implementing a simple solution in a single weekend, thanks to Phoenix and Airtable. Here's who I did it.
Introduction
In this new tutorial, we are going to be building a headless content management system consisting of two main elements, which are an Airtable base and a Phoenix application powered by LiveView. Let's take a more in-depth look at them:
Airtable
Airtable is a really cool service based on spreadsheets grouped in bases, that act as a database. Using a very intuitive and friendly UI, it lets you design your own data structures, add attachments, handle relationships between different tables, design different data views for your tables, and much more. It also exposes all the data through a very convenient API, which is crucial for this tutorial.
But why do we need such a service? The main reason is that we want to externalize the content of our website and the management of it by our users, letting us focus only on building the presentation layer, which is a simple Phoenix application. And Airtable is perfect for that.
Here you can find the base that the we are using for this tutorial, which consists of two tables:
The contents table
This table stores the sections of the main page. Its structure is straightforward, structuring the data with the following fields:
-
id: the ID of the section. -
position: An auto-increment number that specifies the order of the section within the page. -
type: the type of the section, which can have three different values:-
hero: for a hero section containing a big title and subtitle. -
text_and_image: for sections that have some text and an image. -
feature: for a section that has a list of items with some text and an icon.
-
-
title: the title of the section. -
content: the main content of the section. It can store HTML. -
image: the main image of the section. Stored as an attachment. -
styles: any additional styles that we want to add to the section.
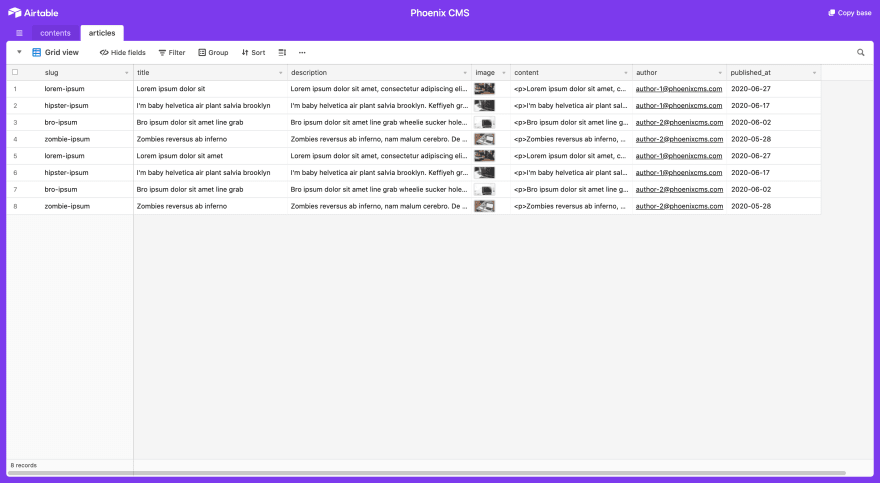
The articles table
This table stores all the blog articles of our website, and each article consists of the following attributes:
-
slug: the SEO friendly slug for the article. -
title: the main title of the article. -
description: the article's excerpt. -
image: the main image of the article. Stored as an attachment. -
content: the main content of the article. It can store HTML. -
author: the email of the article's author. -
published_at: the publication date of the article.
The Phoenix application
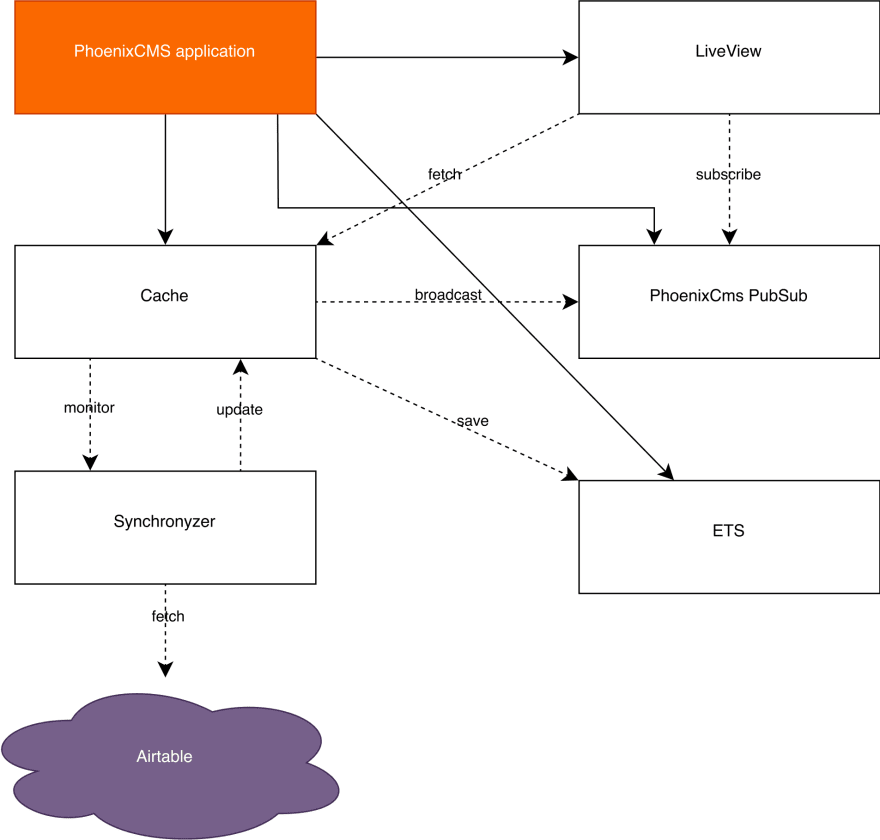
The presentation layer of our CMS is a Phoenix application which supervision tree looks something like this:
Let's have a closer look at some of its components.
Cache
Airtable has a limit of five requests per second for free accounts, so we can't just send requests on every page visit, because if we have a lot of users, the API is likely going to start returning rate limit errors. Using Erlang's ETS to store successful responses from the API helps to prevent rate limiting issues. Once a page is mounted, the data is taken from the cache instead of performing an HTTP request. However, this is not enough, because we need to keep the cache data synced with the latest changes in Airtable.
Synchronizer
To keep the cache data in sync with Airtable, it spawns a GenServer process, which periodically makes requests to the API every second, updating its stored data if needed and broadcasting the new data to the live views using PubSub. This way, we limit the number of interactions with the API to two requests per second, no matter the number of users are currently visiting our site.
LiveView
Instead of using regular views and templates, the application takes advantage of Phoenix LiveView, subscribing to specific PubSub topics, updating its data when needed, and refreshing its content on the browser without requiring a reload from the user.
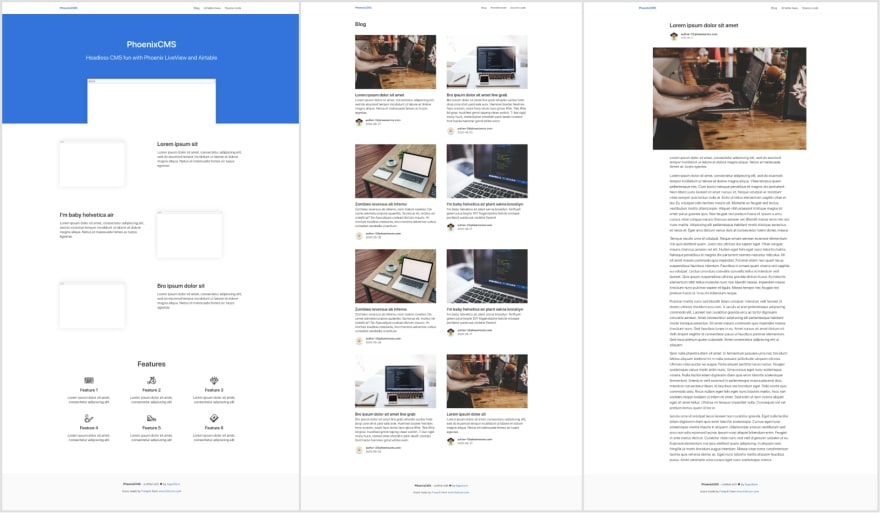
Here you can see the three views that it has:
- A main landing page that renders the sections stored in the contents table. These sections are the main hero section, some image and text sections, and a feature list section.
- A blog page, listing all the articles stored in the articles table.
- An article detail page that renders a complete article.
And I think this is all for the introduction. In the next part, we will start building the Phoenix application and implementing an HTTP client to retrieve the data stored in Airtable. In the meantime, you can check the end result here, or have a look at the source code.
Happy coding!


Top comments (1)
Good introduction