In this tutorial we are touching some more commands and aspects about Git.
Short status
Let's modify a file in your directory.
echo hey >> file1.txt
When you run git status it gives quiet a lot of information. But you can have summary status by simply using the command,
git status -s
As you can see in the above screen shot we have a red 'M' as we have done modifications which have yet not in the staging area.
Let's add file1 to the staging area and get the git status.
Now you can see the green 'M'.
Now let's change file1 again and get the status.
echo there >> file1.txt
git status -s
Now you can see a green 'M' in left for the changes in the staging area which we have not yet committed, and a red 'M' in right for the changes we have not yet added to the staging area.
Staged and un-staged changes
To check what we have in the staging area you can use the command,
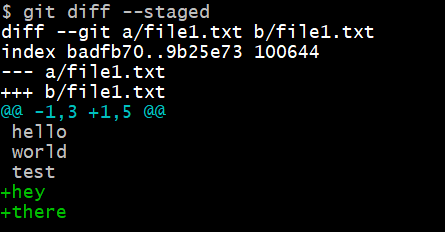
git diff --staged
The output I got is shown in the above screen shot.
Here we are comparing the a/fil1.txt with b/file1.txt. In other words, we are comparing two copies of file1.txt. The oldest copy is a/file1.txt. So the changes in the old copy is stated in a minus (-) sing while plus (+) sign indicates the changes of the new file. The 7th line gives us an idea on what parts of our code has changed. The part with minus sign as a prefix tells about the old copy. Hence according to my screen shot, in old copy starting from line 1, 3 lines have been extracted and shown in the terminal ( check the lines hello, world, and test in the terminal). In the new copy starting from line 1, 5 lines have been extracted. With lines hello, world, and test two more words hey and there have been added to the new copy. That is why they are green and has + as a prefix.
Incase you want to see the changes in our working directory that are not staged yet, you can run the command git diff.
You can also use a diff tool like LDiff3, P4Merge, WinMerge, and VSCode to compare files. Here I am going to use VSCode as our default diff tool. So you have to set two configuration settings;
git config --global diff.tool vscode
git config --global difftool.vscode.cmd "code --wait --diff $LOCAL $REMOTE"
Now check whether everything is done correctly by running the command git config --global -e to edit the global configuration settings in the default editor.
Now run the command git difftool and as shown below you have to give 'Y' to open the VSCode.
When VSCode is open it will display two copies (old and new) of the file that we have changed.
Now it is much easier to check and compare the changes.
View History
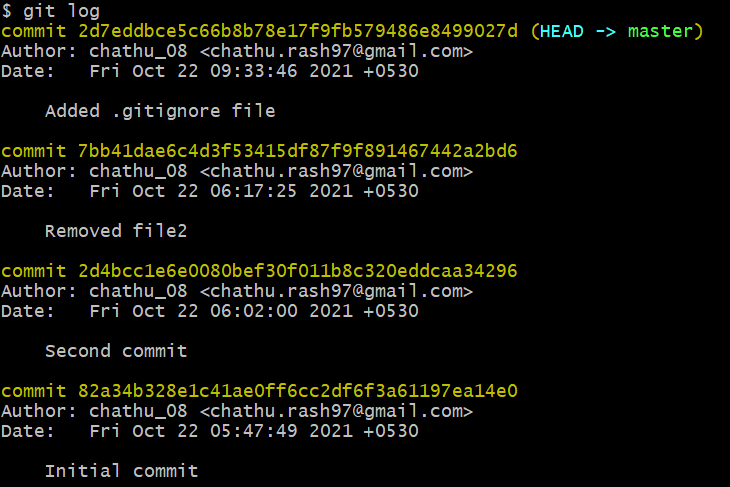
For us to view the history of our repository we can use the command git log.
It displays our commits from latest to the earliest. Each commit has a unit identifier. And each commit segment displays its author, the date of commit, and your commit message. If you feels like this is too informative, you can only view commit id and message with the code git log --oneline
You can also reverse the commit order and have the initial commit at top using the command, git log --oneline --reverse.
View a commit
To check what we have changed in a given commit we can use the command show by specifying the commit you want. There are two ways to specify commits;
- Using its unique Id
- Using head pointer
1. Using commit id
git show 2d7eddb
Here you need not to write complete id. You can specify first few characters of the id if there is no other id that starts with those same characters.
2. Using head pointer
By running the command git log --oneline you can check where your head pointer is at the moment. Then to trace backward you should use the symbol '~'. For example if you want to trace one commit back from the current head pointer, then the command should be,
git show HEAD~2
If you set 1, that means you are referring the current head pointer. Incase you want to see all the files and directories in a commit you can use the command,
git ls-tree HEAD~2
Unstaging Files
How can you revert a commit that you have done? You should undo the add command. Hence you need to use the command,
git restore --staged fileName.extention
Now file you have specified in the above command is now not in staging area.
Discarding Local Changes
To discard local changes you can use a similar command like the one above,
git restore fileName.ext
Now you went through three tutorials about Git. So did you Git get it??? 😉


Top comments (1)
Absolutely got it all......I just want articles from you about creating a new brach, merging, going to previous commi etc. It would be helpful to me!