Webpack is somewhat of a black box for most developers. Tools like "create-react-app" abstract most of the bundler functionality away. I did some research into it and began building my own light-weight web bundler to understand more about what it entails.
There will be 3 parts to this article:
- What is a "web bundler"
- Building a compiler for a "web bundler"
- Using the output with an application
A full video walkthrough for this post can be found here. A part of my "under-the-hood of" video series.
1. What is a "web bundler"
We should first ask the question "Its 2020, why bundle in the first place?". There are many answers to this question:
Performance: 3rd party code is expensive, we can use static code analysis to optimise it (things like cherry picking and tree shaking). We can also simplify what is shipped by turning 100 files into 1, limiting the data and resource expense on the user
Support: the web has so many different environments and you want your code to run in as many as possible, while only writing it once (e.g. adding Polyfills where necessary)
User experience: Utilise browser caching with separate bundles (e.g. vendor for all your libraries and app for your application itself)
Separate concerns: Manage how you serve fonts, css, images as well as JS.
The basic architecture of a web bundler is:
Basically we put modules through a compiler to produce assets.
There are many concepts involved in the compiler. It is one of the reasons why I feel it is such an interesting topic, as there is so much in such a small amount of space.
These concepts are:
- IIFE
- Pass by ref
- Dependency graphs (as we traverse our application files)
- Defining custom import/export system (which can run on any environment)
- Recursive functions
- AST parsing and generation (turning source code into its tokenized form)
- Hashing
- Native ESM (ESM manages cyclic dependencies well due to its compile-time checks)
We will be ignoring non-js assets in our compiler; so no fonts, css or images.
2. Building a compiler for a "web bundler"
This will be a massive oversimplification of how Webpack works, as there are many different ways to solve the problem, hopefully this way will offer some insight into the mechanisms involved.
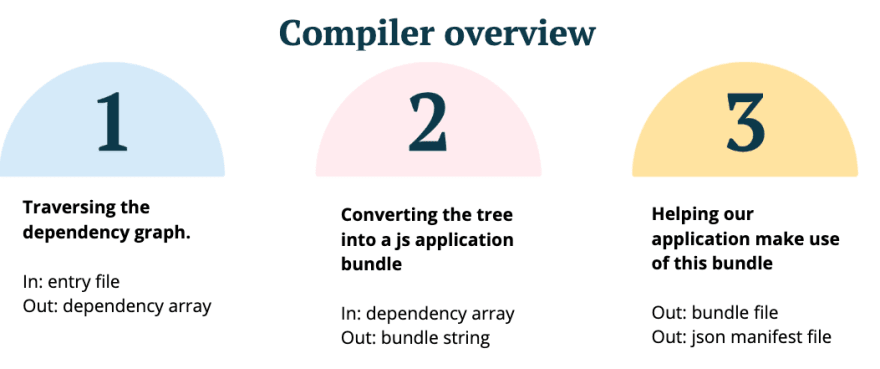
The overview of a compiler is below, we will be breaking down each phase.
Our application:
Our application consists of 4 files. Its job is to get a datetime, then hand that to a logDate, whose job is to add text to the date and send it to a logger. It is very simple.
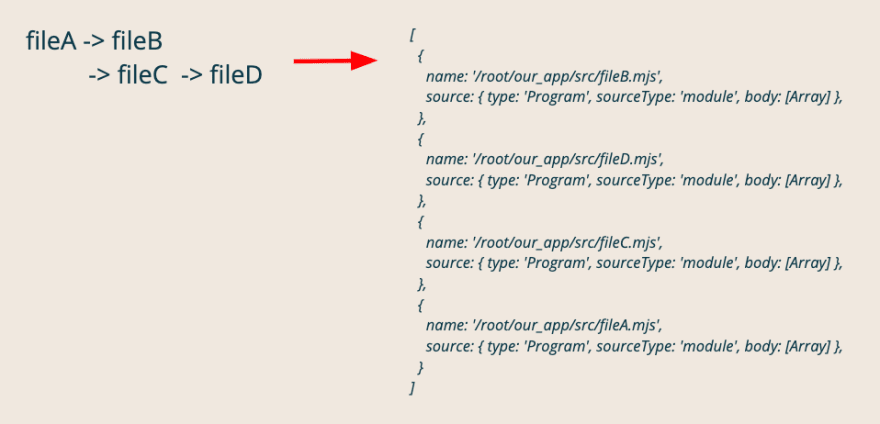
Our application tree is thus:
PHASE 1
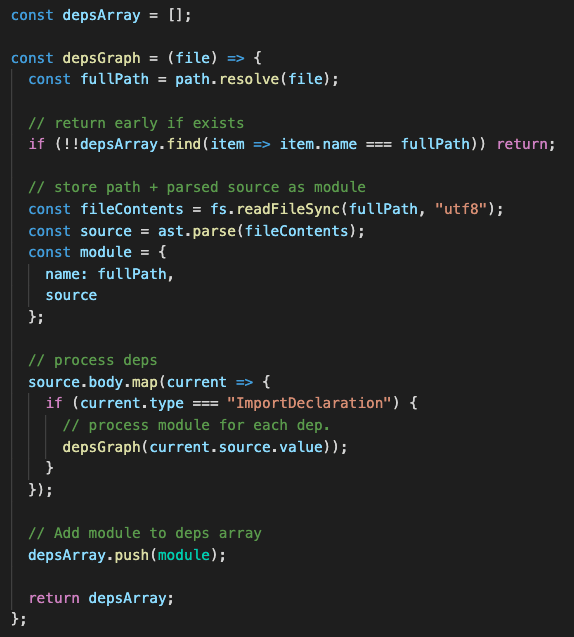
Using a 3rd party tool for AST parsing we (see code below):
- Determine files full path (very important so its clear if we are dealing with the same file again)
- Grab files contents
- Parse into AST
- Store both contents and AST onto a "module" object.
- Process the dependencies inside the contents (using the AST "ImportDeclaration" value), recursively calling this function with the value
- Finally add that function to the depsArray, so we can build up our tree with the first file appearing last (this is important)
SO our tree now looks like the below right array:
PHASE 2
A compilers job is to "Execute code which will produce executable code". This means we will have 2 levels of code so we will review them 1 at a time. First we will review what the compiler builds, then review the built/outputted code (run by the browser).
First the built code
Templates:
Module template: Its job is to convert a given module into a module our compiler can use.
We hand it the module code and an index (Webpack also does this with the index).
We want the code to be as compatible in as many environments as possible. ES6 modules support strict mode natively, but ES5 modules do not so we explicitly define strict mode in our module templates.
In NodeJS all ES modules are internally wrapped in a function attaching runtime details (i.e. exports), here we are using the same. Again Webpack does this.
Runtime template: Its job is to load our modules and give a id of the starting module.
We will review this more later, once we have the modules code inside it.
Custom import/export:
With our import statement we will be replacing the instance of "importing" with our own. It will look like the middle comment.
Our export will do something similar to the import, except replace any "exports" with our own. See bottom comment.
It is worth noting Webpack stores dependency IDs on the module earlier. It has its own "dependency template" which replaces the imports and exports usage with custom variables. Mine swaps just the import itself (theirs swaps the entire line and all usages of it). One of MANY things which aren’t exactly the same as the real Webpack.
Transform
Our transform function iterates through the dependencies. Replaces each import and export it finds with our own. Then turns the AST back into source code and builds a module string. Finally we join all the module strings together and hand them into the runtime template, and give the index location of the last item in the dependency array as this is our "entry point".
Now the code outputted from the compiler:
The left hand side is our runtime, the right hand side shows all the "modules" which are loaded. You can see they are the modules we started with at the beginning.
What is going on?
The runtime template IIFE runs immediately handing the modules array as an argument. We define a cache (installedModules) and our import function (our_require). Its job is to execute the module runtime and return the exports for a given module id (the ID correlates to its location in the modules array). The exports are set on the parent module, utilising pass-by-ref, and the module is then stored in cache for easier re-use.. Finally we execute the import function for our entry point which will start the application as it does not require calling an export itself. All imports inside our modules will now utilise our custom method.
3. Using the output with an application
Now we have an updated "vendorString" we want to use it (the above code). So we:
- Create a hash of the contents which is to be used in the bundle filename and stored in the manifest
- Write the vendorString into our new bundle
Lastly we run a small express server application which pulls the bundle name from the manifest and exposes the built code (/build) under a /static route.
If we now run:
> npm run compile
> npm run start
Our application will run and we can see our bundle and its contents in the "network" tab.
Lastly we can confirm it worked by checking the "console". Good job 👍
Not covered
You might be wondering "so what else does Webpack do which ours does not?"
- Handles non-js assets (css/images/fonts)
- Dev and HMR: this is built into Webpack
- Chunks: Webpack can put different modules into different chunks, and each can have a slightly different runtime and polyfills if necessary. i.e. vendor, dynamic imports
- Multiple exports: Ours could do this but needs a defensive check on the module type so its not worth it for this mess.
- Further optimisations (e.g. minification/code splitting/cherry picking/tree shaking/polyfills)
- Source maps: Webpack uses a mix of preprocessor which all generate their own maps. Webpack manages merging them all together.
- Making it extensible or configurable (e.g. loaders, plugins or lifecycle). Webpack is 80% plugins even internally i.e. the compiler fires hooks on lifecycle events (e.g. "pre-process file") and the loaders listen out for this event and run when appropriate. Additionally we could extend our compiler to support lifecycle events, perhaps using NodeJS event emitter, but again not worth it for this mess.
Thats it
I hope this was useful to you as I certainly learnt a lot from my time on it. There is a repository for anyone interested found at craigtaub/our-own-webpack
Thanks, Craig 😃


Top comments (0)