We are going to build an API for a sports team. We will start with the basics and then build a simple API to get a list of all the teams present in our database. We are taking an example of cricket team in this post but these principles would apply to any team sport which you love. This will be first part of a series of post which will cover more on the expanding and building you API using Hasura and Postgress
Objectives of this post
- Learn about API
- Basics on Hasura
- Create a new web service using Hasura
- What is GraphQL?
- Create database and tables about team
- Access the data from the web service
API - (Application Programming Interface)
You can think of an API like a contract between applications. API defines how to interact with the application to receive or send data and the format of the data. Once you have your data ready in the database, we need a way to retrieve and send data to the database and we can setup the API to do that
Basics on Hasura
When you are building an web service, there are lot of steps and technologies to consider. You will need to figure out what programming language to use and how to connect and interact with the database. Then you need to find a hosting solution for your web service and manage and deploy your web service to the server. Since we don't want to worry about these issue in this post, we will just focus on creating a GraphQL api for your database using Hasura.
Hasura connects to your databases and instantly gives you a production-ready GraphQL API.
Hasura does a great job of getting you started with their hosted solution which will provide instant access to your data and you can connect your database or create a new hosted database using Heroku deploy.
We will setup our first api using Hasura and Heroku to start accessing the web service
Create web service in Hasura for free
You can follow the documentation provided in their platform to create an account and follow along with this post
Hasura Get Started
Once you have created an account you can choose to connect any existing database or create a new database using Heroku deploy which is also present in the documentation
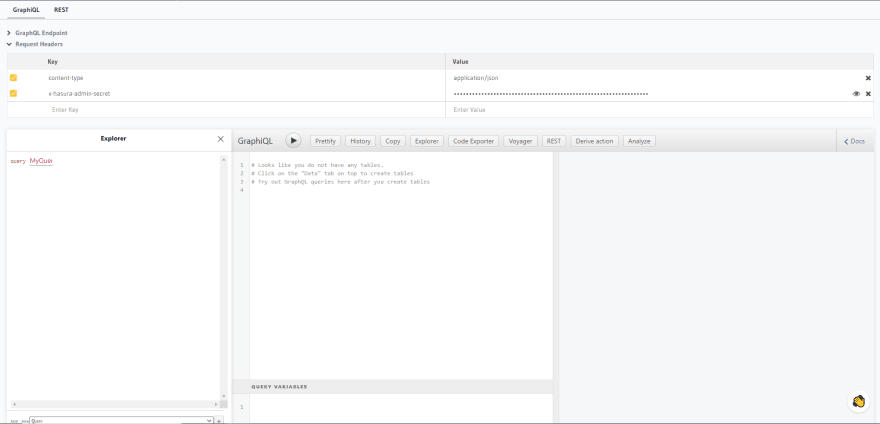
You will have a console similar to this in your project
We will be using GraphQL in this post to access the data from the database. There are other ways of fetching data using REST endpoints, those are beyond the scope of this post and so we will focus of GraphQL
What is GraphQL?
GraphQL is a query language for your API. You can define queries in your code which will return the data which you have asked for. One of the main advantages of using GraphQL over the REST endpoints is that we can define what is needed in GraphQL queries and so we only get the data of what is needed for that particular page and avoid over fetching data.
Example: In your database, you might have the following data about your team
- Team name
- Country of origin
- Team Manager
- Team Coach
- Player count
- Number of trophy won
- Number of tournament particpated
Consider a scenario where you need to display all the team names in your home page. GraphQL queries lets you pick the field which you want and so the query will only return those fields.
query HomePageQuery {
  teams {
    team_name
    country
  }
}
In your details page, you might need to display all the info related to the team and you can choose to include all the other fields and thus making your code cleaner and avoid over fetching extra data
  query DetailsPageQuery {
    teams {
      team_name
      players_count
      country
    }
  }
Create database and tables about team
Once we have the hasura console, we can go to the Data tab and link you existing database or create a new database with Heroku. In this post, we have linked our Heroku account and created a new database.
Once that is done you should be able to see the Create Table button to create a new table.
We can start with the basic datatypes and simple table for this post. We can modify and add more fields in later post where we dive deep into the relationship between tables
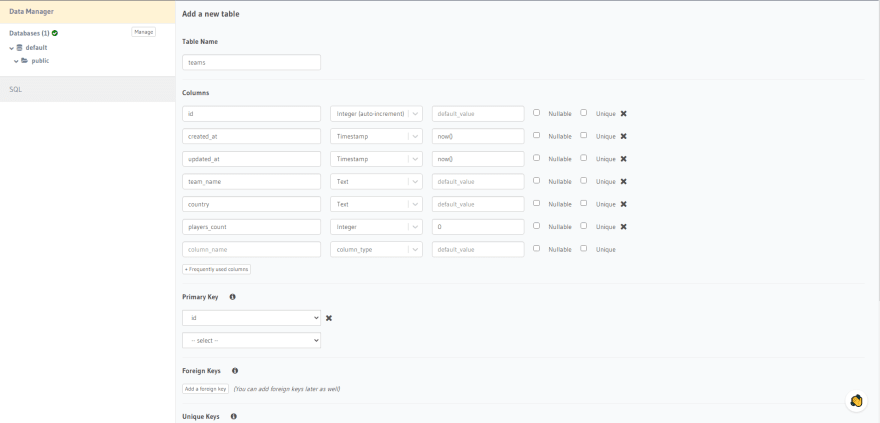
Set the table name as teams
These are the columns we will create
- id - Integer (Auto-Increment) Primary Key -
Can be accessed from frequently created columns in Hasura
-
Primary key column should uniquely identity each row in a table. So when we set it to Auto increment and a new row is created, id is automatically inserted and will increment with each row thus avoiding the issue of duplicate entry.
- created_at - Timestamp -
Can be accessed from frequently created columns in Hasura
- created_at - Timestamp -
-
Used for book keeping purpose to know when this row was created
- updated_at - Timestamp -
Can be accessed from frequently created columns in Hasura
- updated_at - Timestamp -
-
Used for book keeping purpose to know when this row was updated
- team_name - Text
-
Simple text field for the name of the team
- country - Text
-
Simple text field for the country
- players_count - Integer
Number value for the total number of players in the team
Create the table by clicking on the Add Table button
Insert Data into the table
Select the newly created table and browse to the Insert Row tab and add a few rows about your favourite teams. You can leave the first three fields as default and just fill the other three field values (team_name, country. players_count)
Access the data from the console
Select the API tab in the console. We can see GraphiQL window which can help in writing out quick GraphQL queries on our data. You can also use the Explorer window to generate these queries as well. Let's try the simple query of retriving the data from the table using graphQL
query MyQuery {
  teams {
    team_name
    players_count
    country
  }
}
Next Steps
In the next post we will expand our database to include information about the players and add relationships between the table to facilitate easy access of data using our GraphQL queries. Let us know if this post was helpful and any feedback is appreciated.
Stay tuned by subscribing to our mailing list and joining our Discord community
Discord


Top comments (0)