Setting Up AWS S3 Buckets + CloudFront CDN for your Assets
Using a cloud storage system like AWS S3 with a CDN distribution can be a convenient and inexpensive way to store your assets. Here’s how to set it up right.
Andrew Welch / nystudio107
Assets like images, PDFs, and other files are often an important part of the “content” that a Content Management System handles.
Although this article was written with Craft CMS in mind, the vast majority of the article applies generically to any CMS or website.
Craft CMS has some fantastic native handling of said assets, which by default are stored in folders on your server.
However, it can be convenient to use a cloud-based storage system like Amazon Web Services (AWS) Simple Storage Service (S3):
- You’ll never run out of disk space
- Your assets are inherently backed up & stored off-site
- Your assets can go to long-term backup in AWS Glacier easily
- You can leverage a Content Delivery Network (CDN) in the form of Cloudfront
- Eliminates the need to sync assets between local dev, staging, and production environments
- It’s cheap (or even free) & scalable
There are other advantages as well, but we’ll just assume you’re on-board, and get right into how to set it up.
Setting up S3
S3 stores files in “buckets”, and while you can serve assets directly from an S3 bucket, I’d strongly recommend against it.
S3 buckets are intended for asset storage, not serving assets. It’ll work, but you’ll only be serving them out of one geographic region (wherever your S3 bucket was created), and it really wasn’t designed to for that.
Instead, use AWS CloudFront as your Content Delivery Network (CDN) that actually serves up your assets.
Here’s what it looks like conceptually:
The idea is that when a person loads one of your web pages with an image on it, the image will point to a CloudFront URL.
If that image is in the cache, it’ll return it from a CDN Edge server that is geographically near the person loading the page. This makes it quick, with low latency.
If the image isn’t in the cache, CloudFront pulls it from your S3 bucket, returns it to the person, and propagates the image to the CDN Edge locations.
The rule of thumb here is that S3 buckets aren’t publicly accessible. Instead, CloudFront is given permission to pull assets from the S3 buckets.
That said, let’s get into setting it all up.
Step 1: Have an AWS account
If you don’t already have an AWS account, you’re going to need one. Go to your AWS Console and either log in to your account, or create a new account.
If you want the billing to go directly to your clients, you can either create an AWS account for them, or use their existing account.
If you factor in the relatively low cost of S3 into your maintenance contracts or the like, you can just your account for all of your clients.
If you don’t have one already, you should also set up an admin account for AWS now.
Step 2: Create an S3 Bucket
Now that we have an AWS account, the first thing we’re going to do is set up our S3 bucket. We’re going to use kebab-case for all of our AWS entity names, and we’ll use the format:
project-name + - + descriptor
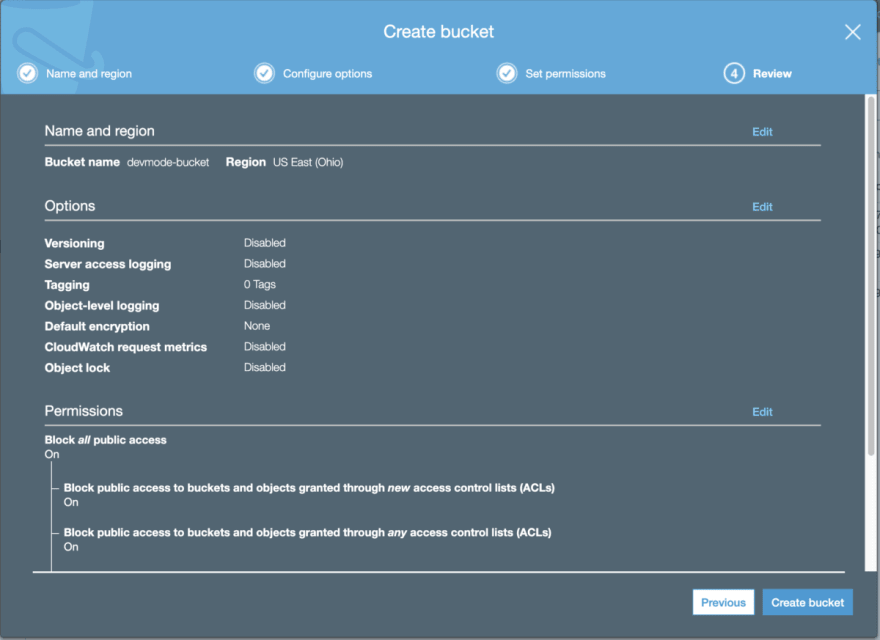
We’ll be setting up S3 + CloudFront for devMode.fm, so the project name is devmode, and the bucket name is devmode-bucket.
In your AWS Console, click on Services → S3 → + Create Bucket. Fill in the name of the bucket, and click through to the end (we won’t be changing any settings from the default other than the name):
Note that for Permissions, it’s set to Block all public access. As discussed above, our S3 bucket will be private, and the CloudFront distribution will be public.
For most projects, I create one bucket, and use sub-folders in the bucket for different Asset Volumes. You can certainly also create more than one bucket if that’ll work better for you.
Step 3: Create a Custom Policy
Next we’ll set up a custom Identity and Access Management (IAM) policy to control access. IAM policies can be attached to any AWS object, and they control who can access what, with some fairly fine-grained permissions.
We’re using a custom policy because we want to grant as little access as possible, but still have it work correctly.
From your AWS Console, click on Services → IAM → Policies → Create Policy.
Click on the JSON tab, and then paste this in:
{
    "Version": "2012-10-17",
    "Statement": [
        {
            "Effect": "Allow",
            "Action": [
                "acm:ListCertificates",
                "cloudfront:GetDistribution",
                "cloudfront:GetStreamingDistribution",
                "cloudfront:GetDistributionConfig",
                "cloudfront:ListDistributions",
                "cloudfront:ListCloudFrontOriginAccessIdentities",
                "cloudfront:CreateInvalidation",
                "cloudfront:GetInvalidation",
                "cloudfront:ListInvalidations",
                "elasticloadbalancing:DescribeLoadBalancers",
                "iam:ListServerCertificates",
                "sns:ListSubscriptionsByTopic",
                "sns:ListTopics",
                "waf:GetWebACL",
                "waf:ListWebACLs"
            ],
            "Resource": "*"
        },
        {
            "Effect": "Allow",
            "Action": [
                "s3:GetBucketLocation",
                "s3:ListAllMyBuckets"
            ],
            "Resource": "*"
        },
        {
            "Effect": "Allow",
            "Action": [
                "s3:ListBucket"
            ],
            "Resource": [
                "arn:aws:s3:::REPLACE-WITH-BUCKET-NAME"
            ]
        },
        {
            "Effect": "Allow",
            "Action": [
                "s3:*"
            ],
            "Resource": [
                "arn:aws:s3:::REPLACE-WITH-BUCKET-NAME/*"
            ]
        }
    ]
}
Make sure you replace REPLACE-WITH-BUCKET-NAME with the name of the bucket we created in Step 2 (in our case devmode-bucket), in both places.
Then click on Review Policy , and give your policy a name (in our case devmode-policy) and description, then click on Create Policy :
Step 4: Create a Group
Instead of attaching the IAM policy we created to a bucket or a user, we’re going to create a group, and attach it to the group.
We’re doing this because it makes it trivial to move users in and out of the group, and the group is what is controlling access permissions.
You also then won’t be out of luck if you somehow lose the user credentials, you can just create a new user and assign it to the group.
From your AWS Console, click on Services → IAM → Groups → Create New Group , and give your group a name (in our case devmode-group).
At the Attach Policy screen, search for the policy we created in Step 3, and check it and click Next Step :
Then click on Create Group to create your new group.
Step 5: Create a User
Next we’re going to create a user, and assign it to the group we just created. The user we create will be a generic project user, rather than an actual person.
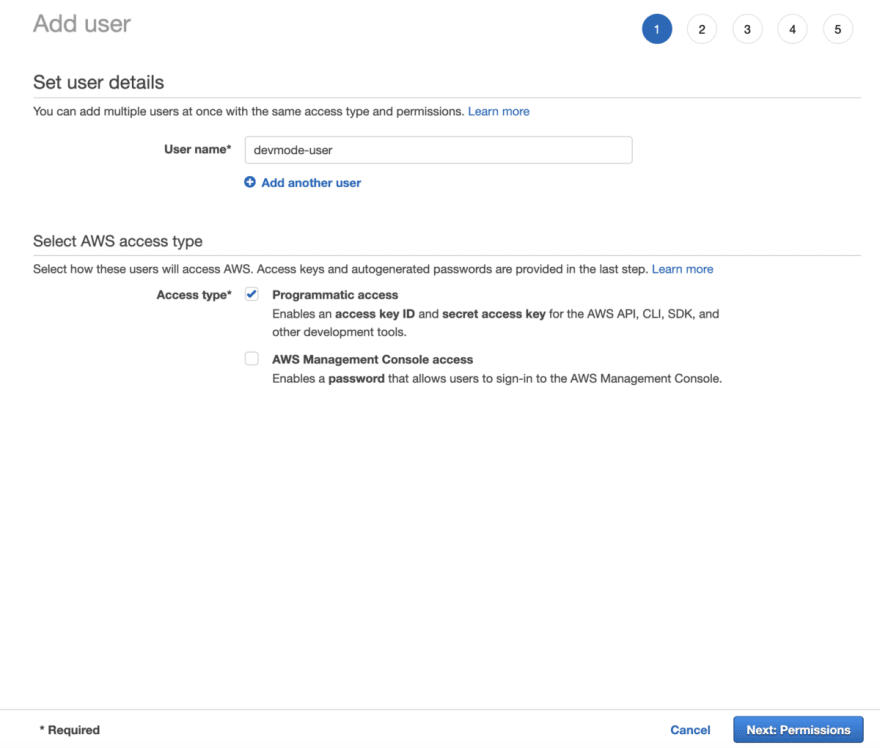
From your AWS Console, click on Services → IAM → Users → Add user , and give your user a name (in our case devmode-user). Also check only the Programatic access checkbox under Access type:
This ensures that using these credentials, there’s AWS Management Console access. For that, you’ll use your regular admin account & credentials.
Click on Next: Permissions , then add the user to the group we created in Step 4:
Then click on Next: Tags (we don’t set any tags here), then click on Next: Review :
Then click on Create User. You’ll be taken to a screen where you can see your Access key ID and Secret access key :
Click on Download .csv to download a CSV file that has your credentials in it. You will need these credentials to access your S3 bucket, and this is the only time you’ll be able to retrieve them.
Step 6: Create a CloudFront Distribution
Now we need to create a CloudFront Distribution that will be acting as our CDN, and actually delivering our assets to the users who request them.
From your AWS Console, click on Services → CloudFront → Create Distribution , and click on the Get Started button below the Web heading.
Alter the following settings:
- Origin Domain Name — choose the origin for the S3 bucket we created in Step 2
- Restrict Bucket Access — Yes
- Origin Access Identity — Create a New Identity
- Grant Read Permissions on Bucket — Yes, Update Bucket Policy
- Viewer Protocol Policy — Redirect HTTP to HTTPS
- Allowed HTTP Methods — GET, HEAD, OPTIONS, PUT, POST, PATCH, DELETE
- Object Caching — Customize
- Minimum TTL — 1296000
- Maximum TTL — 31536000
- Default TTL — 1296000
- Compress Objects Automatically — Yes
Here’s a full screenshot for the settings we’re using for devMode.fm:
Then click on Create Distribution.
You’ll be taken to a strange “CloudFront Private Content Getting Started” page; this isn’t an error page, and there aren’t any more steps to take.
We just need to grab a couple of settings from our newly created CloudFront distribution.
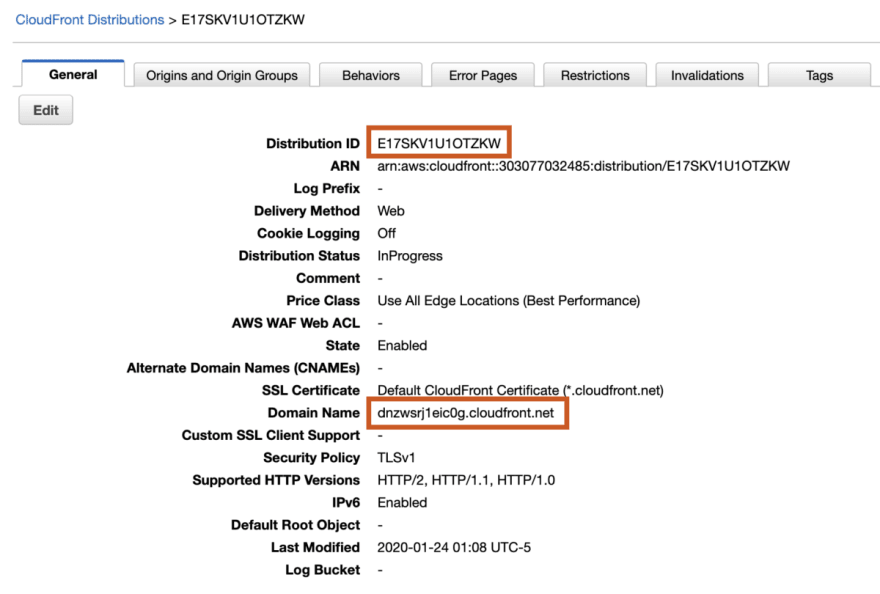
From your AWS Console, click on Services → CloudFront → then click on the CloudFront distribution we just created:
We’re going to need the Distribution ID and Domain Name settings, so copy them down somewhere.
We’re all done with the AWS S3 + CloudFront setup!
Step 7: Configure your Asset Volumes in Craft CMS
Next we need to configure Craft CMS to use our new S3 bucket setup. If you’re using something other than Craft CMS, you’ll need to fill in the analogous settings.
The key point to remember is that the public URL will be our CloudFront distribution URL (in our case https://dnzwsrj1eic0g.cloudfront.net); make sure you add the https:// protocol to it.
First, we’ll need to install the first-party Amazon S3 plugin.
Next we’ll need to set up our Asset Volumes. I use Environment Variables in my .env file to store all of my secrets, so they aren’t in the database, and the don’t end up in Git via Project Config:
# S3 settings
S3_KEY_ID=XXXXXXXXXX
S3_SECRET=XXXXXXXXXX
S3_BUCKET=devmode-bucket
S3_REGION=us-east-2

# CloudFront settings
CLOUDFRONT_URL=https://dnzwsrj1eic0g.cloudfront.net
CLOUDFRONT_DISTRIBUTION_ID=E17SKV1U1OTZKW
CLOUDFRONT_PATH_PREFIX=
In the Craft CMS CP, go to Settings → Assets → New volume , and fill in the volume settings as shown:
Note that Bucket has been set to Manual so we can use our environment variables, and we’ve manually added episodes to Subfolder.
Also note that we have turned Make Uploads Public OFF. If you enable it, it will set a manual ACL on your S3 assets to allow public access, which isn’t what we want. We want private S3 assets with public access through CloudFront only
If you’re using Project Config, your project.yaml will end up looking like the following:
  e69c8edb-d562-4367-9a05-91a6fd2c7d99:
    name: 'Devmode Episodes'
    handle: devmodeEpisodes
    type: craft\awss3\Volume
    hasUrls: true
    url: $CLOUDFRONT_URL
    settings:
      subfolder: episodes
      keyId: $S3_KEY_ID
      secret: $S3_SECRET
      bucketSelectionMode: manual
      bucket: $S3_BUCKET
      region: $S3_REGION
      expires: '3 months'
      makeUploadsPublic: ''
      storageClass: ''
      cfDistributionId: $CLOUDFRONT_DISTRIBUTION_ID
      cfPrefix: $CLOUDFRONT_PATH_PREFIX
      autoFocalPoint: ''
    sortOrder: 4
Look, mah, no secrets!
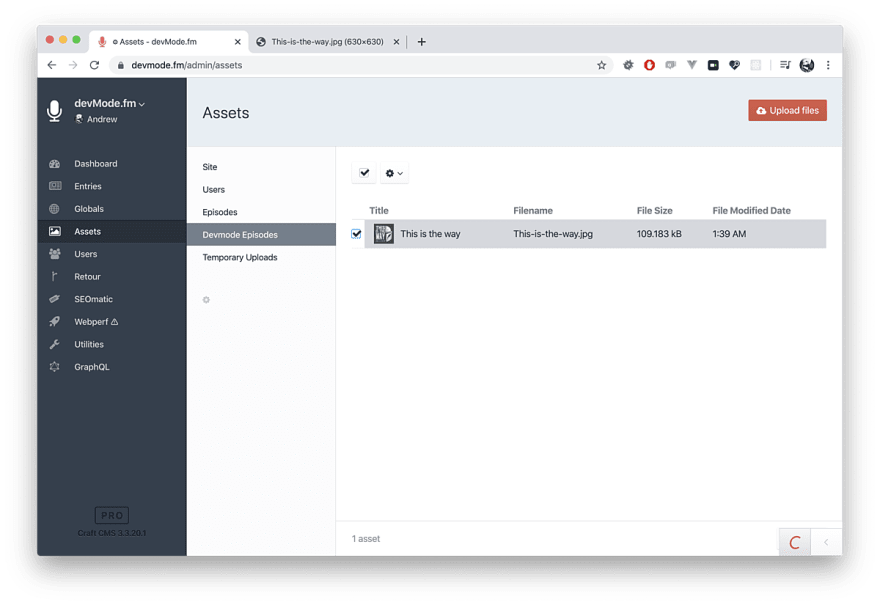
Then we can upload an image to our new Asset Volume:
And we can verify that the image is indeed coming from our CloudFront distribution URL:
Fill your Buckets
That’s all you need to start enjoying the benefits of cloud storage in S3, and CloudFront as a global Content Delivery Network.
This whole manual setup can be automated via an AWS CloudFormation stack… but that’s left as an exercise for the reader (or maybe another article).
Thanks to all around great guy Jonathan Melville of CodeMDD.io for this help with this article.
Happy uploading!
Further Reading
If you want to be notified about new articles, follow nystudio107 on Twitter.
Copyright ©2020 nystudio107. Designed by nystudio107


Top comments (0)