Originally published on crunchingnumbers.live
Lately I've been working on Ember Music, an app that I can use as a playground to test addons and ideas in Ember. When I need to write a blog post, I can reach for this app instead of designing a new one each time. Since the app will grow over time, I wanted to introduce continuous integration (CI) and continuous deployment early.
Heroku Dashboard makes deploying code on GitHub simple. From the Deploy tab, you select GitHub, find your repo, then check "Wait for CI to pass before deploy."
For continuous integration, I tried out GitHub Actions since it is free (there are limits to minutes and storage for private repos) and my code is on GitHub. I also wanted to find an alternative to Codeship Pro that I use for work. One app has about 150 tests, but CI time wildly varies between 3 and 15 minutes. Because ten minutes is how long CI took for a larger app that I had worked on, I haven't been content.
With GitHub Actions, I was able to make a workflow that did everything I want:
- Set operating system and Node version
- Cache dependencies (avoid
yarn install) - Lint files and dependencies
- Run tests separately from linting
- Split tests and run in parallel
- Take Percy snapshots in parallel
- Be cost effective
In this blog post, I will share my workflow because there is a high chance that you, too, want to solve the problems listed above. Rather than dumping the entire workflow on you, I will start with a simple one and let it organically grow. Throughout, I will assume that you use yarn to manage packages. If you use npm, please check the GitHub Gist at the end to see the differences.
1. I Want to Run Tests
Testing is available to every Ember app and is integral to CI, so let's look at how to write a workflow that runs ember test. Along the way, you will see how to set the operating system and Node version.
a. Create Workflow
In the root of your project, create folders called .github and .github/workflows. All workflows must be stored in .github/workflows. Workflows are written in YAML, so let's create a file called ci.yml.
# Folder structure

ember-music
│
├── .github
│   │
│   └── workflows
│       │
│       └── ci.yml
│
├── app
│
│   ...
│
├── tests
│
│   ...
│
├── package.json
│
└── yarn.lock
In the file, we can use the on and jobs keys to specify when CI runs and what it does. We can also give the workflow a name.
# File: .github/workflows/ci.yml

name: CI

on: [push, pull_request]

jobs:
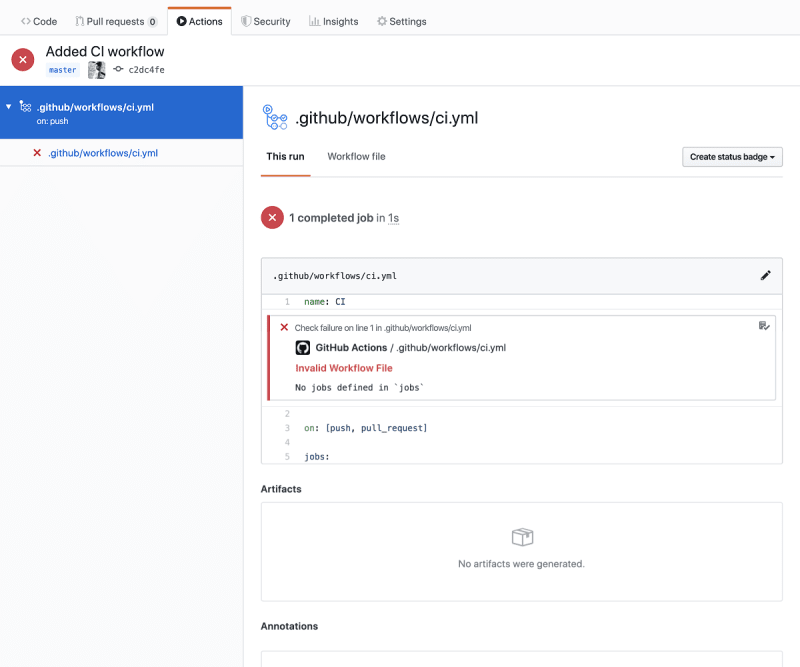
If you commit and push this file, the workflow will fail in an instant. (GitHub does notify you by email.) On GitHub, let's click on the Actions tab, then find the workflow to see what went wrong. The error message shows that we haven't defined jobs.
b. Define Jobs
A workflow must have one or more jobs to do. A job is completed by following a set of steps. At each step, we can run a command or use an action (custom or imported) to do something meaningful—something that gets us closer to finishing the job.
When someone makes a push or pull request, a CI's job is to run tests. Think about what steps you take to test someone else's Ember app. Likely, you would:
- Clone the repo.
- Set the Node version, maybe with
nvm. - Run
yarnto install dependencies. - Run
ember test.
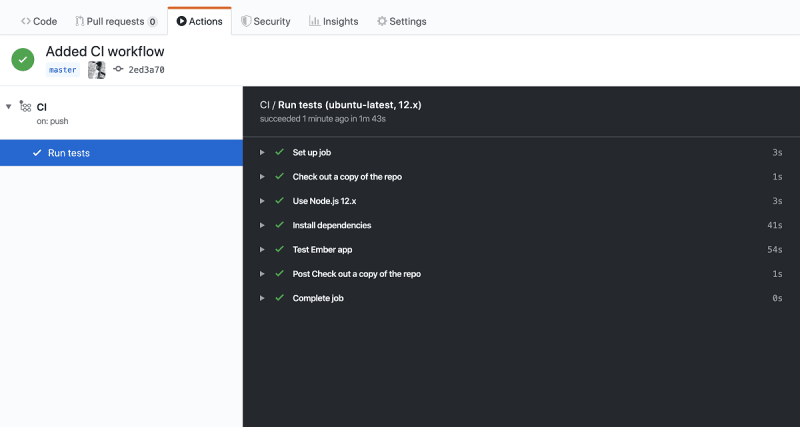
Guess what? We can tell a workflow to do the same!
# File: .github/workflows/ci.yml

name: CI

on: [push, pull_request]

jobs:
    test:
        name: Run tests
        runs-on: ${{ matrix.os }}
        strategy:
            matrix:
                os: [ubuntu-latest]
                node-version: [12.x]
        steps:
            - name: Check out a copy of the repo
              uses: actions/checkout@v2

            - name: Use Node.js ${{ matrix.node-version }}
              uses: actions/setup-node@v1
              with:
                node-version: ${{ matrix.node-version }}

            - name: Install dependencies
              run: yarn install --frozen-lockfile

            - name: Test Ember app
              run: yarn test
Because checking out a repo and setting up Node are common tasks, GitHub Actions provides actions that you can just call. The matrix key lets you run the workflow on various operating systems and Node versions. Since I'm writing the app for myself, I specified one OS and Node version. If you are developing an addon for other people, you will likely specify more (take Ember versions into account, too).
You may have noticed that I ran yarn test. I did so because package.json provides a script called test. In Ember 3.16, these are the default scripts:
// File: package.json

{
    ...

    "scripts": {
        "build": "ember build --environment=production",
        "lint:hbs": "ember-template-lint .",
        "lint:js": "eslint .",
        "start": "ember serve",
        "test": "ember test"
    }

    ...
}
In short, running yarn test means running ember test. By relying on the scripts in package.json, CI can check our code in the same manner as we might locally. We'll update these scripts as we expand the workflow.
c. When Should CI Run?
In the sections above and below, I used on: [push, pull_request] for simplicity.
For a production app where you would create branches, make pull requests (PRs), then merge to master branch, consider instead:
# File: .github/workflows/ci.yml

name: CI

on:
    push:
        branches:
            - master
    pull_request:

...
Then, your CI will run according to these rules:
- If you create a branch and make a push, CI will not run.
- If you create a PR for that branch (draft or open), CI will run. GitHub Actions shows the run type to be
pull_request. - Marking a draft PR as ready (open) will not trigger CI again. 👍
- Any additional pushes that you make to the PR will trigger CI. (type:
pull_request) - If you merge the PR into
master, CI will run once more. (type:push)
2. I Want to Lint
A CI can also lint files and dependencies. Before the app becomes large and unwieldy, we want to ensure that our code follows a standard and relies on a single version for each package.
Rather than adding a step to our existing job, we can create 2 jobs—one for linting and another for running tests—so that they can run in parallel. In GitHub Actions, we specify an extra job like this:
# File: .github/workflows/ci.yml

name: CI

on: [push, pull_request]

jobs:
    lint:
        name: Lint files and dependencies
        runs-on: ${{ matrix.os }}
        strategy:
            matrix:
                os: [ubuntu-latest]
                node-version: [12.x]
        steps:
            - name: Check out a copy of the repo
              uses: actions/checkout@v2

            - name: Use Node.js ${{ matrix.node-version }}
              uses: actions/setup-node@v1
              with:
                node-version: ${{ matrix.node-version }}

            - name: Install dependencies
              run: yarn install --frozen-lockfile

            - name: lint:dependency
              run: yarn lint:dependency

            - name: lint:hbs
              run: yarn lint:hbs

            - name: lint:js
              run: yarn lint:js

    test: ...
Although duplicate code (lines 14-23) are an eyesore, we'll repeat steps for simplicity—take baby steps to understanding GitHub Actions. At this point, we are more concerned by if the workflow will still pass than if GitHub Actions allows a "beforeEach hook." (The feature that'd let us DRY steps is called YAML anchor. At the time of writing, anchors are not supported.)
From line 26, you might guess that package.json has an additional script. Indeed, it runs the addon ember-cli-dependency-lint.
// File: package.json

{
    ...

    "scripts": {
        "build": "ember build --environment=production",
        "lint:dependency": "ember dependency-lint",
        "lint:hbs": "ember-template-lint .",
        "lint:js": "eslint .",
        "start": "ember serve",
        "test": "ember test --query=nolint"
    }

    ...
}
By default, Ember QUnit lints if you have ember-cli-eslint, ember-cli-template-lint, or ember-cli-dependency-lint. Now that we have a job dedicated to linting, I passed --query=nolint so that the job for testing does not lint again.
As an aside, starting with Ember 3.17, you are advised to remove ember-cli-eslint and ember-cli-template-lint in favor of using eslint and ember-template-lint. The one exception is if you need live linting. But chances are, you don't thanks to CI. You can now enjoy faster build and rebuild!
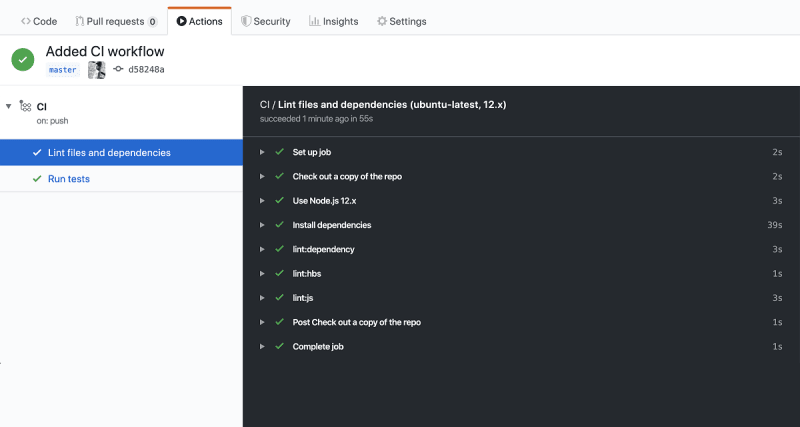
Let's commit changes and push. When you see 2 green checks, let out that sigh.
3. I Want to Run Tests in Parallel
We can promote writing more tests if the time to run them can remain small. One way to achieve this is to split tests and run them in parallel using Ember Exam.
a. Setup
After you install ember-exam, please open the file tests/test-helper.js. You must replace the start method from Ember QUnit (or Mocha) with the one from Ember Exam. Otherwise, running the command ember exam has no effect.
// File: tests/test-helper.js

import Application from '../app';
import config from '../config/environment';
import { setApplication } from '@ember/test-helpers';
import start from 'ember-exam/test-support/start';

setApplication(Application.create(config.APP));

start({
    setupTestIsolationValidation: true
});
b. Divide and Conquer
By trial and error, I came up with a script that I hope works for you too:
// File: package.json

{
    ...

    "scripts": {
        "build": "ember build --environment=production",
        "lint:dependency": "ember dependency-lint",
        "lint:hbs": "ember-template-lint .",
        "lint:js": "eslint .",
        "start": "ember serve",
        "test": "ember exam --query=nolint --split=4 --parallel=1"
    }

    ...
}
I wrote the script so that we can append flags to do useful things. With yarn test --server, for example, you should see 4 browsers running. Good to have a sanity check. Each browser—a partition—handles roughly a quarter of the tests. If you use QUnit, you can run yarn test --server --random to check if your tests are order-dependent.
Most importantly, the script allows us to append the --partition flag so that GitHub Actions knows how to run Ember tests in parallel. Let's rename the job called test to test-partition-1 and update its last step to run partition 1. Then, create three more jobs to run partitions 2 to 4.
# File: .github/workflows/ci.yml

name: CI

on: [push, pull_request]

jobs:
    lint: ...

    test-partition-1:
        name: Run tests - Partition 1
        runs-on: ${{ matrix.os }}
        strategy:
            matrix:
                os: [ubuntu-latest]
                node-version: [12.x]
        steps:
            - name: Check out a copy of the repo
              uses: actions/checkout@v2

            - name: Use Node.js ${{ matrix.node-version }}
              uses: actions/setup-node@v1
              with:
                node-version: ${{ matrix.node-version }}

            - name: Install dependencies
              run: yarn install --frozen-lockfile

            - name: Test Ember app
              run: yarn test --partition=1

    test-partition-2: ...

    test-partition-3: ...

    test-partition-4:
        name: Run tests - Partition 4
        runs-on: ${{ matrix.os }}
        strategy:
            matrix:
                os: [ubuntu-latest]
                node-version: [12.x]
        steps:
            - name: Check out a copy of the repo
              uses: actions/checkout@v2

            - name: Use Node.js ${{ matrix.node-version }}
              uses: actions/setup-node@v1
              with:
                node-version: ${{ matrix.node-version }}

            - name: Install dependencies
              run: yarn install --frozen-lockfile

            - name: Test Ember app
              run: yarn test --partition=4
Now, the workflow has 5 jobs. You can check that tests do run separately from linting and in parallel. You can also check that each partition has a different set of tests.
Unfortunately, everything isn't awesome. Each job has to run yarn install, and this will happen every time we make a push or pull request. When you think about it, linting and running tests can rely on the same setup so why install 5 times? Furthermore, if packages didn't change since the last build, we could skip installation altogether.
Let's take a look at how to cache in GitHub Actions next.
4. I Want to Cache
Here is where things began to fall apart for me. The documentation didn't make it clear that the way to cache differs between yarn and npm. It also didn't show how to avoid yarn install when the cache is available and up-to-date. Hopefully, this section will save you from agony.
To illustrate caching, I'll direct your attention to one job, say test-partition-1:
# File: .github/workflows/ci.yml

name: CI

on: [push, pull_request]

jobs:
    test-partition-1:
        name: Run tests - Partition 1
        runs-on: ${{ matrix.os }}
        strategy:
            matrix:
                os: [ubuntu-latest]
                node-version: [12.x]
        steps:
            - name: Check out a copy of the repo
              uses: actions/checkout@v2

            - name: Use Node.js ${{ matrix.node-version }}
              uses: actions/setup-node@v1
              with:
                node-version: ${{ matrix.node-version }}

            - name: Install dependencies
              run: yarn install --frozen-lockfile

            - name: Test Ember app
              run: yarn test --partition=1
We want to know how to update lines 22-23 so that the job does yarn install only when necessary. The changes that we will make also apply to the other jobs.
The idea is simple. First, yarn keeps a global cache that stores every package that you use. This way, it doesn't need to download the same package again. We want to cache that global cache. Second, from experience, we know that creating the node_modules folder takes time. Let's cache that too! When the global cache or node_modules folder is out of date, we will run yarn install.
The hard parts are digging documentation and scouring the web for examples. I'll save you the trouble. In the end, we get lines 22-48:
# File: .github/workflows/ci.yml

name: CI

on: [push, pull_request]

jobs:
    test-partition-1:
        name: Run tests - Partition 1
        runs-on: ${{ matrix.os }}
        strategy:
            matrix:
                os: [ubuntu-latest]
                node-version: [12.x]
        steps:
            - name: Check out a copy of the repo
              uses: actions/checkout@v2

            - name: Use Node.js ${{ matrix.node-version }}
              uses: actions/setup-node@v1
              with:
                node-version: ${{ matrix.node-version }}

            - name: Get Yarn cache path
              id: yarn-cache-dir-path
              run: echo "::set-output name=dir::$(yarn cache dir)"

            - name: Cache Yarn cache
              id: cache-yarn-cache
              uses: actions/cache@v1
              with:
                path: ${{ steps.yarn-cache-dir-path.outputs.dir }}
                key: ${{ runner.os }}-${{ matrix.node-version }}-yarn-${{ hashFiles('**/yarn.lock') }}
                restore-keys: |
                  ${{ runner.os }}-${{ matrix.node-version }}-yarn-

            - name: Cache node_modules
              id: cache-node-modules
              uses: actions/cache@v1
              with:
                path: node_modules
                key: ${{ runner.os }}-${{ matrix.node-version }}-nodemodules-${{ hashFiles('**/yarn.lock') }}
                restore-keys: |
                  ${{ runner.os }}-${{ matrix.node-version }}-nodemodules-

            - name: Install dependencies
              run: yarn install --frozen-lockfile
              if: |
                steps.cache-yarn-cache.outputs.cache-hit != 'true' ||
                steps.cache-node-modules.outputs.cache-hit != 'true'

            - name: Test Ember app
              run: yarn test --partition=1
Amid the changes, I want you to grasp just 3 things.
First, the workflow needs to know where to find the global cache to cache it. We use yarn cache dir to find the path (line 24) and pass it to the next step via id (line 23) so that we don't hardcode a path that works for one OS but not others. (For npm, the documentation showed path: ~/.npm. It works in Linux and Mac, but not Windows.)
Second, the workflow needs to know when it is okay to use a cache. The criterion will depend on what we're caching. For the global cache and node_modules folder, we can be certain that it's okay to use the cache if yarn.lock hasn't changed. hashFiles() allows us to check for a file difference with efficiency and high confidence. We encode this criterion by including the hash in the cache's key (lines 31 and 40).
Finally, we can use if to take a conditional step (line 46). The action, actions/cache, returns a Boolean to indicate if it found a cache. As a result, we can tell the workflow to install dependencies if the yarn.lock file changed.
Thanks to caching, all jobs can now skip yarn install.
5. I Want to Take Percy Snapshots
The last problem that we want to solve is taking Percy snapshots (visual regression tests) in parallel.
a. Setup
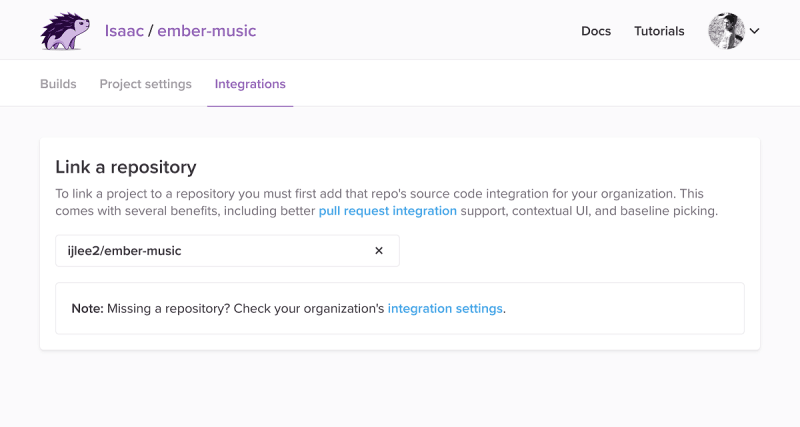
If you haven't yet, make a new project in Percy. Link it to your GitHub repo by clicking on the Integrations tab. Finally, retrieve the project token, PERCY_TOKEN, by switching to Project settings tab.
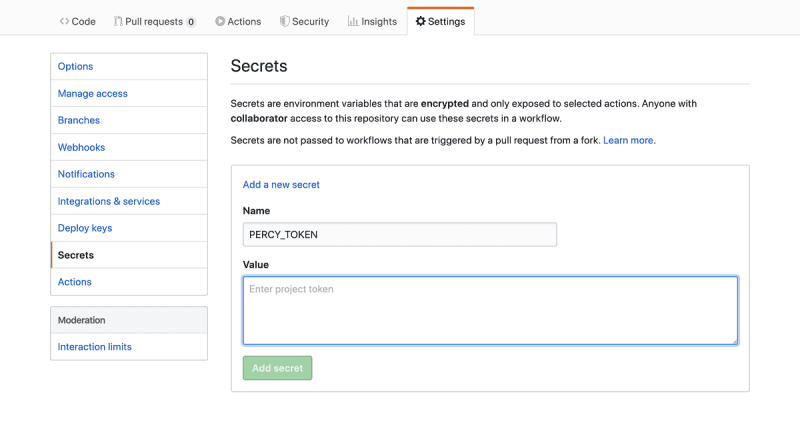
You can provide PERCY_TOKEN to GitHub by visiting your repo and clicking on the Settings tab. Find the submenu called Secrets.
GitHub Actions can now access PERCY_TOKEN and send Percy snapshots.
b. First Attempt
Integrating Percy with GitHub Actions isn't too difficult. Percy documented the how-to well and even provides an action, percy/exec-action, to facilitate the workflow.
Let's see what happens when we update the test step like this:
# File: .github/workflows/ci.yml

name: CI

on: [push, pull_request]

jobs:
    lint: ...

    test-partition-1:
        name: Run tests - Partition 1
        runs-on: ${{ matrix.os }}
        strategy:
            matrix:
                os: [ubuntu-latest]
                node-version: [12.x]
        steps:
            - name: Check out a copy of the repo

            ...

            - name: Test Ember app
              uses: percy/exec-action@v0.3.0
              with:
                custom-command: yarn test --partition=1
              env:
                PERCY_TOKEN: ${{ secrets.PERCY_TOKEN }}

    test-partition-2: ...

    test-partition-3: ...

    test-partition-4:
        name: Run tests - Partition 4
        runs-on: ${{ matrix.os }}
        strategy:
            matrix:
                os: [ubuntu-latest]
                node-version: [12.x]
        steps:
            - name: Check out a copy of the repo

            ...

            - name: Test Ember app
              uses: percy/exec-action@v0.3.0
              with:
                custom-command: yarn test --partition=4
              env:
                PERCY_TOKEN: ${{ secrets.PERCY_TOKEN }}
We need to change the test script one last time. Let's prepend percy exec --. It allows Percy to start and stop around the supplied command.
# File: package.json

{
    ...

    "scripts": {
        "build": "ember build --environment=production",
        "lint:dependency": "ember dependency-lint",
        "lint:hbs": "ember-template-lint .",
        "lint:js": "eslint .",
        "start": "ember serve",
        "test": "percy exec -- ember exam --query=nolint --split=4 --parallel=1"
    }

    ...
}
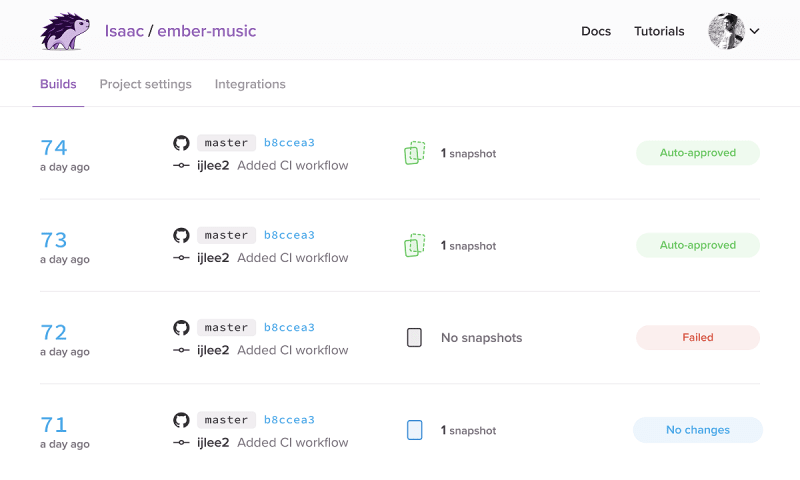
When we commit the changes, the tests for Ember will continue to pass. However, Percy will think that we made 4 builds rather than 1. It's hard to tell which of the four holds the "truth." Maybe none do.
This problem occurs when we run tests in parallel. We need to tell Percy somehow that there are 4 jobs for testing and the snapshots belong to the same build.
c. Orchestrate
Luckily, we can use Percy's environment variables to coordinate snapshots. Setting PERCY_PARALLEL_TOTAL, the number of parallel build nodes, is easy in my case. It's always 4. But what about PERCY_PARALLEL_NONCE, a unique identifier for the build?
GitHub keeps track of two variables, run_id and run_number, for your repo. The former is a number for each run in the repo (e.g. 56424940, 57489786, 57500258), while the latter is a number for each run of a particular workflow in the repo (e.g. 44, 45, 46). Just to be safe, I combined the two to arrive at a nonce.
# File: .github/workflows/ci.yml

name: CI

on: [push, pull_request]

env:
    PERCY_PARALLEL_NONCE: ${{ github.run_id }}-${{ github.run_number }}

jobs:
    lint: ...

    test-partition-1:
        name: Run tests - Partition 1
        runs-on: ${{ matrix.os }}
        strategy:
            matrix:
                os: [ubuntu-latest]
                node-version: [12.x]
        steps:
            - name: Check out a copy of the repo

            ...

            - name: Test Ember app
              uses: percy/exec-action@v0.3.0
              with:
                custom-command: yarn test --partition=1
              env:
                PERCY_PARALLEL_NONCE: ${{ env.PERCY_PARALLEL_NONCE }}
                PERCY_PARALLEL_TOTAL: 4
                PERCY_TOKEN: ${{ secrets.PERCY_TOKEN }}

    test-partition-2: ...

    test-partition-3: ...

    test-partition-4:
        name: Run tests - Partition 4
        runs-on: ${{ matrix.os }}
        strategy:
            matrix:
                os: [ubuntu-latest]
                node-version: [12.x]
        steps:
            - name: Check out a copy of the repo

            ...

            - name: Test Ember app
              uses: percy/exec-action@v0.3.0
              with:
                custom-command: yarn test --partition=4
              env:
                PERCY_PARALLEL_NONCE: ${{ env.PERCY_PARALLEL_NONCE }}
                PERCY_PARALLEL_TOTAL: 4
                PERCY_TOKEN: ${{ secrets.PERCY_TOKEN }}
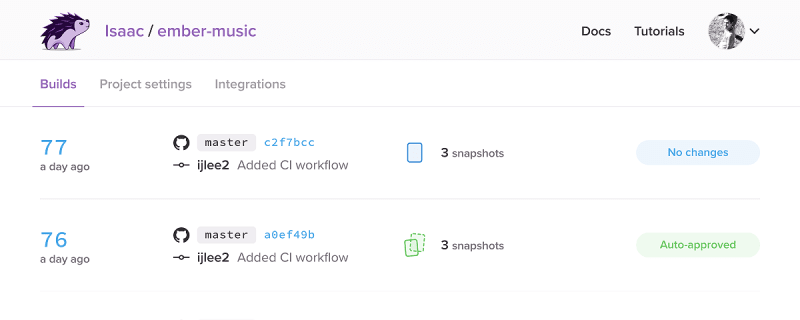
Once you introduce these environment variables, Percy will group the snapshots to a single build.
6. Conclusion
Overall, I had a great time figuring out how to write a CI workflow for Ember apps in GitHub Actions. Writing code helped me understand better the steps involved in a CI. Not all was great, though. The documentation for caching can definitely use help with showing clear, exhaustive examples.
At any rate, now, I can sit back and enjoy the benefits of linting and running tests with every commit. I'm looking forward to see what Ember Music will turn into.
Notes
You can find my CI workflow for Ember apps on GitHub Gist (yarn, npm). It works for all operating systems: Linux, Mac, and Windows.
In testem.js, you will see a reference to process.env.CI:
// File: testem.js

module.exports = {
    test_page: 'tests/index.html?hidepassed',

    ...

    browser_args: {
        Chrome: {
            ci: [
                // --no-sandbox is needed when running Chrome inside a container
                process.env.CI ? '--no-sandbox' : null,
                '--headless',
                '--disable-dev-shm-usage',
                '--disable-software-rasterizer',
                '--mute-audio',
                '--remote-debugging-port=0',
                '--window-size=1440,900'
            ].filter(Boolean)
        }
    }
};
I'm not sure where --no-sandbox gets used (this comic explains sandbox) and haven't found a need for it yet. If you need it for CI, please check the ember-animated example below. It seems, at the job level, you can set the environment variable.
I would like to know more about the history of and need for --no-sandbox.
Resources
If you want to learn more about GitHub Actions, Ember Exam, and Percy, I encourage you to visit these links:
GitHub Actions
- About Billing for GitHub Actions
- Configuring a Workflow
- Using Node.js with GitHub Actions
- Caching Dependencies to Speed Up Workflows
- Cache Implementation for
npm - Cache Implementation for
yarn






Top comments (5)
First off I want to say thanks a lot for writing this, it was tremendously helpful when I was setting up github actions for the first time recently.
A couple things I tried in addition to what you described which I thought might be worth sharing:
Cache action v2
There's a new version of the cache action which seems easier to use:
Cache ember build
I wanted to cache the built ember app so it didn't need to be rebuilt for each testing job, so I added a "build" job:
which uploads the contents of
distas an "artifact" and then the 4 test partition jobs (which all depend on this job) download it and then run ember exam with the--patharg:Sweet, I'll have to try out the caching of the build!
Yep, the actions that GitHub provides have changed since the blog was written, so I recommend readers to always check what the latest version does. You can find an example of what I did with
actions/cache@v2in ember-container-query.I don't think I'll update this particular blog post to use
v2(to preserve what had happened in early 2020).I do want to submit a workflow and a new, short blog post for dev.to GitHub Actions Hackathon, to show that it's easy to write a shareable GitHub Actions workflow for the Ember community. Is it okay if I include your
buildcode into the workflow?Absolutely! Use it wherever you want. That's why I figured I'd share it 😁
Thanks again for letting us know about pre-building the Ember app!
I was able to update the workflows for production apps. The workflows seem to now incur two-thirds of the billable time before. ✨
I will definitely write a follow-up blog post to explain pre-building the app as well as a couple of other tips.
Wow that's great! It definitely seemed to be taking a while in my test app so I thought it would be a good step to try and shave off some time