Note: The following post is a guide that can be viewed as a YouTube video:
You made a web game! What's next?
So you just made an awesome web game. You published it on Newgrounds or Itch.io, and now you're ready to make some money from it.
It's not easy to make money with a free online game, but perhaps if you were to package it as an app or exe, you could sell it on Steam!
This is where I come in. This guide walks you through the steps needed to package your game as a desktop app, so that players can purchase them on Steam. This is a web game I've built in PhaserJS and packaged with Electron for Steam:

The Supernatural Power Troll on Steam
Step into the shoes of a mischievous Power Troll, gifting humans with powers they’re definitely not ready for! Watch the chaos unfold as each NPC reacts in bizarre and unpredictable ways. Each encounter is a new disaster waiting to happen—how much chaos can one troll create?
 store.steampowered.com
Checklist
In this guide, you will be doing the following:
- ☐ Test the game as a desktop app with Electron
- ☐ Package your game as an NPM / BunJS package
- ☐ Build your game as an app with electron-builder
- ☐ Commit your code into a repo on github.com
- ☐ Use GH workflow to build your game in various operating systems.
The Game
As a desktop app, your game could have a lot more features such as file access, or making an overlay in your desktop. But for this guide, I chose to package a very simple game that I previously built for a tutorial video:
This is the entire JS code for the game, about 100 lines, so you know it's going to be simple:
https://github.com/jacklehamster/hamster-run/blob/master/index.js
Run your game in Electron
Currently, the game can run in a browser like Chrome or Brave. You can even try it here:
But we want to run it locally without any web browser. First of all, let's install Electron. It's a system for packaging web apps into Desktop apps. (.exe for Windows, .app for Mac).
Prerequisite: Install NPM
You first need to install NPM. There are many ways. Some simple the instructions are here:
https://nodejs.org/en/download
Run your game in Electron
Next, in your terminal, install Electron.
Since you have NPM, you can execute this in terminal:
npm i -g electron
electron # execute just to ensure it's installed
Setup your game for electron:
You need some JavaScript code to inform how electron will execute your game. Create a main.js file in your game root, where you have your index.html. Also place a 512x512 icon.png for your game in there:
// main.js

const { app, BrowserWindow } = require("electron");

function createWindow() {
  const win = new BrowserWindow({
    title: "Your Game Title",
    width: 900,
    height: 700,
    icon: "icon.png",
  });

  win.loadFile("index.html");
}

app.whenReady().then(createWindow);

app.on("window-all-closed", () => {
  app.quit();
});

app.on("activate", () => {
  if (BrowserWindow.getAllWindows().length === 0) {
    createWindow();
  }
});
And execute your game through electron:
electron main.js
You're game is now running as a desktop app!
Build your game using electron-builder
Now you want to package your game as an app, because you're not going to simply bundle electron in your Steam package.
For that, we'll be using electron-builder.
Repackage your game as an NPM / BunJS package
Having your game as an NPM or BunJS package makes the whole packaging process smoother, so let's do that. You can use NPM to build your app, but I like to use BunJS because it's faster. So I'm just gonna show you the BUN way!
Install bun.js
Install bun from: https://bun.sh/
Make your project a bun.js app
bun init # Within the game folder, run this command
This will generate the configs you need within your game folder. One of them is a package.json file. We'll be adding some entries into it:
- scripts for building the app
- config so electron knows how to build your app
{
  "$schema": "https://json.schemastore.org/package",
  "name": "<your-game-name>",
  "version": "1.0.0",
  "description": "<your-game-description>",
  "author": {
    "name": "<Your-name>",
    "email": "<your-email@example.com>"
  },
  "main": "main.js",
  "type": "module",
  "build": {
    "appId": "<your-app-id, ex: net.dobuki.hamster-run>",
    "mac": {
      "target": "zip",
      "category": "public.app-category.games",
      "icon": "icons/app.icns"
    },
    "win": {
      "target": "portable",
      "icon": "icons/app.ico"
    },
    "linux": {
      "target": "zip",
      "icon": "icon.png"
    },
    "portable": {
      "unicode": false,
      "artifactName": "game.exe"
    },
    "files": [
      "*.png",
      "index.js",
      "index.html",
      "main.js",
      "package.json",
      "icon.png",
      "icons/*.*"
    ]
  },
  "devDependencies": {
    "@types/bun": "latest",
    "electron": "latest",
    "electron-builder": "latest",
    "icon-gen": "latest"
  },
  "scripts": {
    "start": "electron .",
    "build-icons": "mkdir -p icons && icon-gen -i icon.png -o icons",
    "build:mac": "bun run build-icons && electron-builder --mac --universal -c.mac.identity=null --publish never",
    "build:win": "bun run build-icons && electron-builder --win",
    "build:linux": "bun run build-icons && electron-builder --linux"
  }
}
- In the files section, make sure to specify all files needed to run your game. That includes all html, css, js files, all images and sounds.
- The scripts contain commands that you will execute to build your app.
Install the dependencies located in devDependencies:
bun i
Use icon-gen to generate icons
The build-icons script execute "icon-gen" to build icons in different format using your icon.png, and place them into your icons folder.
Add this line in .gitignore, because you don't really need to save those icons in git.
# .gitignore
icons
Build your app using electron-build
Execute one of the build scripts in the operating system you're using. On Mac, I'm using build:mac:
bun run build:mac
This takes a few minutes. The resulting app to test is in the "dist/mac-universal" folder on my Mac. Just run it to make sure it works.
This is great, but you still need your app on different operating system. You could repeat the process on different computers, but a more practical way to do this is to build your apps in various OS using Github workflow.
Setup GitHub workflow to build game
Pre-requisite: Install git
Have git installed in your local machine:
https://git-scm.com/
Then setup git locally:
# Configure Git with your GitHub credentials
git config --global user.name "Your Name"
git config --global user.email "your-email@example.com"

Generate an SSH key and add it to your GitHub account
ssh-keygen -t rsa -b 4096 -C "your-email@example.com"
eval "$(ssh-agent -s)"
ssh-add ~/.ssh/id_rsa
pbcopy < ~/.ssh/id_rsa.pub
This copies your local ssh key into the clipboard.
Then go to Profile > Settings > SSH and GPG keys, click new ssh key to register your ssh key with github. This is needed to publish your code into that site.
Push your code to Github.com
First, you will need to push your code to Github.com. Sign in or Sign Up a new account on Github.com.
Create repo
Create a repo online for your code on https://github.com/new. By default it will be public, so if you want your code private, make sure to specify that.
Keep in mind the Github username and repo name for later.
Push your local code to Github.com
In your game folder, execute the following commands:
git init
git add .
git commit -m "Initial commit"

# Push to your repo using your Github.com username and repo:
git remote add origin git@github.com:your-username/your-repo.git

# If you already pushed to github before, use the following command:
git push -u origin main
Setup a Github page to see your game online
- Go to Repo Settings > Pages (https://github.com/your-username/your-repo/settings/pages)
- Under
Build and deployment, choose the branch asmainthen/rootand save. - Go to your repo home: https://github.com/your-username/your-repo, and in to the About section on the right, click on the ⚙️ icon.
- Click "Use your Github pages website". Then [Save Changes].
- Then click the link in the About page and you should see your game in the browser.
This is really just so we have a nice preview of the game available at any time. It's good to test that your game works well online and is bug free before packaging everything.
Setup a Github workflow
Now, let's setup your Github workflow so that Github will package your code into desktop apps, for Mac, Windows, even Linux.
In the .github/workflows folder, add the build.yml file:
name: Build and Release

# Follow https://x.com/jacklehamster on X!

# This workflow requires permission set to write on:
# https://github.com/your-username/your-reposettings/actions
# Create fine-grained permissions for this workflow to run. (Read/Write on contents)

on:
  push:
    branches:
      - main
  pull_request:
    branches:
      - main

jobs:
  create_release:
    runs-on: ubuntu-latest
    permissions:
      contents: write
    outputs:
      upload_url: ${{ steps.create_release.outputs.upload_url }}
    steps:
      - name: Checkout repository
        uses: actions/checkout@v4

      - uses: oven-sh/setup-bun@v2
        with:
          bun-version: latest

      - name: Create Tag
        id: create_tag
        env:
          GITHUB_TOKEN: ${{ secrets.PAT_TOKEN }}
        run: |
          git config --global user.email "github-actions[bot]@users.noreply.github.com"
          git config --global user.name "GitHub Actions Bot"
          TAG_NAME="v1.0.${{ github.run_number }}"
          echo "TAG_NAME=$TAG_NAME" >> $GITHUB_ENV
          git tag $TAG_NAME
          git push https://x-access-token:${{ secrets.PAT_TOKEN }}@github.com/${{ github.repository }}.git $TAG_NAME

      - name: Check if Release Exists
        id: check_release
        uses: actions/github-script@v7
        env:
          GITHUB_TOKEN: ${{ secrets.PAT_TOKEN }}
        with:
          script: |
            const { data: releases } = await github.rest.repos.listReleases({
              owner: context.repo.owner,
              repo: context.repo.repo
            });
            const release = releases.find(r => r.tag_name === process.env.TAG_NAME);
            if (release) {
              core.setOutput('release_exists', 'true');
              core.setOutput('upload_url', release.upload_url);
            } else {
              core.setOutput('release_exists', 'false');
            }

      - name: Create Release
        id: create_release
        if: steps.check_release.outputs.release_exists == 'false'
        uses: actions/create-release@v1
        env:
          GITHUB_TOKEN: ${{ secrets.PAT_TOKEN }}
        with:
          tag_name: ${{ env.TAG_NAME }}
          release_name: Release ${{ env.TAG_NAME }} - ${{ github.event.head_commit.message }}
          draft: false
          prerelease: false

  build-windows:
    runs-on: windows-latest
    needs: create_release
    permissions:
      contents: write
    steps:
      - name: Checkout repository
        uses: actions/checkout@v4

      - uses: oven-sh/setup-bun@v2
        with:
          bun-version: latest

      - name: Install dependencies
        run: bun install

      - name: Build Windows
        run: bun run build:win

      - name: Zip Build Artifact
        run: |
          powershell Compress-Archive -Path dist/game.exe -DestinationPath dist/windows-build.zip

      - name: Upload Windows Release Asset
        uses: actions/upload-release-asset@v1
        env:
          GITHUB_TOKEN: ${{ secrets.PAT_TOKEN }}
        with:
          upload_url: ${{ needs.create_release.outputs.upload_url }}
          asset_path: dist/windows-build.zip
          asset_name: windows-build.zip
          asset_content_type: application/zip

  build-macos:
    runs-on: macos-latest
    needs: create_release
    permissions:
      contents: write
    steps:
      - name: Checkout repository
        uses: actions/checkout@v4

      - uses: oven-sh/setup-bun@v2
        with:
          bun-version: latest

      - name: Install dependencies
        run: bun install

      - name: Build macOS
        run: bun run build:mac

      - name: Upload macOS Release Asset
        uses: actions/upload-release-asset@v1
        env:
          GITHUB_TOKEN: ${{ secrets.PAT_TOKEN }}
        with:
          upload_url: ${{ needs.create_release.outputs.upload_url }}
          asset_path: dist/your-game-1.0.0-universal-mac.zip
          asset_name: macos-build.zip
          asset_content_type: application/zip

  build-linux:
    runs-on: ubuntu-latest
    needs: create_release
    permissions:
      contents: write
    steps:
      - name: Checkout repository
        uses: actions/checkout@v4

      - uses: oven-sh/setup-bun@v2
        with:
          bun-version: latest

      - name: Install dependencies
        run: bun install

      - name: Build linux
        run: bun run build:linux

      - name: Upload linux Release Asset
        uses: actions/upload-release-asset@v1
        env:
          GITHUB_TOKEN: ${{ secrets.PAT_TOKEN }}
        with:
          upload_url: ${{ needs.create_release.outputs.upload_url }}
          asset_path: dist/your-game-1.0.0.zip
          asset_name: linux-build.zip
          asset_content_type: application/zip
Make sure to replace "your-game" with the actual game name (found in package.json).
Aside from that, you can just use the yaml file as it is, but here's some brief explanation of each section:
- on push branches...: In this section, we specify that the workflow runs every time the "main" branch is modified. Make sure this matches your branch name (sometimes it's called "main")
- Create Release: In this section, we create a Github release. It's basically a place where you will store all your artifacts (.exe, .app files...). On Github, your artifacts will stay there forever, and you will get artifacts whenever you commit. So eventually, you might want a way to delete old releases automatically. I never ran into storage issues, so I never really looked into that, but perhaps it's something you might want to consider.
- build-windows / build-mac / build-linux: Each section builds the game in their respective operating system. It does so by installing bun.js, then executing one of your scripts from the "package.json" file. At the end, the file is uploaded into the release you created earlier.
Setup proper Github Actions permissions
For your Github workflow to run, you need to grant permissions:
In https://github.com/your-username/your-repo/settings/actions, make sure the Workflows permission is set to Read and Write permissions, then save.
Generate a Personal Access Token
You also need to generate a PAT (Personal Access Token), because your Github workflow does a lot of Github manipulation.
- Go to https://github.com/settings/profile, then Developer settings
- Click Personal Access Token.
- Create a tokens, either Classic or Fine-grained. Let's do fine grained for now:
- [Generate new Token]
- Enter a name: PAT_TOKEN
- Expiration: If you set it, you'll have to make sure to come back and re-generate it when it stops working. For a test project, feel free to just set "No expiration".
- Description: Token for Github actions
- For repository access, select Only select repositories and specify the directory of your game. If you plan to reuse that same token for all your games, feel free to set access to "All respositories".
- In permissions, set "Contents" to "Read and Write".
Save your token, and save it somewhere.
- Now go to your repository settings: Settings > Secrets and Variables > Actions (https://github.com/your-username/your-repo/settings/secrets/actions)
- Create a new repository secret.
- Name: PAT_TOKEN. Value: The personal access token that you copied.
Your Github action should run properly when there's a new commit. But let's trigger it manually.
- Go to the Actions tab of your repo (https://github.com/your-username/your-repo/actions).
- In the list of workflows, one will have the same name as your last commit, and it should have failed. Click on that.
- Select [Re-run all jobs].
- It might be good to also get a build-badge, so you can see the status of your build right on your repo's readme. Click on [...], then [Create status badge]. Then copy the code into your README.md.
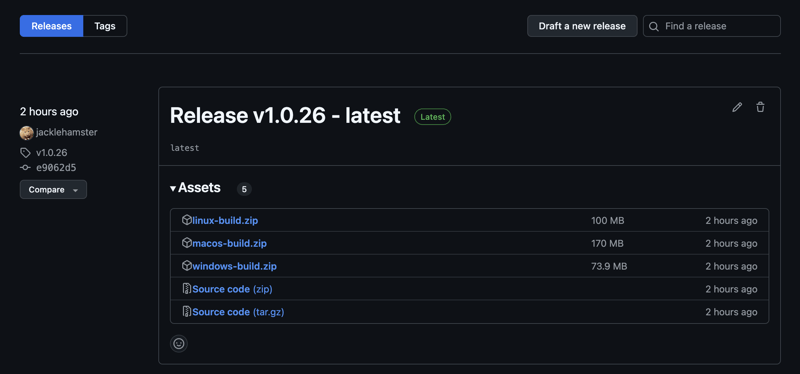
If everything works well, you should have all your artifacts available in your repo's release (Repo > Releases on the right).
See https://github.com/jacklehamster/hamster-run/releases/ for example.
Publish on Steam
The next step will be to publishing on Steam. This might require a separate post, but this is not very hard once you have all the files necessary to upload.
I will share the link here once I have the new post. Meanwhile, feel free to follow me to keep an eye on my posts.
All good?
I hope this was helpful for you. Please check out the links below if you want to follow me and support my work. I'll try to provide more useful content for novice game developers.
About Me

More games to check out

The Test of Insanity on SteamEver argued with a squirrel? Welcome to The Test of Insanity by Big Nuts! Dive into twisted puzzles, quirky quizzes, and bizarre mini-games. It’s not just a game; it’s a brain-bending adventure. Think you can outsmart the madness? There’s only one way to find out. Play now and embrace the insanity!!
store.steampowered.com
|

World of Turtle on SteamEmbark on a comical Sokoban-style puzzle adventure in World of Turtle! Solve 100 levels, collect delicious fruits, and reach the awaiting helicopter. Beware of cunning crocodiles and treacherous waters, as you navigate the levels. Can you outsmart the dangers and conquer this hilarious challenge?
store.steampowered.com
|
More resources
GameDev.js: https://gamedevjs.com/tutorials/publishing-web-games-on-steam-with-electron/
Humans In a Box: An upcoming game that's going to blow your socks off!

Top comments (1)
This is super helpful! I've been spinning my wheels trying to figure out a good workflow for this process and I really appreciate your write up!