"Journey With Go - A Blog Series" about the basics of Go Go Basic, advanced concepts in Go Go Beyond Basics, testing with go Godog as Test Framework and many more.
This is the second installment of the series. You are here, which means you have already read the first blog of the series. If you haven't read the first blog, please read it first. It is available here. In this blog, we will learn about the Control Flow Statements in Go. So, let's get started.
Control Flow Statements
These statements are used to control the flow of the program. In other words, they control the execution of the program. There are two types of control flow statements in Go.
- Branching Statements
- Looping Statements
A. Branching Statements
Branching statements divide the program into different branches on the basis of a given condition. Some blocks of code might execute and some might not. In Go, we have if-else and switch to control the flow of the program.
1. if-else
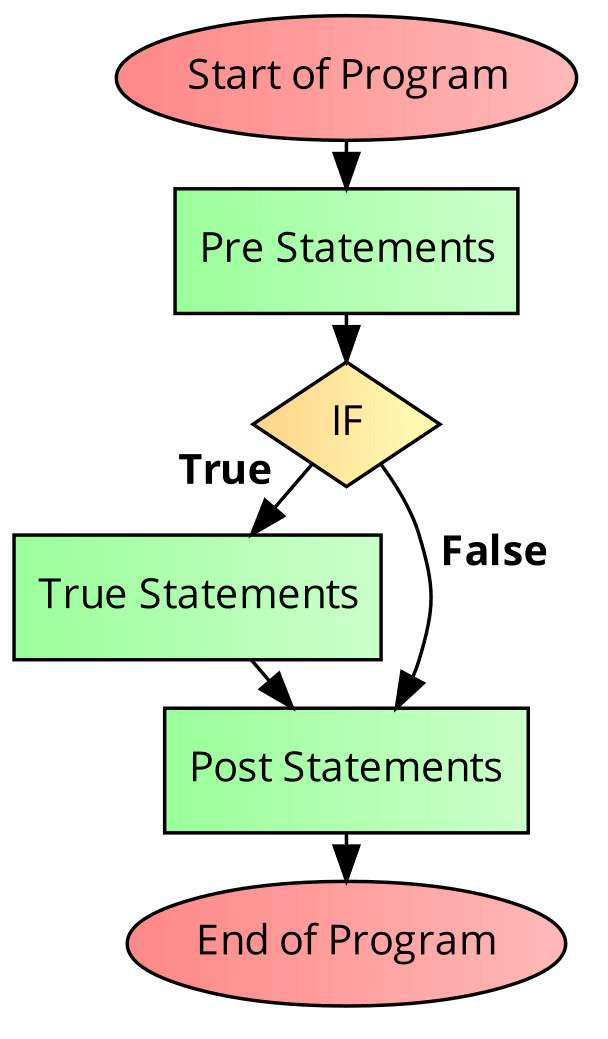
If the condition is true, it executes the code inside the if block otherwise (i.e., the condition is false), it executes the code inside the else block. There are different forms of if-else pairs such as, if, if-else, nested if-else, and else-if ladder.
a. if
This can be used if you want to execute the code only if the condition is true. The syntax of if is as follows.
if condition {
    // code to execute if the condition is true
}
Example:
Output:
You are eligible to receive a Citizenship
b. if-else
When you want to execute codes either for true or false cases then if-else can be used. if-else executes the code inside the if block if the condition is true otherwise, it executes the code inside the else block. The syntax of if-else is as follows.
if condition {
    // code to execute if the condition is true
} else {
    // code to execute if the condition is false
}
Example:
Output:
You are eligible to vote.
c. nested if-else
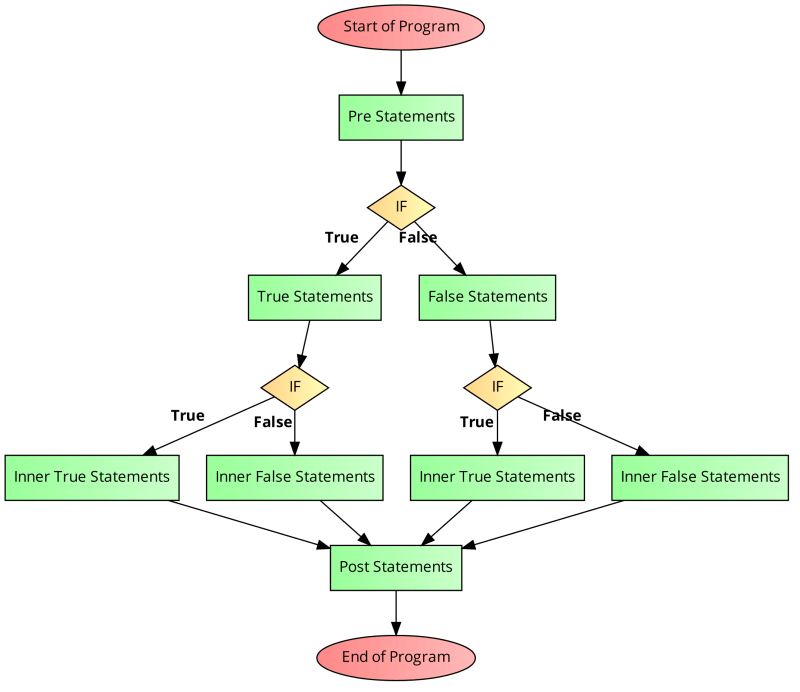
If the if-else statement is inside another if-else statement, it is called a nested if-else statement. We can use nested if-else statements to check other conditions if the previous condition is met. We have different variations of nested if-else statements. We will discuss only one of them.
The syntax of nested if-else is as follows.
if condition {
    // code to execute if the condition is true
    if condition {
        // code to execute if the condition is true
    } else {
        // code to execute if the condition is false
    }
} else {
    if condition {
        // code to execute if the condition is true
    } else {
        // code to execute if the condition is false
    }
}
Example:
Output:
The greatest number is: 566
d. else-if ladder
The else-if ladder is a series of if-else statements. It is used when we have multiple conditions to check when the previous condition is not met. The syntax of else-if ladder is as follows.
if condition {
    // code to execute if the condition is true
} else if condition {
    // code to execute if the condition is true
} else if condition {
    // code to execute if the condition is true
} else {
    // code to execute if none of the conditions are true
}
Example:
Output:
It is a Negative number
2. Switch
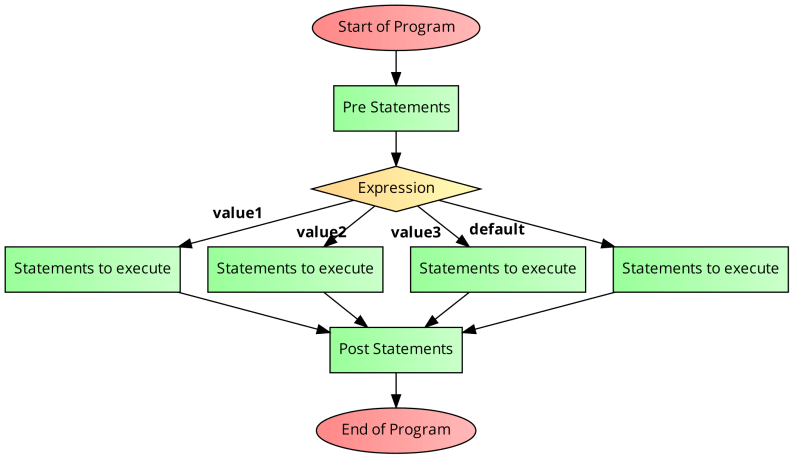
switch allows us to execute one block of code among several cases based on the value of a given expression. It can be used as an alternative to the else-if ladder statement when you have lots of conditions to be checked. If none of the cases match with the expression, the code inside the default block gets executed. The syntax of switch is as follows.
switch expression {
    case value1:
        // code to execute if the expression matches with value1
    case value2:
        // code to execute if the expression matches with value2
    case value3:
        // code to execute if the expression matches with value3
    default:
        // code to execute if none of the cases match with the expression
}
Example:
In the above example, we can see else-if ladder is used to check the day of the week. But there are lots of conditions to be checked. So, it is better to use the switch statement instead of the else-if ladder to achieve the same result.
Output:
Tuesday
The break keyword is not required, as the switch statement automatically breaks the execution of the code as soon as the first case is matched.
But, we can use the fallthrough keyword to execute the code inside the next case. The syntax of fallthrough is as follows.
switch expression {
    case value1:
        // code to execute if the expression matches with value1
        fallthrough
    case value2:
        // code to execute if the expression matches with value2
    case value3:
        // code to execute if the expression matches with value3
    default:
        // code to execute if none of the cases match with the expression
}
Example:
Output:
It's Weekday
B. Looping Statements
If we want to execute the block of codes repeatedly, we can use looping statements. The block of codes executes repeatedly until the condition is met. In Go, we have two ways to use a loop in the codes. They are for and range.
1. for
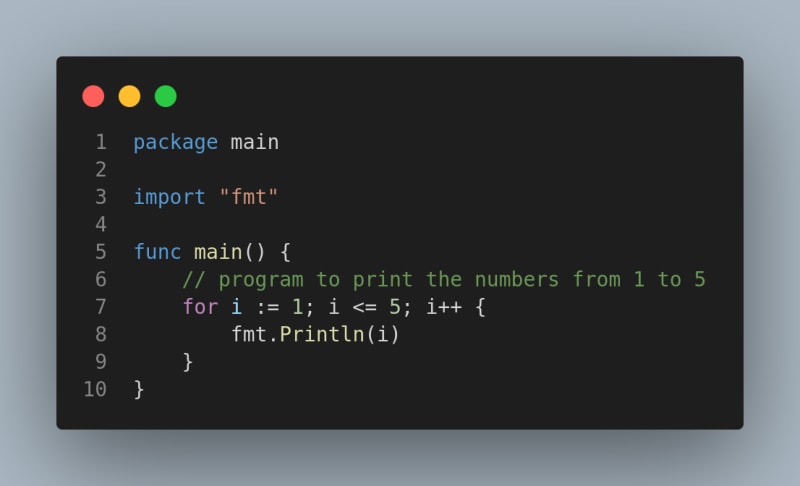
The for loop allows a program to execute a block of code repeatedly if the condition is true. The syntax of for is as follows.
for initialization; condition; increment/decrement {
  // code to execute if the condition is true
}
Example:
Output:
1
2
3
4
5
We don't have a separate while loop in Go like other programming languages. We can use the for loop as a while loop as follows.
for condition {
    // code to execute if the condition is true
}
Example:
Output:
1
2
3
4
5
2. range
range in the Go language is used to iterate over arrays, slices, maps, and strings. The range is used along with the for loop. The syntax of range is as follows.
for index, value := range collection {
    // code to execute until every element of the collection is iterated
}
Example:
Output:
Fruit at index 0 is Apple
Fruit at index 1 is Mango
Fruit at index 2 is Grape
Fruit at index 3 is Lichi
Fruit at index 4 is Strawberry
C. Other Statements
Besides, if, switch, for, and range, the Go language also provides some other statements. They are break, continue, defer, and panic.
1. Break Statement
The break statement terminates the loop or switch statement and transfers execution to the code immediately after the loop or switch. The keyword break is used.
Example:
In the above example, the break statement terminates the for loop when the value of i is equal to 5. So, the output will be as follows.
Output:
0
1
2
3
4
Done
2. Continue Statement
The continue statement skips the current iteration of the loop and continues with the next iteration. The keyword continue is used.
Example:
In the above example, the continue statement skips the current iteration of the loop when the value of i is equal to 5. So, the output will be as follows.
Output:
0
1
2
3
4
6
7
8
9
Done
3. Defer Statement
The defer statement invokes the function after the surrounding function returns. This delays the execution of the function. If there are multiple defer statements, they are executed in the last-in-first-out order. This statement might be useful for a cleanup task after the function has been executed. The syntax of defer is as follows.
func functionToDoSomething() {
    defer deferFunction()
    // code to execute
}

func deferFunction(){
    // code to execute
}
Example:
In the above example, the defer statements are pushed into the stack. And the last defer statement popped out first. The output will be as follows.
Output:
Hello World, I am From Nepal.
4. Panic Statement
The panic statement in Go is used to stop the normal flow of the program and start panicking. The panic statement is used to throw an exception. panic() is either raised by the Go runtime or can be raised by the user. The syntax of panic is as follows.
panic("error message")
Example:
In the above example, the panic statement is raised by the user. The program terminates as panic is raised. The output will be as follows.
Output:
panic: Something went wrong

goroutine 1 [running]:
main.main()
    /home/prarup/JankariTech/playground/go-code/panic.go:7 +0x27
exit status 2
5. Recover Statement
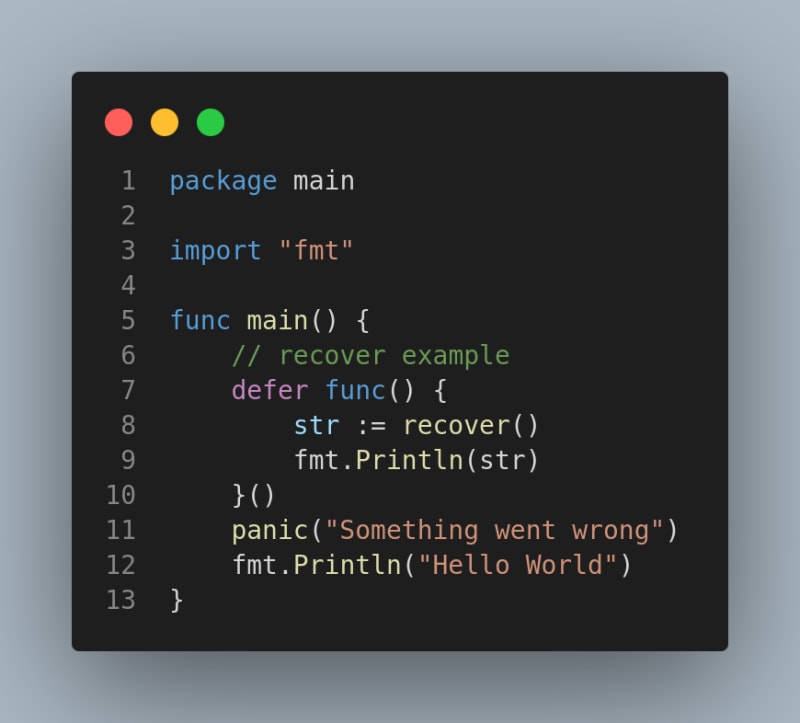
The recover statement recovers from the panic state and resumes normal execution of the program if possible. The recover statement is used to catch the panic statement. The syntax of recover is as follows.
recover()
Example:
In the above example, the recover statement is used to catch the panic statement. The output will be as follows.
Output:
Something went wrong
What we have learned so far
- Branching Statements
- if-else
- switch
- Looping Statements
- for
- range
- Break Statement
- Continue Statement
- Defer Statement
- Panic Statement
- Recover Statement
Conclusion
In this blog, we have learned about the control flow in the Go language. We have learned about the branching statements and looping statements. We have also learned about the break, continue, defer, panic, and recover statements. In the next blog, we will learn about the functions, Arrays, Strings, and Structures in the Go language. Keep learning and keep practicing. Stay tuned!!!.












Top comments (0)