Hello Again World! For this weeks blog I'll be talking to you about the wonderful world of AngularJS' 'ng-directives'. First I'll give ya a little background into AngularJS. Then I'll get into some explanations and examples of how their directives work. Alrighty then, here we go!
If you're not familiar with AngularJS, it is a JavaScript based open-source web framework that is currently maintained by Google. It was originally designed in 2009 by Misko Hevery at Brat Tech LLC. AngularJS is an opinionated front-end framework that adopts the MVW approach to web design. When we say opinionated that means that when you use AngularJS you have to abide by its specific rules and terminology in order to make the magic happen. This MVW approach is in contrast to the typical MVC approach, Model View Controller, where the 'C' stands for controller but with AngularJS the 'W' takes the place of the 'C' and it stands for 'whatever works for you'. This basically means that the controller aspect found in the 'separation of concerns' ideology can be carried out be either the view or the model, go wild! It's up to you!
So you may be wondering what are these directives I keep hearing about? Well you've come to the right place! The directives are markers on DOM elements that tell AngularJS to attach a specified behavior to that DOM element. In layman's terms, directives are how AngularJS really does its magic. They have the ability to transform the DOM element and its children, wowza! They can make new attributes, essentially supercharging the HTML, 'To infinity and beyond'!🐱🏍
AngularJS has many built-in directives. They are arranged in four categories and they are invoked by one of these identifiers: attribute, element, class, or comment. The attribute and element approach are the most common. Here is an example of what they may look like:
- Attribute
- Element
- Class
- Comment <!-- directive: BIG -->
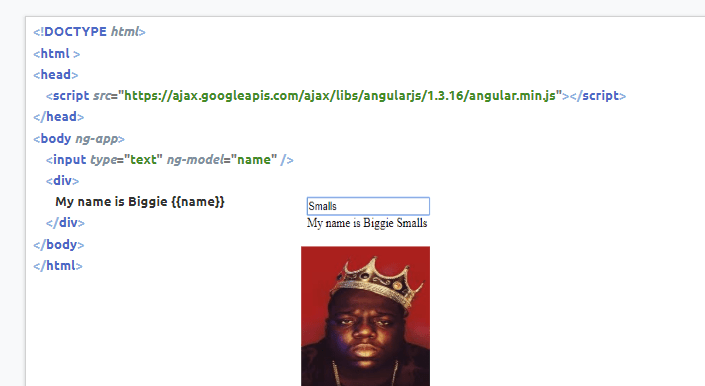
Most of these built-in directives are prefaced with the prefix 'ng-' where the 'ng' stands for...? You guessed it Angular! If you're feeling creative you can also make your very own shiny custom directives. Now lets get into the nitty gritty of some actual directives. The most common one (most common because it is essential for AngularJS to work🤣) is the 'ng-app'. This directive initializes AngularJS and makes the specified element a root element of the app. It tells the interpreter that the HTML in this element will be Angular-magical HTML and not just boring plain-ol' vanilla HTML. Next up to bat is 'ng-model'. This fellah will bind the value of HTML controls (like input, select, or textarea) to application data. So say for instance you have a text box for someone to enter their name. If you use good ol' 'ng-model' in conjunction with this, then your variable will spit out the text that was entered. Pretty cool huh? If you have no idea what I'm taking about, check out this example, featuring the dynamic duo 'ng-app' and 'ng-model' and also one of my favorite rappers Biggie Smalls!
Here you can see where I use 'ng-app' to initialize my AngularJS magicified element. Then I use 'ng-model= name' right in the same marker as 'input type=text'. This means that whatever text is input will supply the value to the 'name' variable. Then in the 'div' element below I need to use the double curly braces around 'name' to let the interpreter know that this is the dynamic variable which gets its data supplied from the input text box. You can see that I entered 'Smalls' into the text box and 'My Name is Biggie Smalls' was shown on the HTML. RIP B.I.G.!
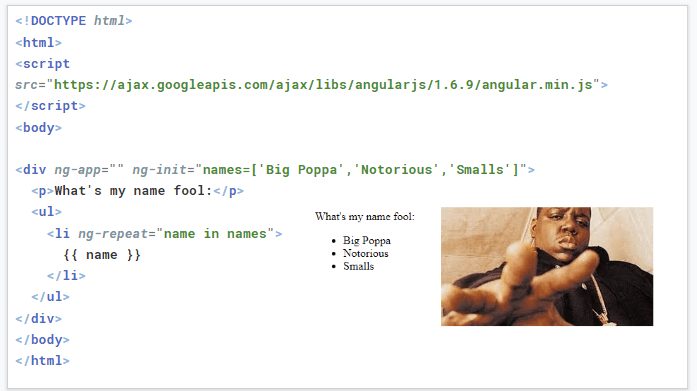
Another crowd favorite is the 'ng-repeat' directive. It's probably pretty hard to guess what this directive is used for but I'll go ahead and help you out with this one. It repeats an HTML element, actually cloning the HTML once for each element in a collection. This is how we loop with AngularJS and it can be used on arrays or objects! Cha-Ching! Lets take a look at that in action!
Here once again I used old faithful 'ng-app' to specify my angularJS root element. This time I had to use another directive called 'ng-init' to create a 'names' array variable and give it data right in the HTML. Then in my 'li' element I used classy 'ng-repeat' to loop through my array pulling out 'name' from 'names'. Below that I use the double curlys so the interpreter knows this is the dynamic varaible that will receive the info from 'name'. Viola! You can see in the browser HTML that 'Big Poppa', 'Notorious', and 'Smalls' was shown. BAM!
In conclusion angularJS’ use of 'ng-directives' is a useful method to add suave functionality straight to the HTML and supercharge it. These simple tools can be a sure-fire way to save developers valuable time and headaches. Adios! See ya next time!


Top comments (0)