
Of course we don't only want to be able to display the data, but also modify it. In this post, we will use the PicoLisp GUI to display the data and enable the data modification in a HTML form sheet.
In the first step, we will simply build a page that allows us to display the data and jump between the records:

Set-up of the file
The structure of the program builds up on the previous post, which is used as a basis. We will use this file and extend it.
Let's create a new function called person and add it to the allowed script. Also let's start the server with it. The rest stays the same. We call the new file family-edit.l.
### Modify / add following lines:

(allowed ("css/")
   "@lib.css" "!treeReport" "!person")
...

(de person ())
...

(de go ()
   (rollback)
   (server 8080 "!person") )
The function person shall be the function where we can display all relevant data about a record (i. e. a person) at one glance. We want to display the data as a form field, and be able to toggle between read and edit mode using an "Edit" button.
The first thing we need is to create the standard HTML function including the session start-up. On this page, we will not use the bootstrap CSS classes because we will use many pre-defined PicoLisp gui functions that don't work well with Bootstrap.
(de person ()
   (app)
   (action
      (html 0 "Person" "@lib.css" NIL
         (form NIL
]
The bracket ] closes all open parentheses. This can be useful in the development.
Like in the previous examples, we can start it with $ pil family-edit.l -family~main -go + and when we point the browser to http://localhost:8080, we should see an empty tab with title "Person".
Getting the database item
How does the form "know" which database item we want to display? This is controlled by calling the <id> function somewhere within the form. <id> binds the output to the global variable *ID. So we need to do two things:
- Adding
<id>to our form, - Appending an
*IDparameter to the URL.
For example, we could call <id> in the title of our form. ( <id> (: nm )) will set *ID to the current object and display its name.
(form NIL
   (<h2> NIL (<id> (: nm)))
If we point the browser now to http://localhost:8080/?*ID=-A1, we see this:

The +E/R prefix class
Now that we have specified the current object, we can display its data in a form. In order to access the database object, we will use the +E/R and +Obj prefix classes.
Read here for an introduction to the PicoLisp Form GUI and here for more on Prefix classes.
Just like we can add styles using +Styles and bind variables to a GUI element using +Val, we can also connect a database entity using the +E/R class. The syntax is pretty straightforward:
(gui '(+E/R +TextField) '(nm : home obj) 40 "Name")
This creates a textfield which is connected to the nm ("name") property of the home obj. The home obj is the object that belongs to the current form, i. e. the record that is specified via the global variable *ID.
Analogously, we can get the birth and death date like this:
"born" (gui '(+E/R +DateField) '(dat : home obj) 10)
"died" (gui '(+E/R +DateField) '(fin : home obj) 10)

The +ClassField form element
The +ClassField form element can be used to display and change the class of an object. For example, this example renders a drop-down menu which shows either "Male" or "Female" as current value:
(gui '(+ClassField) '(: home obj) '(("Male" +Man) ("Female" +Woman))) )

The +Obj Prefix class
The +Obj prefix class is used to hold a specific object. This way, a DB object becomes a first class GUI item just like the primitives string, number etc. In addition, +Obj supplies suggestions from the database, using dbHint.
What does that mean? Let's take the person's partner field as an example. The person's partner is also an object, connected by the property mate. Since we use +Obj, we can now access the record's name like this:
(gui '(+E/R +Obj +TextField) '(mate : home obj) '(nm +Person) 30) )
+Obj also offers two nice additional features:
- Suggestions if we want to change the partner's name (we'll see that later in the edit mode!),
- A pencil that executes a predefined function if we click on it. If no function is specified, the
url>method is taken.
Let's say we want to see the partner's record overview when we click on the pencil. In other words, we want to change the *ID in the URL to the partner's record.
Let's define a method url> that does just this in our +Person class model:
### DB ###
(class +Person +Entity)
(rel nm (+Need +Sn +Idx +String))      # Name
...
(rel txt (+String))                    # Info

(dm url> (Tab)
   (list "!person" '*ID This) )
url> takes a (Tab) argument specifying which tab should be opened (which is obviously only interesting in an application with several tabs - not so much in our single page app).
You could see the output in the animated GIF above: when we click on the pen, the page jumps to display this record.
Creating a table using +Chart and <table>
Like already shown in the To-Do App example, we can use the +Chart in combination with <table> to display data in a grid together with some predefined action buttons.
First, we define the data used in the chart, which is the kids property of the current object. +Chart expects a numeric argument as number of columns. Additionally, we can call two functions: The first one gets called when the chart is filled with data; the second one gets called when the data is read.
(gui '(+E/R +Chart) '(kids : home obj) 7
   '((This) (list NIL This (: dat) (: pa) (: ma)))
   cadr )
What does that mean?
-
'((This) (list NIL This (: dat) (: pa) (: ma)))creates a list of lists out of the(kids : home objdata, i. e. exactly one value per column and row. -
cadris equivalent to the second item of a list, which corresponds to the actual child object.
It might be a bit confusing, but it should clarify if you check the actual table output and its function.
After we defined the input value, we can define the table. The <table> function takes the argument "attributes", "title", "head" and "program". Let's set attributes and title to NIL and define the head as:
(<table> NIL NIL
   '(NIL (NIL "Children") (NIL "born") (NIL "Father") (NIL "Mother"))
Then we create our input fields just like specified above:
(do 6
   (<row> NIL
      (choPerson 1)
      (gui 2 '(+Obj +TextField) '(nm +Person) 20)
      (gui 3 '(+Lock +DateField) 10)
      (gui 4 '(+ObjView +TextField) '(: nm) 20)
      (gui 5 '(+ObjView +TextField) '(: nm) 20)
      (gui 6 '(+DelRowButton))
      (gui 7 '(+BubbleButton)) ) )
   (<row> NIL NIL (scroll 6 T)) )
Please ignore choPerson for the moment, we will come back to that in the next post.

Output table finished!
Let's apply a little bit of formatting. PicoLisp has a built-in function <grid> that formats in rows and columns similar to a table. Each four "elements" will be placed in one row, and the width is determined by the longest item.
(<grid> 4
"Occupation" (gui '(+E/R +TextField) '(job : home obj) 20)
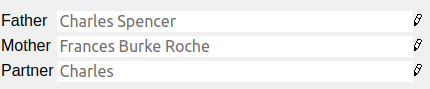
"Father" (gui '(+E/R +Obj +TextField) '(pa : home obj) '(nm +Man) 30)
"born" (gui '(+E/R +DateField) '(dat : home obj) 10)
"Mother" (gui '(+E/R +Obj +TextField) '(ma : home obj) '(nm +Woman) 30)
... )

Setting a default starting point
Lastly, let's define a default starting point for our application. This means that a default record should be loaded when we point the browser to http://localhost:8080.
How can we do that? First thing, we need to set the val of our *DB global variable, for example to record {A12} (Queen Elizabeth). In the REPL:
$ family-edit.l -family~main +
family: (set *DB '{A12})
-> {A12}
family: (show *DB)
{1} {A12}
   +Woman {3}
   +Person {2}
   +Man {4}
-> {1}
Next, let's load this value as default *ID at session startup. The session should also start immediately at loading the page.
(when (app)
   (redirect (baseHRef) *SesId *Url "?*ID=" (ht:Fmt (val *DB))) )
Now we can also change our html title dynamically to the person' name:
html 0 (; *ID nm) "@lib.css" NIL
With this, we get directly to Queen Elizabeth's entry when we visit http://localhost:8080.
With this we have all data of the record in a clear and user-friendly output format. However, the input fields are all disabled and we cannot save any changes.
Let's see how to change this in the next post.
You can find the source code up to this point here.


Top comments (0)