I’m taking Raja Rao’s course, Modern Functional Testing with Visual AI, on Test Automation University. This course challenged my perspective on software testing. I plan to summarize a chapter of Raja’s course each week to share what I have learned.
The first chapter compares modern functional testing with Visual AI against legacy functional testing with coded assertions of application output. Raja states that Visual AI allows for modern functional testing while using an existing functional test tool that relies on coded assertions results in lost productivity.
To back up his claim, Raja shows us a typical web app driven to a specific behavior. In this case, it’s the log-in page of a web app, where the user hasn’t entered a username and password, and yet selected the “Enter” button, and the app responds:
“Please enter username and password”
From here, an enterprising test engineer will look at the page above and say:
“Okay, what can I test?”
There’s the obvious functional response. There are other things to check, like:
- The existence of the logo at top
- The page title “Login Form”
- The title and icons of the “Username” and “Password” text boxes
- The existence of the “Sign in” button and the “Remember Me” checkbox – with the correct filler text
- The Twitter and Facebook icons below
You can write code to validate that all these exist. And, if you’re a test automation engineer focused on functional test, you probably do this today.
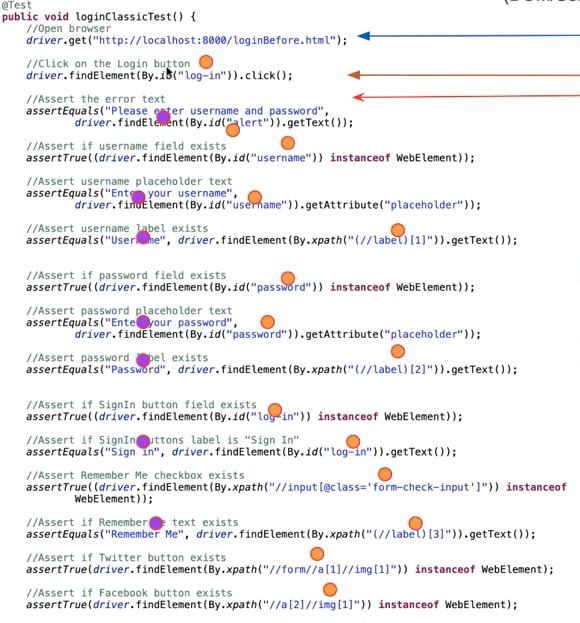
Raja shows you what this code looks like:
There are 18 total lines of code. There is a single line of navigation code to go to this page. One line of directs the browser to click the “Sign In” button. The remaining 16 lines of code assert that all the elements exist on the page. Those 16 lines of code include 14 identifiers (IDs, Name, Xpath, etc.) that can change, and 7 references to hard-coded text.
You might be aware that the test code can vary from app version to app version, as each release can change some or all of these identifiers.
Why do identifiers change? Let’s describe several reasons:
- Identifiers might change, while the underlying content does not.
- Some identifiers have different structures, such as additional data that was not previously tested.
- Path-based identifiers depend on the relative location on a page, which can change from version to version.
So, in some cases, existing test code misses test cases. In others, existing test code generates an error even when no error exists.
If you’re a test engineer, you know that you have to maintain your tests every release. And that means you maintain all these assertions.
Implications For Testing
Let’s walk through all the tests for just this page. We covered the negative condition for hitting “Sign In” without entering a username or password. Next, we must verify the error messages and other elements if one, or the other, field has data (the response messages may differ). Also, we need to handle the error condition where the username or password is incorrect.
We also have to worry about all the cases where a valid login moves to a correct next page.
Okay – lots of tests that need to be manually created and validated. And, then, there are a bunch of different browsers and operating systems. And, the apps can run on mobile browsers and mobile devices. Each of these different instances can introduce unexpected behavior.
What are the implications of all these tests?
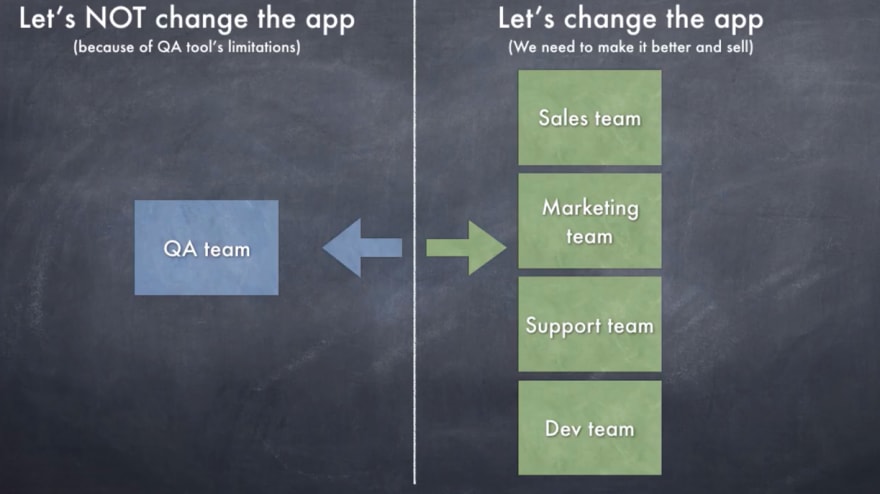
Raja points out the key implication. Workload. For every team besides QA, it matters to make the app better – which means changes. A/B testing, new ideas – applications need to change. And every version of the app means potential changes to identifiers – meaning that tests change and need to be validated. As a result, QA ends up with tons of work to validate apps. Or, QA becomes the bottleneck to all the change that everyone else wants to add to the app.
In fact, every other team can design and spec their change effectively. Given the different platforms that QA must validate, the QA team really wants to hold off changes. And, that’s a business problem.
Visual Validation with Visual AI – A Better Way
What would happen if QA had a better way of validating the output – not just line by line and assertion by assertion? What if QA could take a snapshot of the entire page after an action and compare that with the previous instance?
QA Engineers have desired visual validation since browser-based applications could run easily on multiple platforms. And, using Applitools, Raja demonstrates why visual validation tools appeal so much to the engineering team.
In this screen, Raja shows that the 18 lines of code are down to five, and the sixteen lines of validation code are down to three. The three lines of validation code read:
https://gist.github.com/batmi02/b5174f538e13e3226dba7fac61fc2afc
So, we have a call to the capture session to start, a capture, and the close of the capture session. None of this code refers to a locator on the page.
Crazy as it may seem, visual validation code requires no identifiers, no Xpath, no names. Two pages with different build structures but identical visual behavior are the same to Applitools.
From a coding perspective, test code becomes simple to write:
- Drive behavior (with your favorite test runner)
- Take a screenshot
You can open a capture session and capture multiple images. Each will be treated as unique images for validation purposes within that capture session.
Once you have an image of a page, it becomes the baseline. The Applitools service compares each subsequently captured image to the baseline. Any differences get highlighted, and you, as the tester, identify the differences that matter as either bugs or new features.
Handling Code Changes With Legacy Functional Test
The big benefit of visual validation with Visual AI comes from comparing new code with new features to old code.
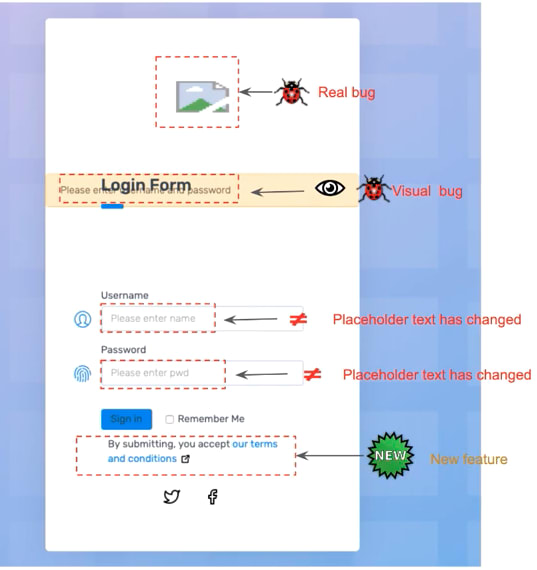
When Raja takes us back to his example page, he now shows a new version of the login page which has several differences – real improvements you might look to validate with your test code.
And, here, there are bugs with the new code. But, does your existing test code capture all the changes?
Let’s go through them all:
- Your existing test misses the broken logo (-1). The logo at the top no longer links to the proper icon file. Did you check for the logo? If you checked to see that the reference icon file was identical, your code misses the fact that the response file is a broken image.
- Your existing test misses the text overlap of the alert and the “Login Form” text (-1). The error message now overlaps the Login Form page title. You miss this error because the text remains identical – though their relative positions change
- Your existing test catches the new text in the username and password boxes (+2). Your test code correctly identifies that there is new prompt text in the name and password boxes and registers an error. So, your test shows two errors.
- Your existing test misses the new feature (-1). The new box with “Terms and Conditions” has no test. It is a new feature, and you need to code a test for the new feature.
So, to summarize, your existing tests catch two bugs (different locators for the username and password field), miss two bugs (the broken logo and the text and alert overlap), and don’t have anything to say about the new feature. You have to modify or write three new tests.
But wait! There’s more!
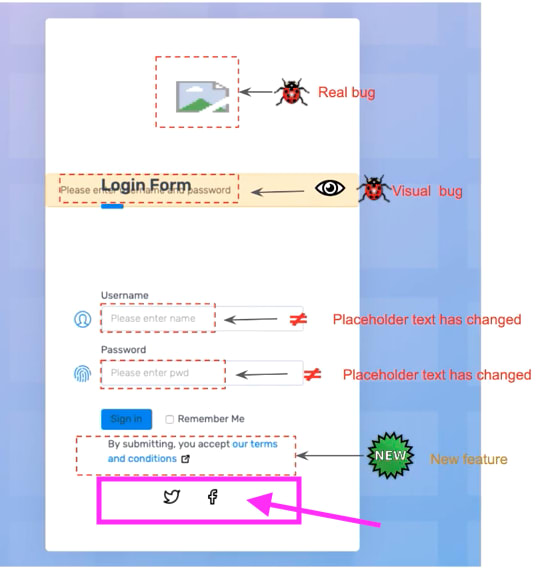
- Your existing test gives you two false alarms that the Twitter and Facebook links are broken. Those links at the bottom used Xpath locators – which got changed by the new feature. Because the locators changed, these now show up as errors – false positives – that must be fixed to make the test code work again.
Handling Visual Changes with Visual AI
With Visual AI in Applitools, you actually capture all the important changes and correctly identify visual elements that remain unchanged, even if the underlying page structure is different.
Visual AI captures:
- 1 – Change – the broken logo on top
- 2 – Change – The login form and alert overlap
- 3 – Change – The fact that the alert text has moved from version to version (the reason for the text overlap)
- 4 – Change/Change – The changes to the Username and Password box text
- 5 – Change – the new feature of the Terms and Conditions text
- 6 – No Change – Twitter and Facebook logos remain unmoved (no false positives)
So, note that Visual AI captures changes in the visual elements. All changes get captured and identified. There is no need to look at the test code afterward and ask, “what did we miss?” There is no need to look at the test code and say, “Hey, that was a false positive, we need to change that test.”
Comparing Visual AI and Legacy Functional Code
With Visual AI, you no longer have to look at the screen and determine which code changes to make. You are asked to either accept the change as part of the new baseline or reject the change as an error.
How powerful is that capability?
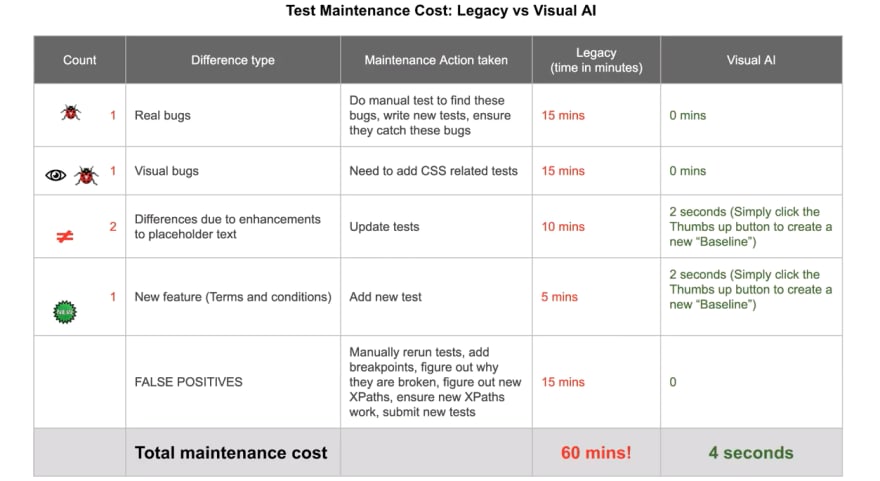
Well, Raja makes a comparison of the work an engineer puts in to do validation using legacy functional testing and functional testing with Visual AI.
With legacy functional testing:
- The real bug – the broken logo – can only be uncovered by manual testing. Once it is discovered, a tester needs to determine what code will find the broken representation. Typically, this can take 15 minutes (more or less). And you need to inform the developers of the bug.
- The visual bug – the text overlap – can only be uncovered by manual testing. Once the bug is discovered, the tester needs to determine what code will find the overlap and add the appropriate test (e.g. a CSS check). This could take 15 minutes (more or less) to add the test code. And, you need to inform the developers of the bug.
- The intentionally changed placeholder text for Username and Password text boxes need to be recoded, as they are flagged as errors. This could take 10 minutes (more or less).
- The new feature can only be identified by manual validation or by the developer. This test needs to be added (perhaps 5 minutes of coding). You may want to ask the developers about a better way to find out about the new features.
- The false positive errors around the Twitter and Facebook logos need to be resolved. The Xpath code needs to be inspected and updated. This could take 15 minutes (more or less)
In summary, you could spend 60+ minutes, or 3,600+ seconds, for all this work.
In contrast, automated visual validation with Visual AI does the following:
- You find the broken logo by running visual validation. No additional code or manual work needed. Incremental time: zero seconds. Alert developers of the error: 2 seconds. Alerting in Applitools can send a bug notification to developers when rejecting a difference.
- Visual validation uncovers the text overlap and moved alert text. Incremental time: zero secondsAlert developers of the error: 2 seconds. Alerting in Applitools can send a bug notification to developers when rejecting a difference.
- Visual validation identifies the new text in the Username and Password text boxes. Visual validation workflow lets you accept the visual change as the new baseline (2 seconds per change – or 4 seconds total)
- You uncover the new feature with no incremental change or new test code, and you accept the visual change as the new baseline (2 seconds).
- The Twitter and Facebook logos don’t show up as differences – so you have no work to do (0 seconds)
So, 10 seconds for Visual AI. Versus 3,600 for traditional functional testing. 360X faster.
Let’s Get Real
I would think that a productivity gain of 360X might appear unreasonable. So did Raja. When he went through the real-world examples for writing and maintaining tests, he came up with a more reasonable-looking table.
For just a single page, in development and just a single update, Raja concluded that the maintenance costs with Visual AI remain about 1000x better, and the overall test development and maintenance would be about 18x faster. Every subsequent update of the page would be that much faster with Visual AI.
In addition, Visual AI catches all the visual differences without test changes and ignores underlying changes to locators that would cause functional tests to generate false positives. So, the accuracy of Visual AI ends up making Visual AI users much more productive.
Finally, because Visual AI does not depend on locators for visual validation, Visual AI ends up depending only on the action locators – which would need to be maintained for any functional test. So, Visual AI becomes much more stable – again leading to Visual AI users being much more productive.
Raja then looks at a more realistic app page to have you imagine the kind of development and test work you might need to ensure the functional and visual behavior of just this page.
For a given page, with calculators, data sorting, user information… this is a large amount of real estate that involves display and action. How would you ensure proper behavior, error handling, and manage update?
Extend this across your entire app and think about how much more stable and productive you can be with Visual AI.
Chapter 1 Summary
Raja summarizes the chapter by pointing out that visual validation with Visual AI requires only the following:
- Take action
- Take a screenshot in Visual AI
- Compare the screenshot with the baseline in Visual AI
That’s it. Visual AI catches all the relevant differences without manual intervention. Using Visual AI avoids both the test development tasks for ensuring that app responses match expectations, and it eliminates the more difficult steps of maintaining tests as part of app enhancement.






Top comments (0)