This article is also available on my personal blog
I am writing this article after trying to follow this outdated guide Using GraphQL with Python - A Complete Guide, and thought "I should try write something like this". So, here we are.
Technologies used in this article:
- Python 3.10.14 (no particular reason, I just have this version installed)
- Flask 3.0.3
- Ariadne 0.23.0
- SQLite (no setup required with SQLite, so we can focus on GraphQL)
- Bash as shell interface
Here is a diagram of what we are going to make in this article.

Table of Contents:
- Environment Setup
- All In One File
- Adding SQLite Into The Mix
- Resolving Query
- Resolving Mutation
- A More Sophisticated Setup
Environment Setup
Use Python virtual environment, so it does not mess with your other packages or Python installation. And don't forget to activate the virtual environment.
python -m venv venv
source venv/bin/activate
Install the packages we are going to use.
pip install flask ariadne
All In One File
This will be the minimum setup to "run a GraphQL server". Here is the minimum code in one file, for you busy people. There is not much explanation done here, since I am sure some people are only here to get the minimal code and are more interested in figuring things out themselves.
# /app.py

# Code originally from
# https://ariadnegraphql.org/docs/flask-integration

from ariadne import QueryType, graphql_sync, make_executable_schema
from flask import Flask, jsonify, request

# GraphQL schema definition
# https://graphql.org/learn/schema/
type_defs = """
    type Query {
        hello: String!
    }
"""

query = QueryType()


# Bind resolver to query
# Meaning: run the function resolve_hello
# when query hello is receiver
@query.field("hello")
def resolve_hello(_, info):
    request = info.context
    user_agent = request.headers["User-Agent"] or "Guest"
    return "Hello, %s!" % user_agent


schema = make_executable_schema(type_defs, query)

app = Flask(__name__)

# Bind /graphql route to accept and process graphQL request
# https://graphql.org/learn/serving-over-http/
@app.route("/graphql", methods=["POST"])
def graphql_server():
    data = request.get_json()
    headers = dict(request.headers)

    success, result = graphql_sync(
        schema,
        data,
        context_value={"request": request, "headers": headers},
        debug=app.debug
    )

    status_code = 200 if success else 400
    return jsonify(result), status_code


# Start the flask app
if __name__ == "__main__":
    app.run(debug=True)
The part below is to add a GraphQL explorer when you go to /graphql in your web browser. This part is completely optional, but it is quite helpful when experimenting.
from ariadne.explorer import ExplorerGraphiQL


explorer_html = ExplorerGraphiQL().html(None)


@app.route("/graphql", methods=["GET"])
def graphql_explorer():
    return explorer_html, 200
Below is how the GraphQL explorer looks like in your browser.

Adding SQLite Into The Mix
In this section we are going to implement the SQLite and Python SQLite Connector part of the server.

If you need a sample SQLite database, you can go get the Northwind sample SQLite DB and copy and paste its content into seed.sql, and then run the python code below to create the SQLite db file. After you run the file, you should have a file named Northwind.db on the root of your folder. Alternatively, you can just download the .db file from the GitHub Repository
# Create Northwind.db from .sql file
import sqlite3

with open('seed.sql', 'r') as f:
    query = f.read()

con = sqlite3.connect('Northwind.db')
cur = con.cursor()

cur.executescript(query)
con.commit()
con.close()
Below is the Entity-Relationship Diagram for the Northwind database.
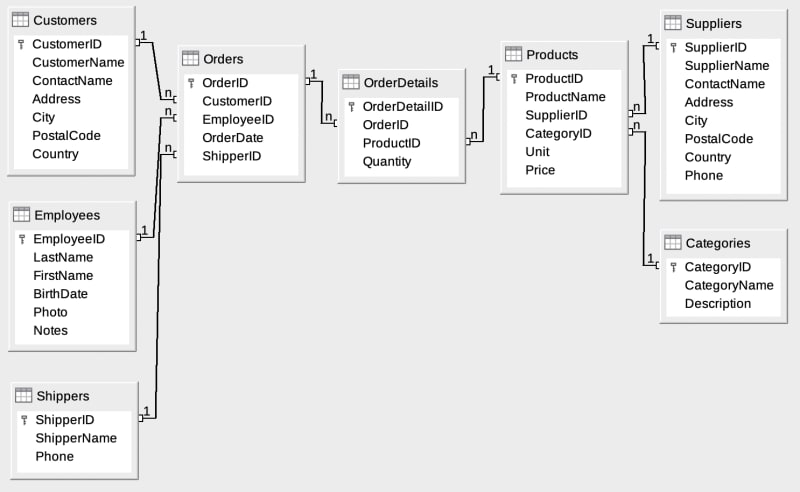
For this article, we are only going to mess with the Shippers table on the Database. First step, first, make a database.py file to store all the sqlite functionality in. This file will be responsible for interacting with the SQLite.
# /database.py
# Code from
# https://flask.palletsprojects.com/en/3.0.x/patterns/sqlite3/

# Build a model of sort to connect to SQLite
import sqlite3

from flask import g

DATABASE = "NorthWind.db"


def make_dicts(cursor, row):
    """Helper function to turn query result into dict"""
    return dict((cursor.description[idx][0], value) for idx, value in enumerate(row))


def get_db():
    """Helper function to get DB connection for Flask"""
    db = getattr(g, "_database", None)
    if db is None:
        db = g._database = sqlite3.connect(DATABASE)
        #  Turn query result into dict
        db.row_factory = make_dicts
    return db


def query_db(query, args=(), one=False, commit=False):
    """Helper function to make query to DB"""
    db = get_db()
    cur = db.execute(query, args)
    if commit:
        db.commit()
        cur.close()
        return None
    else:
        rv = cur.fetchall()
        cur.close()
        return (rv[0] if rv else None) if one else rv
The next file will be shippers.py, this file will act as a model for the Shippers table in the database. While it is completely fine to just put these functions in the database.py file, it is just a little bit better to separate the concerns between file.
# /shippers.py
from database import query_db


def getShippers():
    result = query_db("SELECT * FROM Shippers")
    return result


def getShipper(shipperID):
    query = "SELECT * FROM Shippers WHERE ShipperID = ?"
    result = query_db(query, (shipperID))
    return result


def createShipper(name, phone):
    query = "INSERT INTO Shippers (ShipperName, Phone) VALUES (?, ?)"
    result = query_db(query, (name, phone), commit=True)
    return result


def updateShipper(shipperID, name, phone):
    query = "UPDATE Shippers SET ShipperName = ?, Phone = ? WHERE ShipperID = ?"
    result = query_db(query, (name, phone, shipperID), commit=True)
    pass


def deleteShipper(shipperID):
    query = "DELETE FROM Shippers WHERE ShipperID = ?"
    result = query_db(query, (shipperID), commit=True)
    return result
Resolving Query
Now it's time to make the resolver functions and call the database functions from the resolvers.

First modify the app.py file, modify the type_defs like the code below, so the resolver knows what schema is valid.
type_defs = """
    type Query {
        shippers: [Shipper!]
        shipper(ID: ID!): Shipper
    }

    type Shipper {
        ShipperID: ID!
        ShipperName: String!
        Phone: String!
    }
"""
Next bind the resovler function to the query. These functions will be run when their respective query is invoked. Below the type_defs function add these code.
@query.field("shippers")
def resolve_shippers(_, info):
    result = getShippers()
    return result


@query.field("shipper")
def resolve_shipper(obj, info, ShipperID):
    result = getShipper(ShipperID)
    return result[0] # This is because query_db() will return an array
This is basically what happens when a POST request is made to the /graphql endpoint.

When a POST request is made to /graphql endpoint, the Ariadne internally resolves the query and call the resolver function that was binded to that type of query. Technically, the resolver function can do anything it wants as long as it returns the same type of data as specified in the schema. So technically, the code below is a valid resolver.
@query.field("shipper")
def resolve_shipper(obj, info, ShipperID):
    return {
        "ShipperID": 4,
        "ShipperName": "West World",
        "Phone": "(123) 8485 827"
    }
If you added the GraphQL explorer, you can go to /graphql to your browser and type some queries to test out the GraphQL endpoint.
# example query

{
  shipper(ShipperID: "1") {
    ShipperID
    ShipperName
    Phone
  }

  shippers {
    ShipperID
    ShipperName
    Phone
  }
}
Or you can also use curl or Postman, you get the point.
curl -i -H 'Content-Type: application/json' -H "Authorization: bearer myGithubAccessToken" -X POST -d '{"query":"{\n shipper(ShipperID: \"1\") {\n ShipperID\n ShipperName\n Phone\n }\n \n shippers {\n\t\tShipperID\n ShipperName\n Phone\n }\n}"}' http://127.0.0.1:5000/graphql
Resolving mutation
Time to mutate data through GraphQL. Import MutationType and modify the type_defs variable again into.
from ariadne import MutationType

mutation = MutationType() # You need this line to call the @mutation decorator

type_defs = """
    type Query {
        shippers: [Shipper!]
        shipper(ID: ID!): Shipper
    }

    type Mutation {
        createShipper(ShipperName: String!, Phone: String!): Shipper
        updateShipper(ShipperID: ID!, ShipperName: String, Phone: String): Shipper
        deleteShipper(ShipperID: ID!): Shipper
    }

    type Shipper {
        ShipperID: ID!
        ShipperName: String!
        Phone: String!
    }
"""
And connect the resolver to the mutation like previously done with query.
@mutation.field("createShipper")
def resolve_createShipper(obj, info, ShipperName, Phone):
    result = createShipper(ShipperName, Phone)
    print(result)
    return result
Also, add change the mutation as a parameter to make_executable_schema function like so.
schema = make_executable_schema(type_defs, query, mutation)
Now making a POST request to the /graphql endpoint, try making this query.
mutation {
  createShipper(ShipperName: "New Shipper", Phone: "123 456 789") {
    __typename
  }
}
You should see a null return. To check if the creation succeeded or not, make a getShippers query, and the newly created shipper should show up. Adding the update and delete operation should be quite straigtforward, just add the mutation decorator to a resolver function that will call the functions from shippers.py module.
@mutation.field("updateShipper")
def resolve_updateShipper(obj, info, ShipperID, ShipperName, Phone):
    result = updateShipper(ShipperID, ShipperName, Phone)
    print(result)
    return result


@mutation.field("deleteShipper")
def resolve_deleteShipper(obj, info, ShipperID):
    result = deleteShipper(ShipperID)
    print(result)
    return result
A More Sophisticated Setup
Have you ever heard of the 90-90 Rule, if you haven't you may want to read about it in the meantime. This section is supposed to cover: error handling, better schema types, and more file separation.
Thank you for reading.
Codes are available in GitHub rickyxyz/ariadne-example


Top comments (0)