Do you want to add a button for users to save a post to their Favorite lists, and then read it again? MB Favorite Posts solution of Meta Box is surely a useful tool for you to do this simply and quickly.
MB Favorite Posts is a solution of Meta Box for users having bought lifetime bundles of Meta Box. This solution provides you with all the needed tools and features to add a Favorite button. Using it, users can choose their favorite posts to save in their own lists. More than that, users can access their lists to read the posts they like one more time. MB Favorite Posts solution can automatically create a Favorite button, and you can customize it easily.
To get started, let’s see through some impressive benefits of Favorite buttons.
Why to Use a Favorite Button?
A Favorite button can help you in many cases. Using this button, you can improve the conversion rate, sale, interaction, … and especially users’ experience. For example:
- For eCommerce websites: Customers can save their interested products, then come back to search and buy them in the next shopping time.
- Readers can save posts / documents / novels / helpful contents, then they can get back to the exact position they finished reading the last time.
Here is an eCommerce website using Favorite buttons (the heart-shaped), so that their users can add their preferred products.
Install Meta Box Plugin
Now I will add a favorite button on my blog sites (on single post pages). Once users read my blogs, they can click this button to save their favorite posts for the next reading time, if they find them helpful.
As I have said before, I will use MB Favorite Posts solution of Meta Box. This solution is super easy to use, and I can work on it without configuring or coding. Besides, you also can quickly set up many options for the Favorite button on one and only Settings page.
First, you need to install and activate Meta Box plugin:
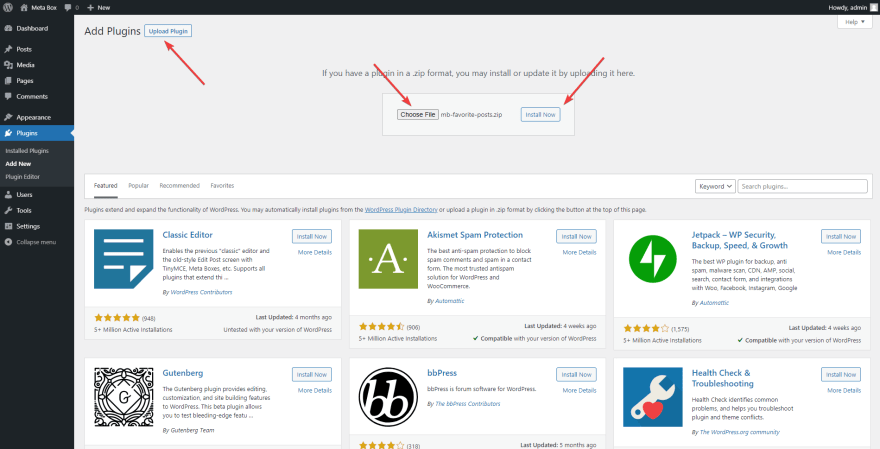
Next, go to your My Account on metabox.io, then download MB Favorite Posts solution. Upload the .zip file you have just downloaded to the website like you usually do to install plugins.
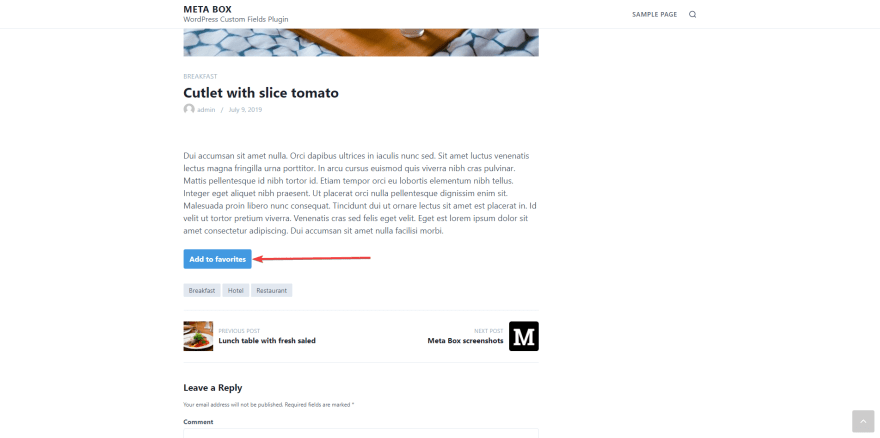
After activating the solution, a favorite button will automatically appear on the posts of your website. You can randomly go to a post to check it out, and the favorite button will come to you like this:
In default, this button is named as Add to Favorites, and shown at the end of the content section. Of course, you can change its name, display position, and ask users to log in before using this button. Especially, you can add a page for users to sign up for a new account or see the list of their favorite posts
Set Up the Favorite Button
To set up the Favorite button, go to Settings > Favorite Posts.
Rename
On this settings page, you just have to type the name of the button in the Button text and Button Added Text section, like in the image below:
Relocate the Favorite Button
You can freely choose where to display the favorite button as you want.
To choose its location on a single post page, you just have to choose 1 of these 3 options in the Position section on the setting page like this:
Note: If you want to display the Favorite button in the post of a certain post type, tick to choose that post type in the Post Types section.
To show the favorite button at other positions on single post pages or a random page, you can use this shortcode: [mbfp-button].
For example, I have added my favorite button to the sidebar of the WordPress website by going to Appearance > Widgets, adding a Text widget to the Sidebar then paste the shortcode there:
And here is the result:
Ask Users to Log in to Use the Favorite Post Feature
After installing, the Enable for non-logged in users feature will be enabled by default.
But if users do not log in, their favorite post list will be temporarily saved in the cookie of the browser, and will be lost when the cookie is deleted. After a period of time, or when users have deleted cookies, they cannot find out their favorite posts anymore.
To avoid these annoying cases, you had better allow users to create an account and save their favorite post list in their account.
First, untick the Enable for non-logged in users option and then go to the Register Page section:
If you have had a register page already and want to use it, just leave the Register Page box blank. Then anyone logging in to their accounts with any roles can use the favorite button.
If you’ve had a register page, you can create a blank page.
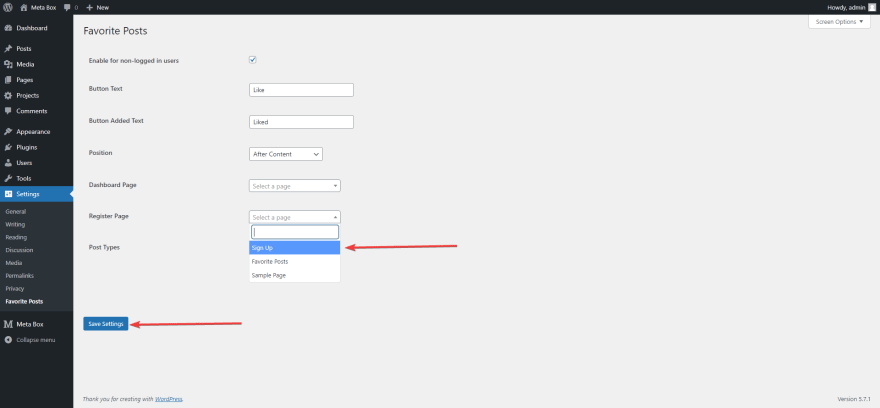
After that, in the Register Page section, you will see the page you have just created in the dropdown list like in the image below:
You just have to choose the page you have created and click Save Settings. MB Favorite Post will automatically add fields to this register page with a form like this:
You can use CSS to make this form more stunning.
When users sign up for a new account on this page, their User Role is Subscriber by default.
Set Up Dashboard Page
Dashboard Page is a page where users review their list of favorite posts. You can choose a random page to turn into Dashboard Page. When users choose a post as favorite, it will be shown on this Dashboard Page.
Here I create a page as Favorite Posts and choose it in the Dashboard Page section in the settings page of MB Favorite Posts.
Note: Even when you choose to allow non-logged in users to use this feature, you still have to choose the Dashboard page as a certain page, so that users have a place to see their favorite post list.
Finally, you need to display your Favorite Posts page on your website to help users access it easily. I will set it on my menu as an example.
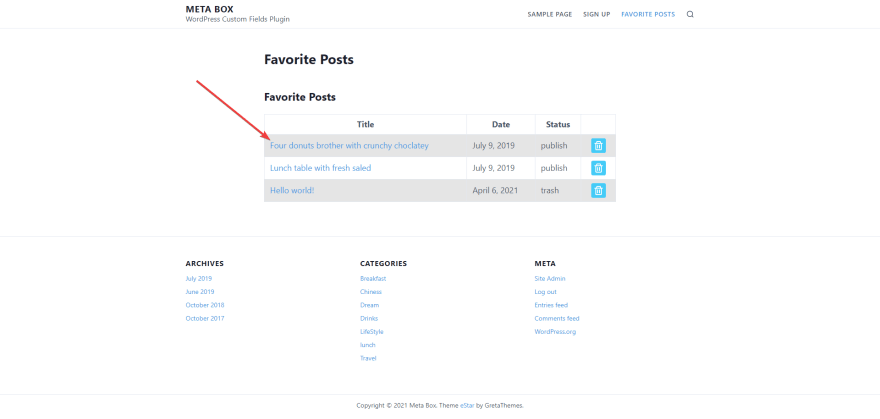
When going to the Favorite Posts page, you will see a list of favorite posts display like this:
Tutorial Video
Last Words
As you can see, MB Favorite Posts solution of Meta Box can provide you with enough tools to add the Favorite Post feature to your websites. It even can create a register page for you. Everything becomes so effortless with this solution, isn’t it?
Beside MB Favorite Posts, Meta Box team also develops other solutions like MB Testimonials and MB User Avatar with the same way of using. All of these solutions are made to support website developers to add more interesting and helpful features within a few clicks. You can read how to use these tools here. However, keep in mind that they are for users having the Lifetime bundle of Meta Box only.
Good luck with your websites!


Top comments (0)