In this section, we will create a GitHub Action to automatically deploy our Client App to AWS S3. You can view the code here.
Create Repository Secrets
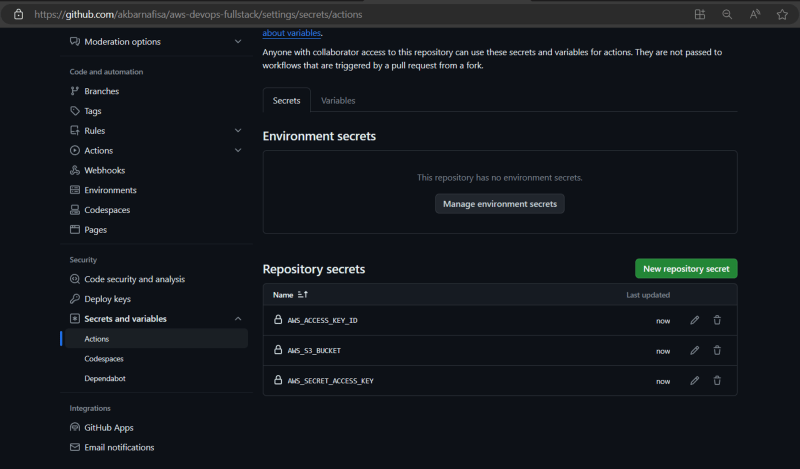
We will add the following secrets to the repository:
-
AWS_ACCESS_KEY_ID→ Access key obtained from the.csvfile in the previous section -
AWS_SECRET_ACCESS_KEY→ Secret key obtained from the.csvfile in the previous section -
AWS_S3_BUCKET→ The name of the S3 bucket
Create Repository Variables
Next, we will add the API URL for our app, which we obtain from API Gateway.
Create Github Action File
The final step is to create the deploy.yml file. The build file consists of installing the dependencies and building the client app. Then, we use jakejarvis/s3-sync-action to upload the build file to the S3.
name: Upload Website

on:
  pull_request:
    branches:
      - main

jobs:
  build:
    runs-on: ubuntu-latest
    env:
      VITE_API_URL: ${{ vars.VITE_API_URL }}
    steps:
      - name: Checkout repo
        uses: actions/checkout@v3
      - name: Setup Node
        uses: actions/setup-node@v3
      - name: Install dependencies
        run: yarn
      - name: Build app
        run: yarn workspace client build
      - name: Upload to S3s
        uses: jakejarvis/s3-sync-action@master
        with:
          args: --acl private --follow-symlinks --delete
        env:
          SOURCE_DIR: apps/client/dist
          AWS_S3_BUCKET: ${{ secrets.AWS_S3_BUCKET }}
          AWS_ACCESS_KEY_ID: ${{ secrets.AWS_ACCESS_KEY_ID }}
          AWS_SECRET_ACCESS_KEY: ${{ secrets.AWS_SECRET_ACCESS_KEY }}
To trigger the build, you need to create a pull request (PR) to the main branch and merge it. Afterward, the GitHub Action will run.
Then, when we check the S3 bucket, we can see that the file has already been uploaded.


Top comments (0)