This is the fourth article in the series, Udacity: SUSE Cloud Native Foundations. This is an extension of the previous article, Udacity | SUSE: Architecture Considerations.
In this section, we'll go over the two exercises and an edge case from the previous section:
- Exercise 1: Endpoints for Application Status
- Exercise 2: Application Logging
- Edge Case: Amorphous Applications
For the following exercises, I'll be using a Windows Laptop and Visual Studio Code. I've also installed Python and Flask. For the installation, you can check this link.
Exercise 1: Endpoints for Application Status
Clone the lab repository, which can be found in this link.
$ git clone https://github.com/udacity/nd064_course_1.git
You should see the folder below.
$ ls -ltr
drwxr-xr-x 1 Eden Jose 197610    0 Jun 18 19:41 nd064_course_1/
Go to exercises/python-helloworld folder.
$ cd nd064_course_1/

$ ls -l
total 25
drwxr-xr-x 1 Eden Jose 197610  0 Jun 18 19:41 exercises/
drwxr-xr-x 1 Eden Jose 197610  0 Jun 18 19:41 project/
-rw-r--r-- 1 Eden Jose 197610 12 Jun 18 19:41 README.md
drwxr-xr-x 1 Eden Jose 197610  0 Jun 18 19:41 solutions/

$ cd exercises/python-helloworld/

$ ls -l
total 6
-rw-r--r-- 1 Eden Jose 197610 167 Jun 18 19:41 app.py
-rw-r--r-- 1 Eden Jose 197610  32 Jun 18 19:41 requirements.txt
Following the guide found here, we can use the folder nd064_course_1 as our project folder and create a virtual environment where flask will be installed. To create a virtual environment, run the command:
$ cd nd064_course_1
$ python -m venv env
You should see a new env folder inside nd064_course_1.
$ ls -l
total 13
drwxr-xr-x 1 Eden Jose 197610  0 Jun 18 21:27 env/
drwxr-xr-x 1 Eden Jose 197610  0 Jun 18 21:12 exercises/
drwxr-xr-x 1 Eden Jose 197610  0 Jun 18 19:41 project/
-rw-r--r-- 1 Eden Jose 197610 12 Jun 18 19:41 README.md
drwxr-xr-x 1 Eden Jose 197610  0 Jun 18 19:41 solutions/
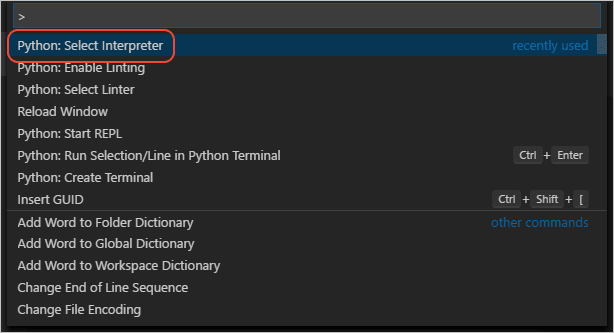
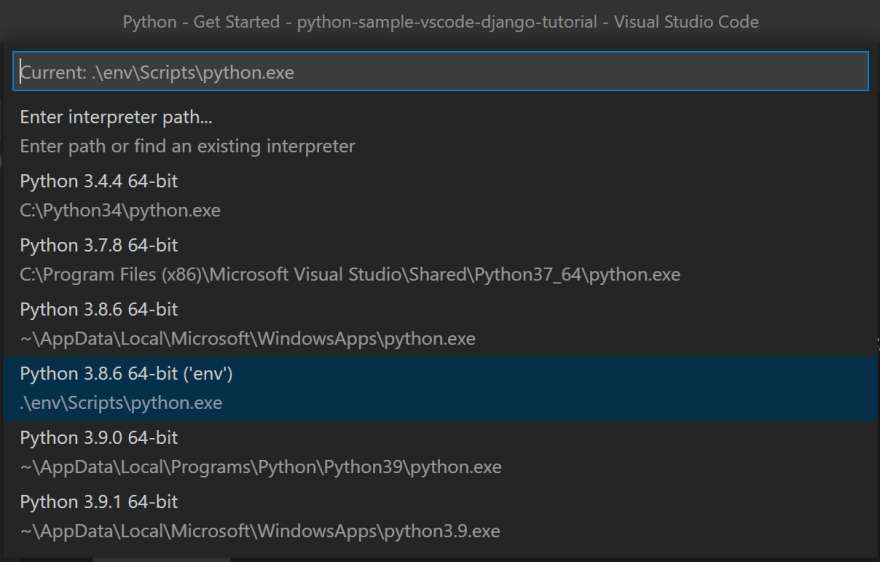
In Visual Studio Code, open the nd064_course_1 folder in the editor and then open the Command Palette (View > Command Palette or (Ctrl+Shift+P)). Then select the Python: Select Interpreter command and then select the virtual environment in your project folder that starts with ./env or .\env.
Open a new terminal to activate the virtual environment.
In the virtual environment, install flask.
$ python -m pip install flask
Once installed, go to exercises/ython-helloworld folder and run the command below. This command runs the Flask development server and looks for app.py by default.
$ cd exercises/python-helloworld/

$ python -m flask run
* Environment: production
WARNING: This is a development server. Do not use it in a production deployment.
Use a production WSGI server instead.
* Debug mode: off
* Running on http://127.0.0.1:5000/ (Press CTRL+C to quit)
To test if this is working, open your browser and go to 127.0.0.1:5000
We will now extend the Python Flask application with /status and /metrics endpoints, considering the following requirements:
- Both endpoints should return an HTTP 200 status code
- Both endpoints should return a JSON response e.g. {"user": "admin"}. (Note: the JSON response can be hardcoded at this stage)
- The /status endpoint should return a response similar to this example: result: OK - healthy
- The /metrics endpoint should return a response similar to this example: data: {UserCount: 140, UserCountActive: 23}
Solution:
Edit the app.py so that it looks like the snippet below:
from flask import Flask
from flask import json

app = Flask(__name__)

@app.route('/status')
def status():
response = app.response_class(
        response=json.dumps({"result":"OK - healthy"}),
        status=200,
        mimetype='application/json'
)

return response

@app.route('/metrics')
def metrics():
response = app.response_class(
        response=json.dumps({"status":"success","code":0,"data":{"UserCount":140,"UserCountActive":23}}),
        status=200,
        mimetype='application/json'
)

return response

@app.route("/")
def hello():
return "Hello World!"

if __name__ == "__main__":
app.run(host='0.0.0.0')
Now try to run the modified app.py and then open the link 127.0.0.1:5000 in your browser again.
$ python -m flask run
* Environment: production
WARNING: This is a development server. Do not use it in a production deployment.
Use a production WSGI server instead.
* Debug mode: off
* Running on http://127.0.0.1:5000/ (Press CTRL+C to quit)
Check if the endpoints are working by appending /status and /metrics
Exercise 2: Application Logging
At this stage, you have extended the Hello World application to handle different endpoints. Once an endpoint is reached, a log line should be recorded showcasing this operation.
In this exercise, you need to further develop the Hello World application collect logs, with the following requirements:
- A log line should be recorded the timestamp and the requested endpoint, like:
"{{TIMESTAMP}}, {{ ENDPOINT_NAME}} endpoint was reached"
- The logs should be stored in a file with the name app.log.
- Enable the collection of Python logs at the DEBUG level.
- Refer to the logging Python module for more details.
Solution:
Modify the app.py. Here we're using app.logger which records info messages based on the endpoint. To store the logs in a particular file, we use the logging module from Python. The logs will now be streamed to a file, "app.log".
from flask import Flask
from flask import json
import logging

app = Flask(__name__)

@app.route('/status')
def healthcheck():
    response = app.response_class(
            response=json.dumps({"result":"OK - healthy"}),
            status=200,
            mimetype='application/json'
    )

    ## log line
    app.logger.info('Status request successfull')
    return response

@app.route('/metrics')
def metrics():
    response = app.response_class(
            response=json.dumps({"status":"success","code":0,"data":{"UserCount":140,"UserCountActive":23}}),
            status=200,
            mimetype='application/json'
    )

    ## log line
    app.logger.info('Metrics request successfull')
    return response

@app.route("/")
def hello():
    ## log line
    app.logger.info('Main request successfull')

    return "Hello World!"

if __name__ == "__main__":

    ## stream logs to app.log file
    logging.basicConfig(filename='app.log',level=logging.DEBUG)

    app.run(host='0.0.0.0')
To test, we run the app.py again, but this time, we use this simple command.
$ python app.py
 * Serving Flask app 'app' (lazy loading)
 * Environment: production
   WARNING: This is a development server. Do not use it in a production deployment.
   Use a production WSGI server instead.
 * Debug mode: off
 * Running on all addresses.
   WARNING: This is a development server. Do not use it in a production deployment.
 * Running on http://192.168.254.105:5000/ (Press CTRL+C to quit)
Going back to your browser, enter the link below with the main endpoint, then with the two endpoints
Back on your terminal, you'll see that an app.log was created in the exercises/python-helloworld folder.
$ ls -l
total 10
drwxr-xr-x 1 Eden Jose 197610   0 Jun 18 22:22 __pycache__/
-rw-r--r-- 1 Eden Jose 197610 685 Jun 18 22:54 app.log
-rw-r--r-- 1 Eden Jose 197610 998 Jun 18 22:52 app.py
-rw-r--r-- 1 Eden Jose 197610  32 Jun 18 19:41 requirements.txt

$ cat app.log
WARNING:werkzeug: * Running on all addresses.
   WARNING: This is a development server. Do not use it in a production deployment.
INFO:werkzeug: * Running on http://192.168.254.105:5000/ (Press CTRL+C to quit)
INFO:app:Main request successfull
INFO:werkzeug:127.0.0.1 - - [18/Jun/2021 22:53:51] "GET / HTTP/1.1" 200 -
INFO:app:Main request successfull
INFO:werkzeug:127.0.0.1 - - [18/Jun/2021 22:54:11] "GET / HTTP/1.1" 200 -
INFO:app:Metrics request successfull
INFO:werkzeug:192.168.254.105 - - [18/Jun/2021 22:54:21] "GET /metrics HTTP/1.1" 200 -
INFO:app:Metrics request successfull
INFO:werkzeug:192.168.254.105 - - [18/Jun/2021 22:54:24] "GET /metrics HTTP/1.1" 200 -
Edge Case: Amorphous Applications
After an engineering team has successfully released a product, with both monolith and microservices, the next phase in the application lifecycle is maintenance. In this edge case, we will explore commonly used maintenance operations after a product is released.
Throughout the maintenance stage, the application structure and functionalities can change, and this is expected! The architecture of an application is not static, it is amorphous and in constant movement. This represents the organic growth of a product that is responsive to customer feedback and new emerging technologies.
Both monolith and microservice-based applications transition in the maintenance phase after the production release. When considering adding new functionalities or incorporating new tools, it is always beneficial to focus on extensibility rather than flexibility.
Generally speaking, it is more efficient to manage multiple services with a well-defined and simple functionality (as in the case of microservices), rather than add more abstraction layers to support new services (as we’ve seen with the monoliths). However, to have a well-structured maintenance phase, it is essential to understand the reasons an architecture is chosen for an application and involved trade-offs.
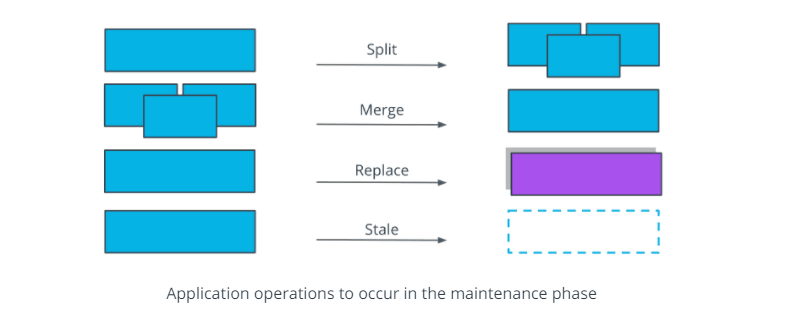
Some of the most encountered operations in the maintenance phase are listed below:
A split operation - is applied if a service covers too many functionalities and it's complex to manage. Having smaller, manageable units is preferred in this context.
A merge operation- is applied if units are too granular or perform closely interlinked operations, and it provides a development advantage to merge these together. For example, merging 2 separate services for log output and log format in a single service.
A replace operation - is adopted when a more efficient implementation is identified for a service. For example, rewriting a Java service in Go, to optimize the overall execution time.
A stale operation - is performed for services that are no longer providing any business value, and should be archived or deprecated. For example, services that were used to perform a one-off migration process.
Performing any of these operations increases the longevity and continuity of a project. Overall, the end goal is to ensure the application is providing value to customers and is easy to manage by the engineering team. But more importantly, it can be observed that the structure of a project is not static. It amorphous and it evolves based on new requirements and customer feedback.
Whew, that was a lengthy write-up! Don't worry, in the next section, we'll be focusing on container orchestration using Kubernetes.
See you there! 😁
If you enjoy this write-up and would like to learn more, make sure to hit the Follow just below and bookmark the series. I'll also be glad to connect with you on Twitter.
See you there! 😃


Top comments (0)