This series intends to show how I build an app to serve content from my WordPress blog by using react-native. Since my blog is talking about react-native, the series and the articles are interconnected. We will learn how to set-up many packages that make our lives comfortable and learn how to deal with WordPress APIs. Here, the most prominent features talked about in the book are the dark theme, offline mode, infinite scroll and many more. You can discover much more in this series. this inspiration to do this tutorial series came from the React Native Mobile Templates from instamobile
In case of wanting to learn from the beginning, all the previous parts for this tutorial series are available below:
- Build WordPress Client App with React Native #1: Overview
- Build WordPress Client App with React Native #2: Setting Up Your Environment
- Build WordPress Client App with React Native #3: Handle Navigation with React navigation
- Build WordPress Client App with React Native #4: Add Font Icon
- Build WordPress Client App with React Native #5 : Home Screen with React native paper
- Build WordPress Client App with React Native #6 : Using Html renderer and Moment
- Build WordPress Client App with React Native #7: Add pull to refresh and Infinite scroll
- Build WordPress Client App with React Native #8: Implementing SinglePost Screen
- Build WordPress Client App with React Native #9: implement simple share
- Build WordPress Client App with React Native #10: Setup and save bookmark
- Build WordPress Client App with React Native #11: Remove and Render Bookmark
- Build WordPress Client App with React Native #12: Categories screen
- Build WordPress Client App with React Native #13: Configuring firebase in contact screen
- Build WordPress Client App with React Native #14 : Implementing Settings Screen
- Build WordPress Client App with React Native #15 : Forwarding message to inbox with Cloud function
- Build WordPress Client App with React Native #16 : Dark theme
- Build WordPress Client App with React Native #17 : Fix react-native-render-html to change theme
- Build WordPress Client App with React Native #18 : changing Theme
- Build WordPress Client App with React Native #19 : Notify user when offline
- Build WordPress Client App with React Native #20 : Saving data to cache
- Build WordPress Client App with React Native #21 : Splash Screen on iOS
- Build WordPress Client App with React Native #22 : Splash Screen on Android
- Build WordPress Client App with React Native #23 : Setup Firebase Push notification [iOS]
- Build WordPress Client App with React Native #24 : Setup Firebase Push Notification [Android]
- Build WordPress Client App with React Native #25 : Manage device token
- Build WordPress Client App with React Native #26 : open specific screen with a deeplink
In this chapter, we will learn how to successfully publish our app on the Google Play Store.
Before uploading our application to Google Play, it needs to be signed with an upload key. The steps to generate the signed APK file in order to upload to Play Store is provided below:
Generating an upload key
In order to generate the private signing key, we need to use keytool. On Windows, keytool needs to be run from C:\\Program Files\\Java\\jdkx.x.x_x\\bin. The command to generate the key is provided in the code snippet below:
>>keytool -genkeypair -v -keystore my-upload-key.keystore -alias my-key-alias -keyalg RSA -keysize 2048 -validity 10000
This command asks us for passwords for the keystore and key and for the Distinguished Name fields for our key. Then, it will generate the keystore as a file called my-upload-key.keystore.
On Mac, we need to navigate to the JDK folder by using the command $ cd /user/jdk/path and use the keytool command with sudo permission. Hence, we need to use the following commands:
>>/usr/libexec/java_home //to check for JDK
>>sudo keytool -genkey -v -keystore my-upload-key.keystore -alias my-key-alias -keyalg RSA -keysize 2048 -validity 10000
Note that, we need to remember to keep the keystore file private.
Setting up Gradle variables
Here, we need to perform two steps which are explained below:
- First, we need to place the
my-upload-key.keystorefile under theandroid/appdirectory in our project folder. - Then, we need to edit the file
~/.gradle/gradle.propertiesorandroid/gradle.properties, and add the following (replace*****with the correct keystore password, alias, and key password):MYAPP_UPLOAD_STORE_FILE=my-upload-key.keystore MYAPP_UPLOAD_KEY_ALIAS=my-key-alias MYAPP_UPLOAD_STORE_PASSWORD=***** MYAPP_UPLOAD_KEY_PASSWORD=*****
Here, these are defined as global Gradle variables, that we can later use in our Gradle config to sign our app.
Adding signing config to our app’s Gradle config
Here, we need to setup release builds to be signed using upload key. For that, we need to edit the file ‘./android/app/build.gradle’ in our project folder, and add the signing config:
...
android {
    ...
    defaultConfig { ... }
    signingConfigs {
        release {
            if (project.hasProperty('MYAPP_UPLOAD_STORE_FILE')) {
                storeFile file(MYAPP_UPLOAD_STORE_FILE)
                storePassword MYAPP_UPLOAD_STORE_PASSWORD
                keyAlias MYAPP_UPLOAD_KEY_ALIAS
                keyPassword MYAPP_UPLOAD_KEY_PASSWORD
            }
        }
    }
    buildTypes {
        release {
            ...
            signingConfig signingConfigs.release
        }
    }
}
...
Generating the release APK
In this step, we are going to generate the APK file that we are going to upload in our Google Play Store. For that, we need to run the following command:
>> cd android //navigate to android folder
>>./gradlew bundleRelease
Here, the gradle’s bundleRelease will bundle all the JavaScript required to run our app into the AAB (Android App Bundle).
Note that, we need to make sure the gradle.properties file does not contain org.gradle.configureondemand=true as it will make the release build skip bundling JS and assets into the app binary.
As a result, the generated AAB will be in the path ‘./android/app/build/outputs/bundle/release/app.aab’. Now, this file is ready to be uploaded to Google Play.
Release build Testing
We can also test the release in order to check for any errors or functioning of any packages. This can be an important step to mitigate errors before publishing to Google play store.
For that, we need to first uninstall any previous version of the app that we already have installed. Then, we can install it on the device by using following command:
>>react-native run-android --variant=release
Note that, –variant=release is only available if we have set up signing as described above.
After the successful test run, we can now move on the uploading our app to Google play store.
Uploading App to Play Store
Here, we have the stepwise guidance on how to upload our signed APK file to the Google play store.
Step 1: Create a Developer Account
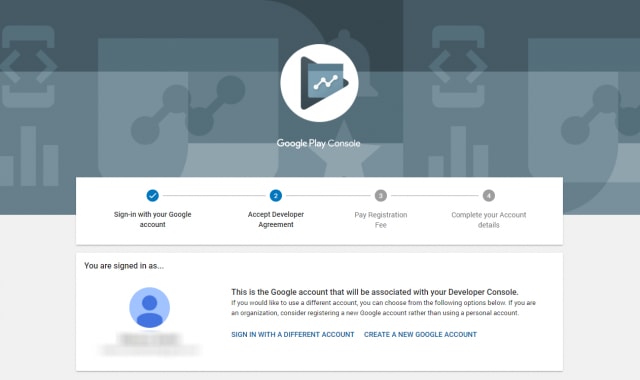
First, we need to create a Developer Account. We can sign up easily using our existing Google Account.
Here, the signup process is fairly straightforward. The registration fee cost about $25. After we review and accept the Developer Distribution Agreement, we can proceed to make the payment using our credit or debit card.
In order to finish the sign-up process, we need to fill out all our necessary account details, including our Developer Name, which will be displayed in Google Play.
Step 2: Merchant Account for paid app
If we want to publish a paid app or plan to sell in-app purchases, we need to create a payments center profile called merchant account. The steps to create the Merchant account are provided below:
- Play Console Sign in.
- Navigate to Download Reports — Financial
- Select ‘Set up a merchant account now’
- Fill in our business information
Once we successfully create the profile, we will be automatically linked to our developer account.
Step 3: Create an App
Since we now have set up our Play Console, we can finally add our app. The steps to add the app are as follows:
- Go to the ‘All applications’ tab in the menu
- Click on ‘Create Application’
- Choose our app’s default language from the drop-down menu
- Provide title of our app
- Finally, click on “Create”
Here, the title that we have given to our app will be displayed on Google Play after it is published. Note that, we can always change the name of the app later as well.
After we successfully created our app, we will be navigated to the store entry page. Here, we will need to fill out all the details for our app’s store listing.
Step 4: Prepare Store Listing
Store listing is are all the details that will be displayed to the customers on our app’s listing on Google Play. So, we need to prepare that first.
The information required for our store listing is divided into several categories:
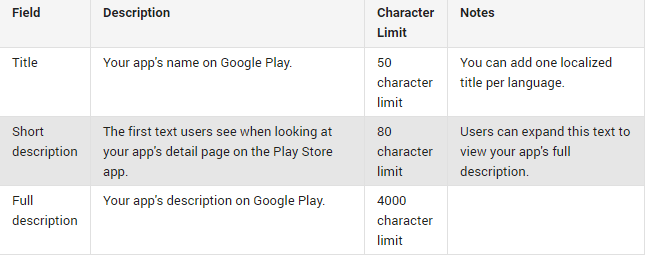
Product Details
Here, we need to fill out three fields which are shown in the screenshot below:
We should always write the title and description of our app very carefully in order to make it more appealing to customers.
Here, we need to make use of the right keywords. We need to make sure our app doesn’t come across as spam or promotional to avoid getting risk of suspension on the Play Store.
Graphic Assets
In graphic assets, we can add screenshots, images, videos, promotional graphics, and icons that showcase our app’s features and functionality.
Some graphic assets are mandatory, like screenshots, a feature graphic, and a high-resolution icon. Others are optional.
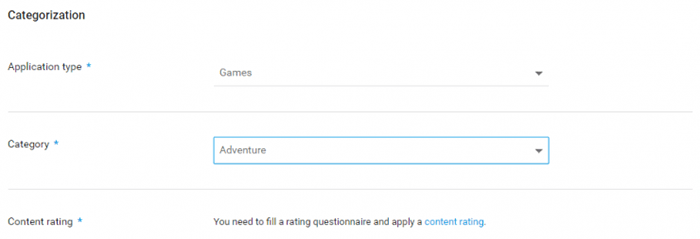
Categorization
Here, we need to select the appropriate type and category to which our app belongs to. From the drop-down menu, we can pick either app or game for the application type.
For the content ratings, we will need to upload an APK first. We can skip this step for later.
Contact Details
Here, we need to enter contact details in order to provide our customers access to support regarding our app.
We can add multiple contact channels here, like an email, website, and phone number. The contact email is mandatory for publishing an app.
Privacy Policy
For apps that request access to sensitive user data or permissions, we need to add a privacy policy that discloses how our app collects, uses, and shares that data.
Here, we must add a URL linking to our privacy policy in our store listing and within our app. We need to make sure the link is active and relevant to our app.
After completion, we can click on ‘Save Draft’ to save our details.
Step 5: Upload APK to an App Release
For uploading APK, Google offers us multiple ways to upload and release our APK. But first, we need to create an app release.
In order to create a release, we need to select the app that we created in Step 3. Then, from the menu on the left side, we need to navigate to ‘Release management’ -> ‘App releases.’
Here, we need to select the type of release that we want to upload our first app version. We can choose between an internal test, a closed test, an open test, and a production release.
The first three releases enable us to test our app among a selected group of users before we make it go live for everyone to access. This is a safer option because we can analyze the test results and optimize or fix our app.
If we create a production release, our uploaded app version will become accessible to everyone in the countries we choose to distribute it in.
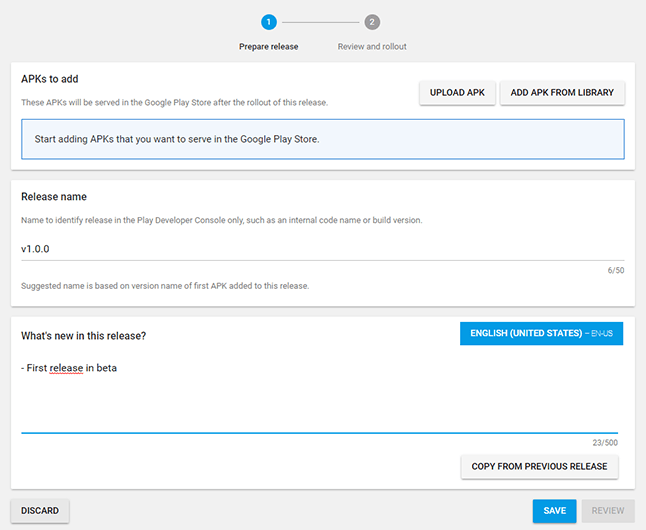
Once we choose an option, we need to click on ‘Create release.’
Next, we need to follow the instructions to add our APK files, and name and describe our release from the screenshots below:
After we are done, we need to press Save.
Step 6: Provide an Appropriate Content Rating
If we do not give a rating to our app, it will be listed as ‘Unrated’. The apps that are ‘Unrated’ may get removed from Google Play.
In order to rate our app, we need to fill out a content rating questions. We can access it when we select our app in the Play Console and navigate to ‘Store presence’ — ‘Content rating’ on the left menu.
We need to make sure that we enter accurate information. Any misrepresentation of our app’s content can lead to suspension or removal from the Play Store.
Step 7: Set Up Pricing & Distribution
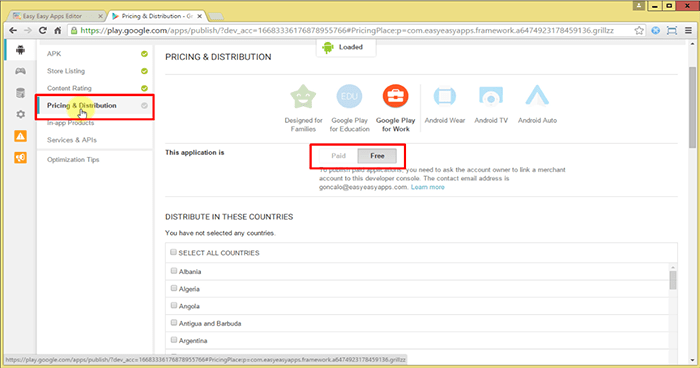
Here, we need to devise our monetization strategy. And after we know how our app is going to make money, we can go ahead and set up our app as free or paid as shown in the screenshot below:
Note that, we can always change our app from paid to free later, but we cannot change a free app to paid.
Here, we can also choose the countries we want to distribute our app in, and opt-in to distribute to specific Android devices and programs too.
Step 8: Rollout Release to Publish our App
This is the final step. Here, we will learn about reviewing and rolling out our release.
Before we review and rollout our release, we need to make sure the store listing, content rating, and pricing and distribution sections of our app each have a green checkmark next to them.
Once we make sure that we have filled out those details, we need to select our app and navigate to ‘Release management’ — ‘App releases.’ Then, we need to click on ‘Edit release’ next to our desired release and review it.
Next, we need to click on ‘Review’. Hence, we will be taken to the ‘Review and rollout release’ screen. Here, we can see if there are any issues or warnings we might have missed out on.
Finally, we need to select a ‘Confirm rollout.’ This will publish our app to all users in our target countries on Google Play.
The post Build WordPress Client App with React Native #28: Publish on Play store appeared first on Kriss.




Top comments (0)