We already saw how to integrate Rasa chatbot with Tiwlio and Google Chat. In this article, I will show you how to integrate the Rasa chatbot with another messaging channel – Socket.IO.
This will be the result:
What is Socket.IO?
Socket.IO is a library that enables real-time bi-directional communication between a client and a server. It uses the WebSocket protocol.
You can write a simple chat application to learn the basics of Socket.IO.
Socket.IO is composed of two parts:
- A server that integrates with the Node.JS HTTP Server –
socket.io. - A client library that loads on the browser side –
socket.io-client.
Let's get started!
By adding the following configuration to credentials.yml in your Rasa chatbot project, you will enable the Socket.IO server.
# credentials.yml
socketio:
  user_message_evt: user_uttered
  bot_message_evt: bot_uttered
  session_persistence: false
All that is left is a client.
Create a folder named webchat in the Rasa chatbot project.
Inside the webchat folder, create a new index.html file.
This file will contain the source code for the interactive web chat. You can view the complete code here.
Let's start with a markup.
At the top of the page, there will be a header.
All sent and received messages will be displayed in the middle. At the bottom, we will have a form with text input and a button to send messages.
<!DOCTYPE html>
<html>
  <head>
    <title>Socket.IO chat</title>
    <style>
      /* styles */
    </style>
  </head>
  <body>
    <header class="header">
      <p class="title">Chat with Rasa chatbot</p>
    </header>
    <div id="messages"></div>
    <form id="form">
      <input id="message-input" autocomplete="off" autofocus/>
      <button class="button">Send</button>
    </form>
  </body>
</html>
At the current stage, the page looks like this and doesn't do anything:

To connect to the Socket.IO server provided by Rasa, we need Socket.IO client library. We'll include it as a script from CDN before the closing </body> tag in index.html.
<script src="https://cdnjs.cloudflare.com/ajax/libs/socket.io/4.1.3/socket.io.js"
        integrity="sha512-PU5S6BA03fRv1Q5fpwXjg5nlRrgdoguZ74urFInkbABMCENyx5oP3hrDzYMMPh3qdLdknIvrGj3yqZ4JuU7Nag=="
        crossorigin="anonymous" referrerpolicy="no-referrer"></script>
Below this <script> we have just added, add another <script> that will contain the application logic.
Connect to the Rasa Socket.IO server:
<script>
    // Connect to RASA server
    const socket = io("http://localhost:5005");
</script>
The URL has a form of http://<host>:<port>, where the host and port are the appropriate values from your running Rasa server.
When the client connects, a connected event will be emitted. We can react to it and log a message into the console.
socket.on('connect', function () {
    console.log("Connected to Socket.io server");
});
In a similar way, log any connection errors.
socket.on('connect_error', (error) => {
    // Write any connection errors to the console
    console.error(error);
});
When the user clicks the Send button, we obtain the input value and emit a user_uttered event, passing the input value as a value of a message field.
user_uttered is the event name for user messages we configured in credentials.yml.
We also append the message to the page and add corresponding classes for adding CSS later on.
Lastly, scroll to the bottom of the page.
const messages = document.getElementById('messages');
const form = document.getElementById('form');
const messageInput = document.getElementById('message-input');

form.addEventListener('submit', function (e) {
    e.preventDefault();
    const msg = messageInput.value;
    if (msg) {
        socket.emit('user_uttered', {
            "message": msg,
        });
        messageInput.value = '';

        appendMessage(msg, "sent");
    }
});

function appendMessage(msg, type) {
    const item = document.createElement('div');
    item.textContent = msg;
    item.classList.add("message");
    item.classList.add(`message_${type}`);
    messages.appendChild(item);
    scrollToBottom();
}

function scrollToBottom() {
    window.scrollTo(0, document.body.scrollHeight);
}
Rasa server processes the message and sends a response in the bot_uttered event payload.
bot_uttered is the event name for bot messages we configured in credentials.yml.
The response can contain various fields. We will handle text, attachment and quick_replies.
socket.on('bot_uttered', function (response) {
    console.log("Bot uttered:", response);
    if (response.text) {
        appendMessage(response.text, "received");
    }
    if (response.attachment) {
        appendImage(response.attachment.payload.src, "received");
    }
    if (response.quick_replies) {
        appendQuickReplies(response.quick_replies);
    }
});
If the response contains text, we want to display it in the chat as a message from the chatbot. This is done with the same method we used to append user's message but with a different class and therefore different CSS.
If the response contains attachment, we want to grab the attachment source and display it as an image sent by the chatbot.
function appendImage(src, type) {
    const item = document.createElement('div');
    item.classList.add("message");
    item.classList.add(`message_${type}`);
    const img = document.createElement('img');
    img.src = src;
    img.onload = scrollToBottom;
    item.appendChild(img);
    messages.appendChild(item);
}
If the response contains quick_replies, we want to display them as buttons that the user can click to send a message without a need for typing.
We attach a click event listener to each button to:
- remove the quick replies,
- append the title of the quick reply the user clicked on as a message from the user,
- send the underlying quick reply payload.
function appendQuickReplies(quickReplies) {
    const quickRepliesNode = document.createElement('div');
    quickRepliesNode.classList.add("quick-replies");
    quickReplies.forEach(quickReply => {
        const quickReplyDiv = document.createElement('button');
        quickReplyDiv.innerHTML = quickReply.title;
        quickReplyDiv.classList.add("button");
        quickReplyDiv.addEventListener("click", () => {
            messages.removeChild(quickRepliesNode);
            appendMessage(quickReply.title, "sent");
            socket.emit('user_uttered', {
                "message": quickReply.payload,
            });
        })
        quickRepliesNode.appendChild(quickReplyDiv);
    })
    messages.appendChild(quickRepliesNode);
    scrollToBottom();
}
Styles
Finally, to make the page nicer, let's add some CSS.
First, add a CSS reset. Then add the rest of the styles.
/** CSS RESET        **/
/** ...              **/
/** END OF CSS RESET **/

body {
    --white-color: #f3f4fb;
    --black-color: black;
    --blue-color: #5a18ee;
    --light-purple-color: #7f7afc;
    --light-violet-color: #8c54f4;
    --darker-violet-color: #713dc3;
    --dark-violet-color: #5d2db0;
    font-family: Roboto, sans-serif;
    background-color: var(--blue-color);
}

#form {
    padding: 0.25rem;
    position: fixed;
    bottom: 0;
    left: 0;
    right: 0;
    display: flex;
    height: 3rem;
    box-sizing: border-box;
    background-color: var(--black-color);
}

#message-input {
    flex-grow: 1;
    padding: 0 1rem;
    border-radius: 2rem;
    margin: 0.25rem;
    background-color: var(--white-color);
}

#message-input:focus {
    outline: none;
}

.button {
    background: var(--light-violet-color);
    border: none;
    padding: 0 1rem;
    margin: 0.25rem;
    border-radius: 3px;
    outline: none;
    color: var(--white-color);
    font: inherit;
}

.button:hover {
    background: var(--darker-violet-color);
}

.button:active {
    background: var(--dark-violet-color);
}

#messages {
    display: flex;
    flex-direction: column;
    padding: 10px 10px 60px 10px;
}

.message {
    padding: 0.5rem 1rem;
    border-radius: 10px;
    word-wrap: break-word;
    max-width: calc(100% - 40px - 32px);
    margin-bottom: 10px;
}

.message_received {
    background: var(--white-color);
    color: var(--black-color);
    border-bottom-left-radius: 0;
    align-self: flex-start;
}

.message_sent {
    color: var(--white-color);
    background: var(--light-purple-color);
    border-bottom-right-radius: 0;
    align-self: flex-end;
}

.header {
    background-color: var(--black-color);
    color: var(--white-color);
    text-align: center;
    padding: 12px;
}

.title {
    font-size: 23px;
}

.quick-replies {
    display: flex;
    align-self: flex-end;
    height: 2.5rem;
    box-sizing: border-box;
}
Run the application
Now let's start the application from the webchat folder by running npx http-server ..
Because the rasa server will be running on http://localhost:5005 and our chat application is running on http://localhost:8080, we need to enable CORS for the rasa server.
- Run the rasa server with enabled cors for all origins:
rasa run --cors "*". Alternatively, enable only a specific host and port:rasa run --cors "http://127.0.0.1:8080". - In a new terminal window, run the actions server:
rasa run actions. - Open
http://127.0.0.1:8080and chat with the chatbot!
The web chat we created does not support all Rasa functionality and it could be improved in many ways. If you want to add Rasa chat to your webpage, consider rasa-webchat which provides more features.
To learn more about Socket.IO channel connector, visit the Rasa documentation.
Repository for this tutorial:
You can checkout the state of the repository at the end of this tutorial by running:
git clone --branch 22-socketio-integration git@github.com:petr7555/rasa-dev-tutorial.git


Top comments (27)
Great
I am very interesting in your every post
Have you ever deploied the Rasa Chatbot into the facebook
I have already the runned the Chat Bot in the sercer using this:
rasa run -m models --enable-api --cors "*" --credentials credentials.yml --endpoints endpoints.yml
rasa run actions
and then I have tried to set up the webhook in the developers.facebook.com
But I can't set up webhook
Do you know how to set up webhook without using the ngrok?
thank you
best
Elina
Hi Elina.
I am glad to hear you like my article.
I was able to deploy the Rasa chatbot to Facebook by following the instructions in the Rasa documentation.
In the first terminal, run:
rasa run.In the second terminal:
rasa run actions.In the third terminal:
ngrok http 5005, where5005is the port where the rasa server is running (first terminal).The ngrok output will contain something like:
Forwarding https://48cc-185-219-166-190.ngrok.io -> http://localhost:5005.Copy the
httpsaddress and add a Webhook Callback URLhttps://48cc-185-219-166-190.ngrok.io/webhooks/facebook/webhook. The48cc-185-219-166-190.ngrok.iopart will be different for you.Lastly, do not forget to add

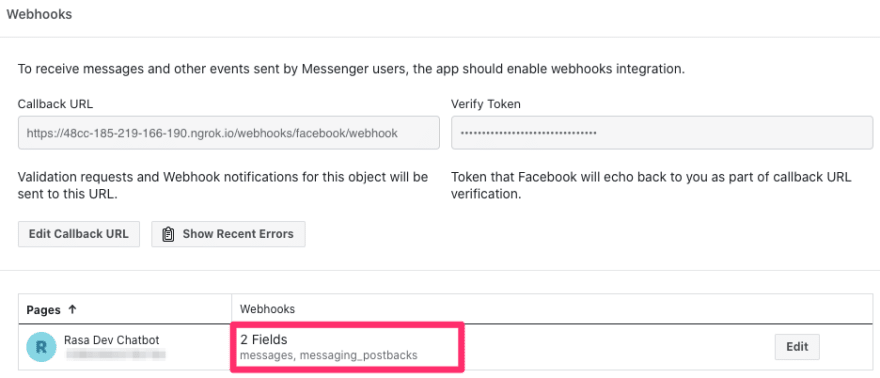
messagesandmessaging_postbacksubscriptions as shown in the screenshot below.I hope this helps! If you encounter any issues, let me know.
Thank you for your help
I solved it by using the ngrok
I tried the X.X.X.X/webhooks/facebook/webhook as webhook callback url
But in the facbook,Ip address is not recognized
This is why we use the ngrok
Your help was avaliable
ngrok http 5005
Using the ngrok, we can convert localhost:/5005 into the another address
And by using this address, we can get this problem
Thank you for your attention and knidly and friendly help
I hope you are doing well
Also I will wait for your next and next and next post ....
💖💋
You're welcome. I am glad I could help.
hello friend
I have a question about the Rasa Bot.
I want to use an IFrame when deploying my Rasa Bot to Facebook.
when click on the URL. Go to a new Chrome tab.
How to solve it?
I am asking for help individually
thank you
best
Hi Elina,
I am sorry, I do not understand what your use case is.
Are you trying to embed Facebook page in an iframe or do you want the chatbot to send an iframe instead of a text?
In my facebook messenger, there are things like this:
dev-to-uploads.s3.amazonaws.com/up...
when I click it:
dev-to-uploads.s3.amazonaws.com/up...
I want make the multiwebform as ifrme in the facebook messenger
that's all
thank you
best
You can use Messenger Webview.
It can be opened either by clicking on a button (see URL button) or by clicking on a template (see Generic Template).
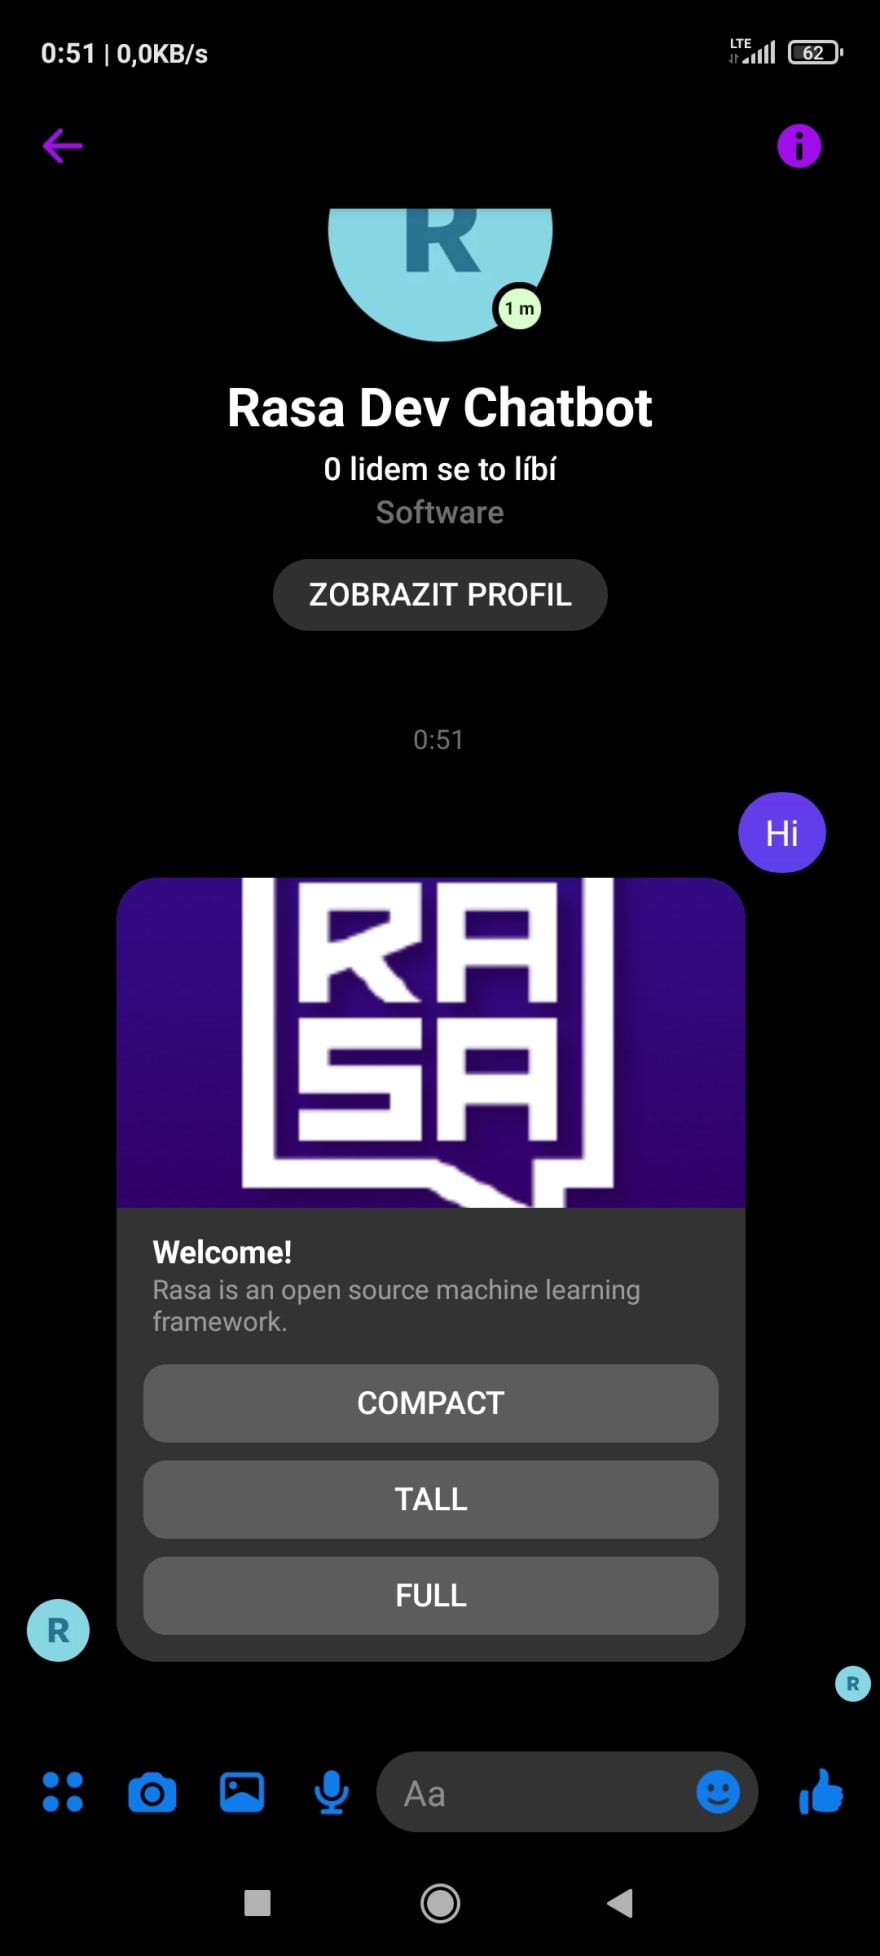
The Webview can be either
compact,tallorfull. This has effect only on mobile. On desktop, the website will always open in a new tab.Example:
Which results in:

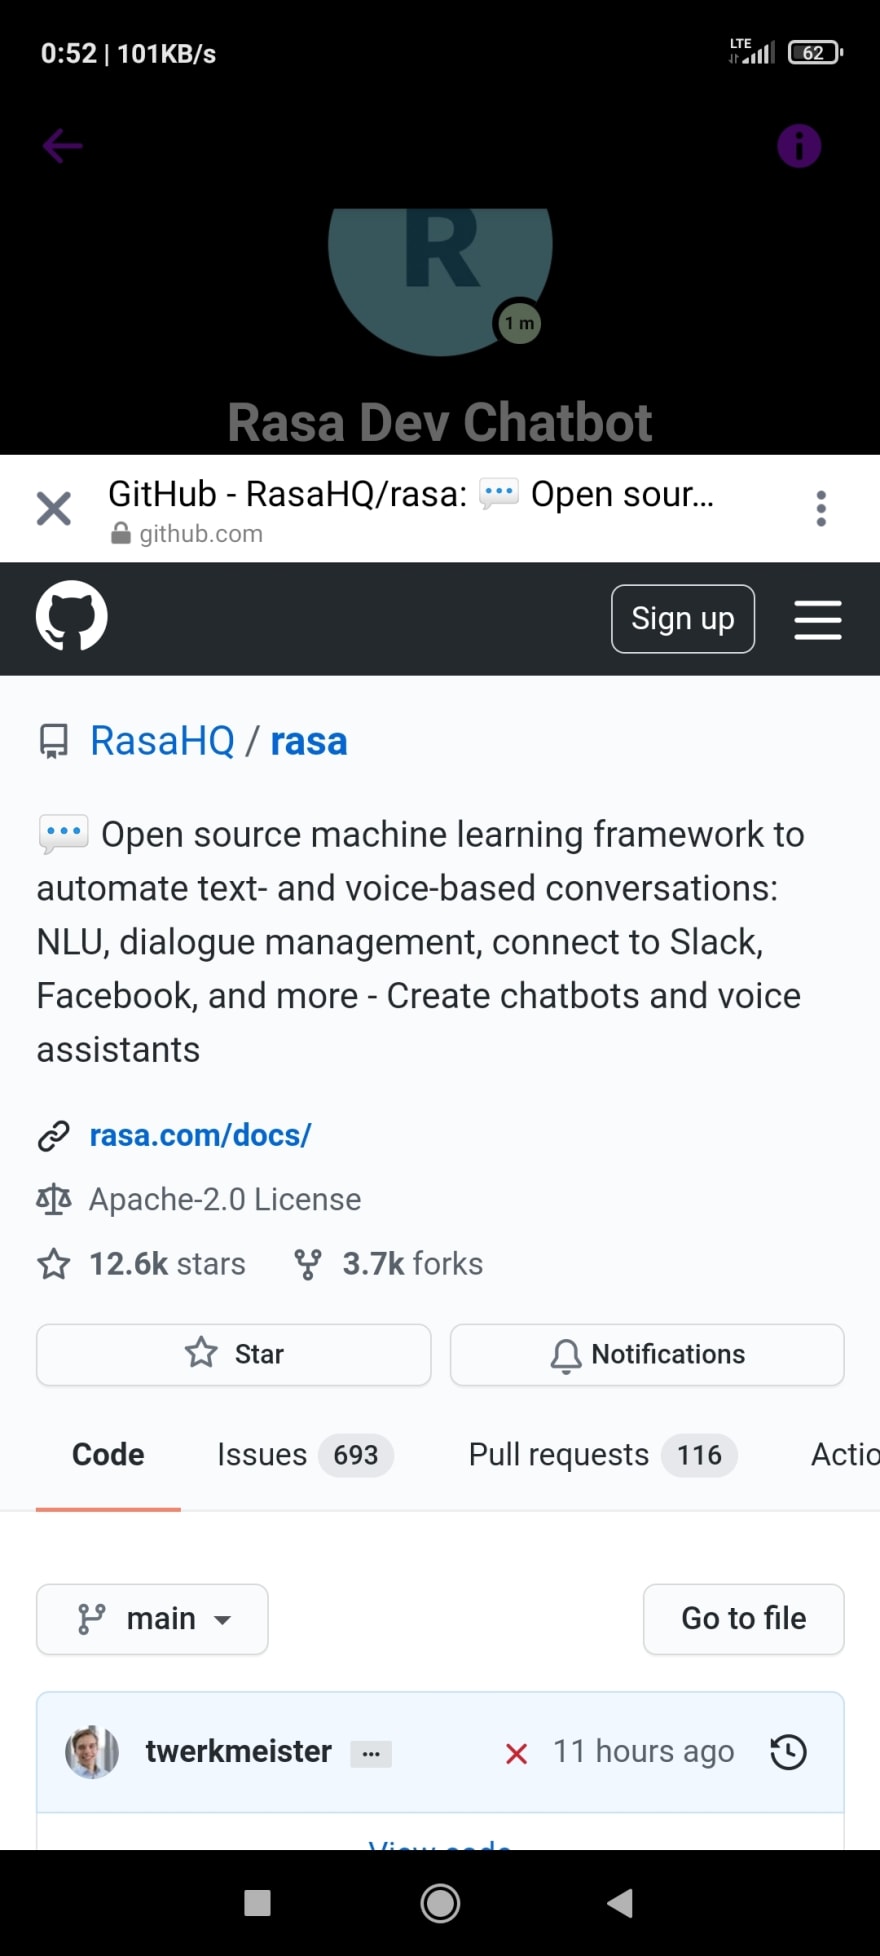
After clicking on Tall button on mobile:

I wish you a lot of luck with your project, Elina! 🍀
Thank you for your help
and you mean that it appears in the new tab in case of desktop?
Yes, in a new tab.
But I saw the iframe in the desktop when I used the facebook messenger
I could only find websites mentioning that you can embed Facebook Messenger into your website, not vice versa – add website as iframe into Facebook Messenger.
dev-to-uploads.s3.amazonaws.com/up...
like this:
I have tried clicking the button in a Messenger application (i.e. facebook.com/messages/), but it still opens in a new tab.
Unfortunately, I do not how to achive something similar to the last picture you sent.
I solved it
thank you for your kindness
I think we can work in rasa project
what do you think about this
thank you
best
That's great! Would you mind sharing a bit about how you solved it?
Could you send me your mail ?
I can contact using that
thank you
I think writing it here in the comments could benefit others who are reading this thread. Is it fine with you to send your solution publicly?
I want to know about you a lot
ok I will publish it as soon as my project is finished
It needs some time to pulish the method
Great work! Your articles helped me for my final year project few months ago. You have also answered a specific question I had personally via email (few months ago) which I'm so thankful. Keep up the great work.
Great tutorial it helped a lot thank you. Question do you know how to apply TTS. So on the integrated website. When the chatbot responds, it outputs the text but also voices the text back to the user.
Hi.
I am glad you found the tutorial helpful.
For text-to-speech you can utilize the Web Speech API.
I have added TTS to the chatbot in this commit. Thank you for the idea!
Thank you for this post! I have a problem with my thesis project:
I built a Rasa bot and I've integrated it in my website that is a photo viewer based on Mirador.
I've created some interactions AGENT TO BOT with 'user_uttered' , this interactions works in this way:
we have 3 photos : X,Y and Z. If you clicks on X , and ask the bot "What is this?" he answers with "It's X" but when you click on Y and ask the bot ""What is this?" he answers with "It's Y".
Now I would like to create an interaction BOT TO AGENT, like for example if I am on photo of X and ask the bot "What is Y?" , I want that the page changes to the photo of Y automatically.
Can you help me?
The way I did the first interaction is simple: I have an intent : What_Is , and the answer changes according to the value of a slot : Topic and I have another intent : Page_Change who acquires the link of the photo changed through the 'user uttered'.
I've created synonyms between the words of my topic and the link of the photos who represtent each topic and when the intent Page_Change arrives, it triggers a custom action that set the slots of entity : Topic with the link of the page. And it works very well.
Now as I said, I'd like to create an interaction from the BOT to AGENT.
If you can help me, thank you so much
Hi,
your thesis project seems very interesting!
If the user asks "What is Y?", then you should be able to get "Y" as an entity value in the Rasa backend. From the custom action, you could then reply with some structured message, like:
NAVIGATE_TO: https://example.com/Y. And in thebot_utteredsocket event handler you would parse the response and change the URL accordingly.Best of luck with the thesis,
Petr
Hello Petr, great tutorial again!
I'm trying to deploy the chatbot in my website (React app) and did it locally with the Chat Widget with: 'data-websocket-url="localhost:5005'.
But if I set it like 'data-websocket-url="localhost:5005/socket.io' nothing happens and using postman I got this message "The client is using an unsupported version of the Socket.IO or Engine.IO protocols".
I found a GitHub issue about this but I didn't find any solution.
I would really appreciate any help. Thanks!
incredible work <3
Thank you, Emma 😊