This is second part of the tutorial. In the first part, we have covered:
- Setting up Appwrite
- Creating collection and documents in Appwrite
- Adding Appwrite data source on ToolJet
- Building the app UI
This part will include:
- Creating queries
- Editing widget properties and connecting queries
- Enabling app features for particular User Group
Let's get started. 🚀
Creating queries
To make our application fully functional we'll be creating these queries:
- listApplicants (Appwrite)
- approvedApplicants (Appwrite)
- rejectedApplicants (Appwrite)
- addApplicant (Appwrite)
- moveToApprove (Appwrite)
- moveToReject (Appwrite)
- sendEmail (SMTP)
- totalApplicants (Custom JavaScript)
1. listApplicants
This query will be used for listing the new applicants. Let's create a new query by clicking on the + in the query panel.
- Select the Appwrite data source and choose the operation List Documents.
- Enter the Collection ID, you can get it from the Appwrite console.
- We will filter the query results using Field, Operator, and Value options. We want the query to list only new applicants so we will enter approved in Field, == in Operator, and new in Value. You'll need to create an index in the Appwrite console for approved key.
- Go to the Advanced tab and enable the toggle for Run this query on page load? This will fire the query every time the app is loaded.
- Rename this query to
listApplicantsand click Save. - You can also click on the Preview button to check the results without firing up the query.
2. approvedApplicants
This query will result the list of only those applicants that have yes value in approved column/key.
- Create a new query, select Appwrite data source, and select the List Documents operation from the operations dropdown.
- Enter the Collection ID
In the Field, Operator, and Value fields enter approved, ==, and yes respectively. (make sure you have added an index for the approved key)

Rename this query to
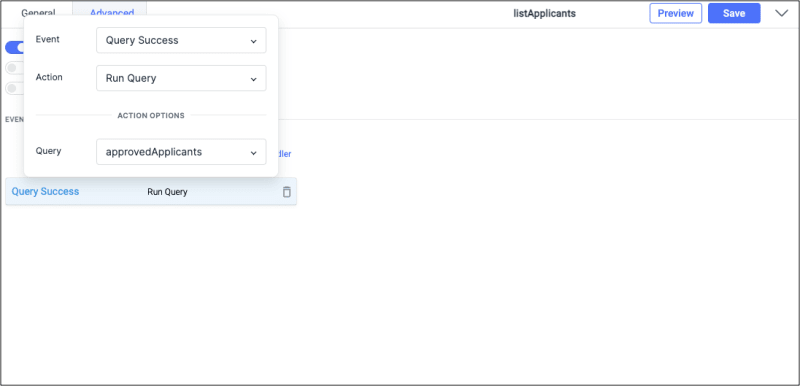
approvedApplicantsand click Save to create the query.Now go to the Advanced tab of listApplicants query, add an event handler to run the query
approvedApplicantson Query Success event.

3. rejectedApplicants
This query will result the list of only those applicants that have no value in approved column/key.
- Create a new query, select Appwrite data source, and select the List Documents operation from the operations dropdown.
- Enter the Collection ID
In the Field, Operator, and Value fields enter approved, ==, and no respectively. (make sure you have added an index for the approved key)

Rename this query to
rejectedApplicantsand click Save to create the query.Now go to the Advanced tab of approvedApplicants query, add an event handler to run the query
rejecteedApplicantson Query Success event.

4. addApplicant
This query will be used for adding a new applicant.
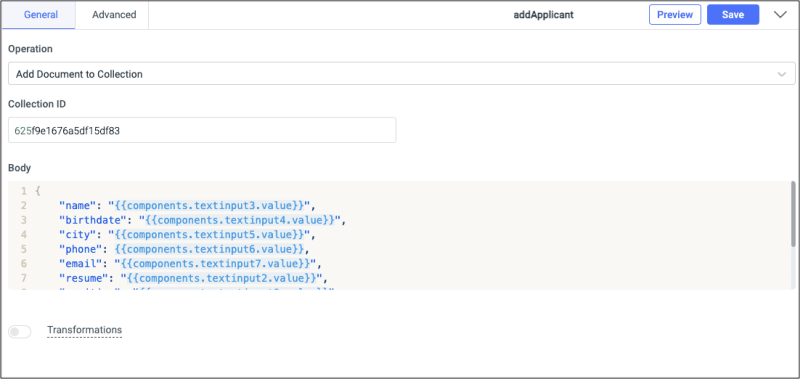
- Create a new query, select Appwrite data source, and select the add a document to the collection operation from the operations dropdown.
- Enter the Collection ID, you can get it from the Appwrite console.
- In the Body field, we'll get the values for the new document in JSON format:
{
    "name": "{{components.textinput3.value}}",
    "birthdate": "{{components.textinput4.value}}",
    "city": "{{components.textinput5.value}}",
    "phone": {{components.textinput6.value}},
    "email": "{{components.textinput7.value}}",
    "resume": "{{components.textinput2.value}}",
    "position": "{{components.textinput8.value}}",
    "approved": "new",
    "picture": "{{components.textinput9.value}}"
}
💡 We are getting values from the components that we added in Modal1. While creating the query you can verify by entering values in the form and then the code hinter will display those values
- Go to the Advanced tab, and add three event handlers. 1st one to close the Modal1 on Query Success event, 2nd to show alert Applicant Added with alert type as Success on Query Success event, and last one to run the query
listApplicantson Query Success event - this will refresh the list and include the recently added applicant.
- Rename this query to
addApplicantand click Save to create the query.
5. moveToApprove
This query will move the selected applicant from New Applicants list to the Approved Applicants list. This query will be triggered from the Approve button in the sidebar.
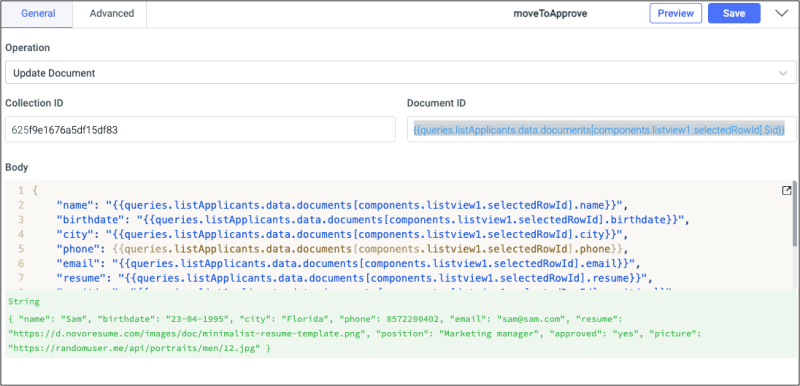
- Create a new query, select Appwrite data source, and select the Update Document operation from the operations dropdown.
- Enter the Collection ID
- In the Document ID, we will enter
{{queries.listApplicants.data.documents[components.listview1.selectedRowId].$id}}. This is getting the Document ID of the selected applicant from the list. - In the body field, we'll enter the updated document as JSON object.
{
    "name": "{{queries.listApplicants.data.documents[components.listview1.selectedRowId].name}}",
    "birthdate": "{{queries.listApplicants.data.documents[components.listview1.selectedRowId].birthdate}}",
    "city": "{{queries.listApplicants.data.documents[components.listview1.selectedRowId].city}}",
    "phone": {{queries.listApplicants.data.documents[components.listview1.selectedRowId].phone}},
    "email": "{{queries.listApplicants.data.documents[components.listview1.selectedRowId].email}}",
    "resume": "{{queries.listApplicants.data.documents[components.listview1.selectedRowId].resume}}",
    "position": "{{queries.listApplicants.data.documents[components.listview1.selectedRowId].position}}",
    "approved": "yes",
    "picture": "{{queries.listApplicants.data.documents[components.listview1.selectedRowId].picture}}"
}
So basically we are updating just one key in the document that is the approved key - updating its value from new to yes.
Now go to the Advanced tab and add two handlers - One to show the alert Applicant Approved on query success and the other to run the query listApplicants on query success.
- Rename this query to
moveToAcceptand click Save to create the query.
6. moveToReject
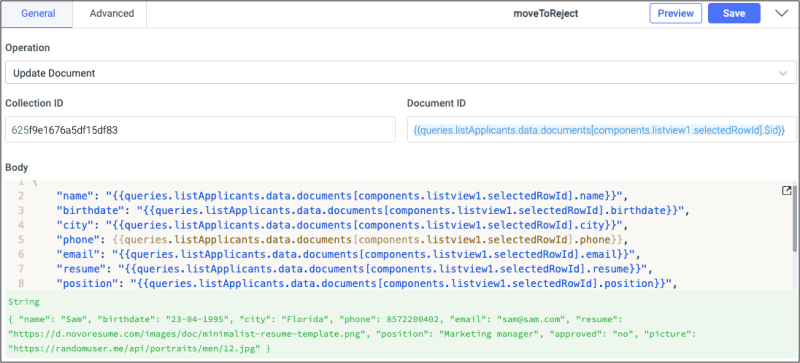
This query will move the selected applicant from New Applicants list to the Rejected Applicants list. This query will be triggered from the Reject button in the sidebar. Under the hood, we will be just updating the value for approve key from new to no.
There is no difference in this query from moveToApprove query - except in that query we were updating the value of approve key from new to yes and in this one will be updating it to no.
- Go to the Advanced tab, and add two handlers - One to show the alert
Applicant Rejectedon query success and the other to run the querylistApplicantson query success.
- Rename this query to moveToReject and click Save to create the query.
7. sendEmail
This query gets the values from Modal2 which is shown when Send Email button is clicked. Before creating this query, you'll need to add the SMTP data source. Check the docs for adding SMTP data source.
- Create a new query, and select SMTP data source.
- Enter the email in From field, and sender's name in From Name field.
- In the To field, we'll get the value from the selected applicant in the list. We'll use the exposed variable selectedRow to get the value -
{{queries.listApplicants.data.documents[components.listview1.selectedRowId].email}} - In the Subject field, we'll get the value from the text input component used inside the modal2 -
{{components.textinput1.value}}, similarly in the Body field enter{{components.textarea1.value}} - Go to the Advanced tab, and create two event handlers - one to close the modal2 and the other to show alert
Email sent
8. totalApplicants
This query will result the total number of Applicants i.e. New+ Approved+ Rejected. To do this, we'll create a new Custom JS query and write a simple JavaScript code:
var total = parseInt(queries.listApplicants.data.total + queries.approvedApplicants.data.total + queries.rejectedApplicants.data.total);
return total;
We'll use the result from this query on the Summary of approved and Summary of rejected containers to show the number of total applicants.
Editing widget properties and connecting queries
Now that we have built the user interface and created all the queries, all we need to do is connect the UI with queries. Let's get started:
- Go to the Summary of approved section, select the text widget that has
2/value, and replace the value with{{queries.approvedApplicants.data.total}}/. In the loading state field, enter{{queries.approvedApplicants.isLoading}}. - In the text widget that has a dummy value
9replace it with{{queries.totalApplicants.data}}. In the loading state field, enter{{queries.totalApplicants.isLoading}}. - In the Summary of rejected section, enter
{{queries.rejectedApplicants.data.total}}to show rejected applicants in the first text widget, and set its loading state to{{queries.rejectedApplicants.isLoading}}. - In the text widget that has total applicants enter
{{queries.totalApplicants.data}}. In the loading state field, enter{{queries.totalApplicants.isLoading}}. - Click on the widget handle of Add Applicant button to open its properties. Set its loading state to
{{queries.addApplicant.isLoading}}, and an event handler to show the modal1 for the On Click event. - Click on the widget handle of the Refresh button, set the Loading state to
{{queries.listApplicants.isLoading}}and add a handler to run listApplicants query on the On Click event. - Now, click on the Image in the right sidebar that is built using the container. Enter the URL for the image
{{queries.listApplicants.data.documents[components.listview1.selectedRowId].picture}} - We'll do the same for basic details (get the data using the selectedRowID variable), for Birthdate enter text value as
{{queries.listApplicants.data.documents[components.listview1.selectedRowId].birthdate}}, for the city enter{{queries.listApplicants.data.documents[components.listview1.selectedRowId].city}}, for Phone number enter{{queries.listApplicants.data.documents[components.listview1.selectedRowId].phone}}, and for email enter{{queries.listApplicants.data.documents[components.listview1.selectedRowId].email}} - Open properties of the Resume button and add the handler to Open a webpage on On Click. Set the URL to
{{queries.listApplicants.data.documents[components.listview1.selectedRowId].resume}} - Click on the handle of Send Email button to edit its properties. Add a handler to show the Modal2.
- Click on the Approve button handle, set the loading state to
{{queries.moveToApprove.isLoading}}, and add a handler to run the moveToApprove query. - Click on the Reject button handle, set the loading state to
{{queries.moveToReject.isLoading}}, and add a handler to run the moveToReject query. - Now select the List view widget inside the container of New Applicants. In the List data field enter
{{queries.listApplicants.data.documents}}. After entering this you'll see that the list now has all the applicants. - We'll do the same for the other two list view widgets - Approved and Rejected lists. For Approved List data enter
{{queries.approvedApplicants.data.documents}}, and for Rejected List data enter{{queries.rejectedApplicants.data.documents}}
We have successfully connected the queries and UI and our app is fully functional now.
Enabling app features for particular User Group
Now that we have successfully built the app, we want some of our features like Adding Applicants only available to a certain group of app users. Let's assume you have two types of users who will use this app:
- group1 - users who will be authorized to create applicants
- group2 - Users who will not be authorized to create applicants but can use other features of the app
To achieve this functionality you'll need to create two groups in your organization and add those users in respective groups. Check out the docs for managing users and groups here.
Let's disable the Add Applicant button for all the users that are not in the group1:
- Click on Add Applicant button handle to edit its properties.
- Go to Style, click on Fx next to Disable, and enter
{{globals.currentUser.groups[1] !== "group1" ? true : false}} - Now whenever a user who is not in the group1 will use the app the Add Applicant button will be disabled.
Finally, make the application live by clicking on the Release button at the top-right corner of the app editor.
Congratulations! 🥳 You’ve successfully built the Recruitment management app. If you have any questions feel free to join our Slack community or send us an email at hello@tooljet.com.


Top comments (0)