In this part we will create a new addon called Search Tabs. This addon allows the user to search any word across all your open tabs.
So, go ahead and create a folder SearchTabs and inside it another folder icons. Inside that folder place three icons. You can get them from the github link at the end of this post.
Now, create a file manifest.json inside the folder SearchTabs and put the below content in it.
It is using the permissions for find and tabs which we are going to use soon.
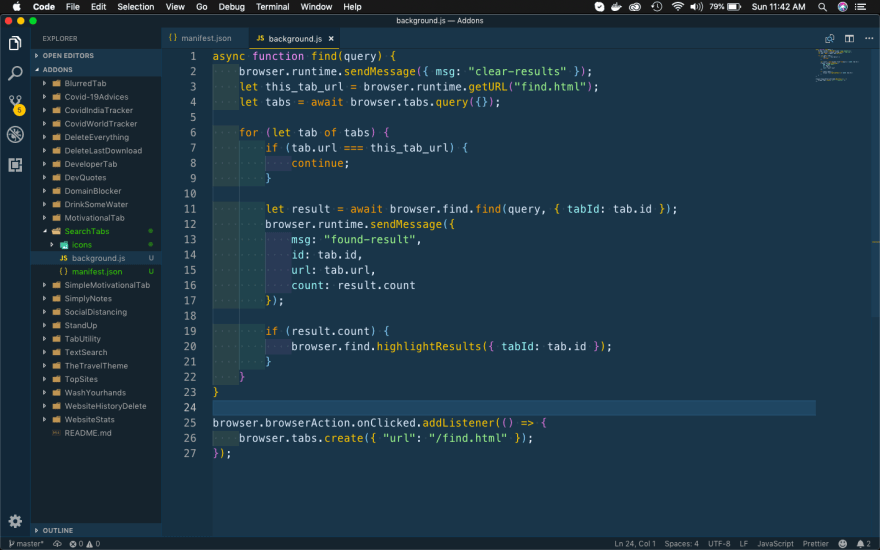
Next, we will create the background.js file. Here, we will open the file find.html in a new tab, once we click the icon. This is been done through the browserAction.onClicked listener at Line 25.
Rest of the code we will understand soon, after the find.html and other files are created.
Let’s now create find.html file in the same folder and put the below content in it.
It is a simple html file, with a search bar and a button. It also have an id result-list, where we are going to list all the result.
Let’s now create the styles for this html file. Create a file find.css in the same folder and put the below content in it.
    html {
        background:#018DED url([http://unsplash.it/1500/1000?image=881](http://unsplash.it/1500/1000?image=881));
        background-size:cover;
        font-family:'helvetica neue';
        text-align: center;
    }

    legend {
        background-color: #000;
        color: #fff;
        padding: 3px 6px;
    }

    input {
        margin: .5rem 0;
        padding: .5rem;
        border-radius: 4px;
        border: 1px solid #ddd;
        width:22%;
    }

    input:invalid + span:after {
        content: '✖';
        color: #f00;
        padding-left: 5px;
    }

    input:valid + span:after {
        content: '✓';
        color: #26b72b;
        padding-left: 5px;
    }

    #result-list{
        display: flex;
        flex-direction: column;
        align-items: flex-start;
        list-style: none;
    }

    .listyle{
        color: white;
    }

    .count__text {
        font-size: 26px;
    }
    .submit {
     box-shadow:inset 0px 1px 0px 0px #e184f3;
     background:linear-gradient(to bottom, #c123de 5%, #a20dbd 100%);
     background-color:#c123de;
     border-radius:6px;
     border:1px solid #a511c0;
     display:inline-block;
     cursor:pointer;
     color:#ffffff;
     font-family:Arial;
     font-size:15px;
     font-weight:bold;
     padding:9px 23px;
     text-decoration:none;
     text-shadow:0px 1px 0px #9b14b3;
    }
    .submit:hover {
     background:linear-gradient(to bottom, #a20dbd 5%, #c123de 100%);
     background-color:#a20dbd;
    }
    .submit:active {
     position:relative;
     top:1px;
    }
To check the styles , i had loaded the addon temporarily and after clicking on the addon icon the new tab, looks like below.
Now, create the file find.js in the same folder and add the below content in it. Now at Line 1, we are getting the access to the background page by extension.getBackgroundPage().
After that in Line 3, we are adding an event listener for the Submit button. So, when we type something in the search bar and click on Submit button, Line 5 fires the find() method in background.js file. It passes the search item as a parameter for the find() method.
Let’s again go back to the background.js file and understand the working of the find() method.
Now, in Line 3 we are finding the url for the find.html file by runtime.getURL(). After that in Line 4 we are finding details of all of the tabs by tabs.query({}).
Then we are looping through all tabs, but but excluding the current tab in Line 7.
Now, we call the find API on each tab. We’ll wait for the results for each, tab before progressing onto the next one by using await.
After getting the results, send a message back to the find.html page using runtime.sendMessage() in Line 12.
We are also sending a runtime.sendMessage() in Line 1, when the find() is executed.
Also, we are also highlighting the text in each tab by find.highlightResults().
Back to find.js the runtime.onMessage event listener, fires first when we receive clear-results from background.js file. It will run the if statement at line 13 and make the result-list id as blank.
After that we will receive found-result, from background.js file. It will run the if statement in Line 16 and add the url and the count to the result-list id. It will fire several time for each tab.
So, our code is complete. I had checked it by testing the temporary addon and it works perfectly.
So, it’s time to publish it in the mozilla addon store. I will follow the procedure from another of my blog in the series. The link is here.
This complete part-22 of the series. You can install the addon in your firefox browser from here
You can find the code for the same in my github account here.


Top comments (4)
Interesting enough... I am starting from the end: this is the first post about this series that I find in my feed :O
Very timely, I am building a few simple extensions for personal use and I am sure your articles will help me a lot.
Thanks for the motivating word. Always love when my series help someone.
I saw you have several series... going to have fun with them, thank you :)
I hope you enjoy them also. Thank you :)